Shannon V. OKeets
Posts: 22095
Joined: 5/19/2005
From: Honolulu, Hawaii
Status: offline

|
Here is my first pass on the help text for the naval review summary form. The first part is the same for all four forms (NRD, NRS, TFD, TFS).
=============
Introduction
There are four closely related forms for working with naval units: Naval Review Details, Naval Review Summary, Task Force Details, and Task Force Summary. These are referred to as NRD, NRS, TFD, and TFS respectively. The NRD and TFD forms have very similar visual designs; and the same is true for the NRS and TFS forms. Also, each of the forms only uses half of the minimum screen area, so that two of these forms can be shown side by side.
However, it is important to understand that each of the four forms is used to accomplish different tasks while playing. You might start by showing the NRD form to see all the units in a port, and then bring up the NRS form alongside of it, to see a summary of naval units in other ports and sea areas. From there you can use the NRS form to select a port or sea area, and refresh the NRD to see the units in the selected port/sea area.
Or, you might start with the NRD form for a sea area and bring up the TFD form for a task force that is in that sea area. You could then replace the NRD form with the TFS form to locate all the task forces under your command. Just like using the NRS and NRD forms together, you can use the TFS and TFD forms together, clicking on a task force in the TFS to refresh the TFD form with the information on the selected task force. The combination of TFS and TFD lets you review all your (or your enemy’s) task forces quickly and in great detail.
Another common use for these forms is to bring up the NRD for a port or sea area section box and then create a task force from the units in the selected port/sea area section box. It’s not possible to create a task force using units from different sections of a sea area, since the rules forbid them from moving as a group. The setup form has a button to initiate this task where the NRD form contains the units in the setup tray’s current location (e.g., US West Coast) and the TFD is placed alongside the NRD so you can create a new task force from the units to be setup. The advantage here is that once you have defined your task force, you merely place the single TF unit on the map, instead of having to place all the individual units.
By giving your task forces meaningful names and attaching Notes to them, you can identify the task/purpose for each of them. Though I would advise against naming them Invade Calais Task Force, unless you really meant to use them to invade Normandy.
A common activity when the NRD and TFD are shown side-by-side is to exchange units between them, modifying the composition of your task forces. Since task forces are purely MWIF administrative units, they have no interaction with the WIF rules. Creating, disbanding, and modifying task forces can be freely done at any time during game play, completely ignoring all rules concerning game play.
-----------------------
Naval Review Summary
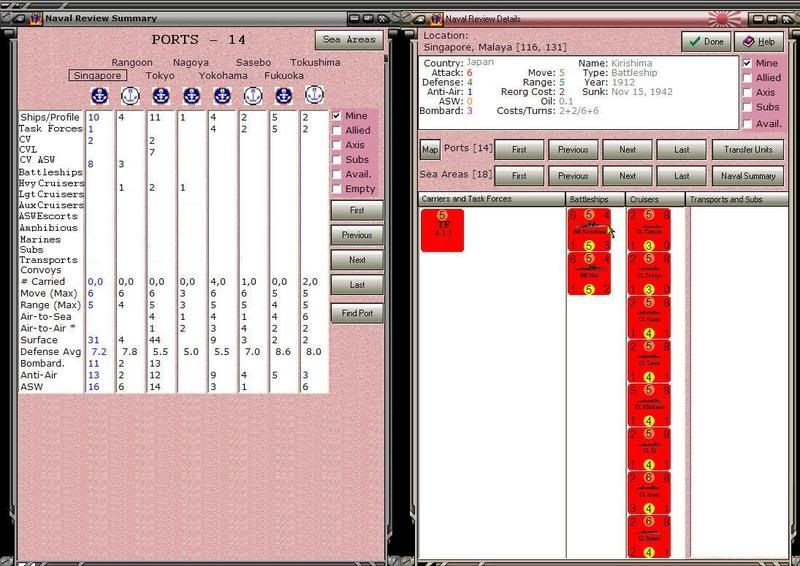
The NRS form is three reports in one. Since naval units can only be located in two places on the map: in port or at sea, the NRS form provides the ability for you to focus on one of those two locations or both at once. When ports are the focal point, summary statistics are shown for up to 8 ports at a time. The same is true for sea areas when they are the focus of the report. Alternatively, you can choose to view both together, 8 of each. The Both report provides less detail than when the focus in on ports or sea areas alone. For example, the summary statistic for carriers in the Both report is for all carrier types, while when reviewing Ports or Sea Areas alone, the carriers are broken out into separate counts for: Carriers, Light Carriers, and ASW Carriers. So, the first control you need to set when viewing an NRS report is the Focus.
The second consideration is whose units you wish to view. Similar to the NRD report, the NRS contains filters for Mine, Allied, Axis, Subs, and Available. It does not have the Task Force filter. Instead all the units assigned to task forces are treated as individual units for the purpose of compiling summary statistics. It does have an additional filter labeled Empty. The Empty filter controls whether the report should display ports and sea areas even if there are no units therein that pass the filter. This is convenient when you want to know what units are in a sea area, even when there are no units in the sea area. This comes up a lot when you change the filters, since there often are only units from one side in a sea area. Rather than have a sea area column disappear from the report because there are no enemy ships present, having the Empty filter set means that the columns being displayed do not change when you change the filters
Which leads to the third decision you need to make when setting up a Naval Review Summary report: which ports and sea areas do you want to review? While it would be nice to see them all at once, the design decision to limit the footprint of the NRS form to half of the minimal screen means that no more than 8 of each can be seen at the same time. However, you have the ability to fine tune what is shown in each column of summary statistics and to save and restore these ‘Displays’ to disk for use at other times and when playing different major powers. Saved display files have the extension NRS.
To change which port or sea area is the subject of the summary statistics in a column, there are 7 buttons provided. The standard navigational buttons of: First, Previous, Next, and Last let you cycle through all the possible ports or sea areas. There is only one set of navigational buttons on the NRS report - the NRD has two sets, one for ports and another for sea areas. To use the navigational buttons, you must first select a column that you want to change. Depending on whether you have selected a port column or a sea area column, the program then cycles through either ports or sea areas.
When choosing the First, Previous, Next, and Last entries, the program applies the filters. If the Empty filter is Off, then the program only shows ports/sea areas that contain at least one unit the passes the filters. When the Empty filter is On, all ports and sea areas are eligible for being shown when cycling through them. Note that there are 81 sea areas and a similar number of ports, so it can take a while before you get to the one you want when the Empty filter is On.
To speed up that process, you can use the Find Port or Find Sea Area buttons. Those bring up an alphabetically sorted list of names for each location type. You can then immediately choose the port or sea area to replace what is currently being shown in the selected column. You can also use the Clear Column button to blank out a column. Using all 7 of these buttons you can define exactly which columns are displayed on the NRS form.
And once you have created the display the way you like it, you can save it by right clicking on the label Displays. That brings up a menu which contains the option Save Display. After you have chosen a name for your display, the settings for the focus and column selections are stored to disk and the display name is placed under the word Displays. You can then create more named displays, with up to 12 different displays listed under the label Displays. The advantage of having displays listed by name on the NRS form is that you can switch between them by simply clicking on the display name.
Other menu options available for controlling displays are: Restore, Rename, Delete (from the list of names, not from the disk), and Redefine. Restore is great when you are first learning to play MWIF, since there are dozens of displays already saved to disk by experienced players. You do not have to create your own from scratch. Redefine lets you modify a display and then have those changes made permanent by writing them out to the disk file.
The Carriers row includes regular carriers, light carriers, and ASW carriers. It has two numbers shown. The first is the number of carriers present and the second, which follows the colon, is the number of carrier air units aboard those carriers. Obviously, the second number is only shown when the optional rule for Carrier Planes is being used.
The Cruisers row includes heavy, light, and auxiliary cruisers, plus ASW escorts. Note that this count includes these unit types even if they are carrying divisions.
The Naval Transport row includes naval transport, amphibious units, and the Queens. This is a raw capacity number and does not differentiate whether the transport is empty or full.
When you are looking sea areas, the # Carried row contains two numbers: the number of units that are capable of invading, followed by the number which can not currently invade. This distinction takes into account the unit type of the transport, the unit type of the cargo, and the sea area section box. It does not take into consideration weather or the presence of invadable hexes adjacent to the sea area.
The only other unique aspect to sea areas, is the Sea Boxes row at the top of the column. This simply lists which sea area section boxes are occupied - given the current filter settings!
Bear in mind that the Naval Review Summary form is designed to provide summary statistics for an overview. You will almost always want to delve deeper into specifics for a port or sea area using the NRD form and/or the detailed map. Other information sources for on-map naval units are Flyouts and the Units in Hex panel.
_____________________________
Steve
Perfection is an elusive goal.
|
 Printable Version


 New Messages
 No New Messages
 Hot Topic w/ New Messages
 Hot Topic w/o New Messages
 Locked w/ New Messages
 Locked w/o New Messages
 Post New Thread