Matrix Games Forums

Forums  Register  Login  Photo Gallery  Member List  Search  Calendars  FAQ 

My Profile  Inbox  Address Book  My Subscription  My Forums  Log Out

RE: Nation in Conflict 1861

 
View related threads: (in this forum | in all forums)

Logged in as: Guest
Users viewing this topic: none
  Printable Version
All Forums >> [New Releases from Matrix Games] >> The Operational Art of War IV >> After Action Reports >> RE: Nation in Conflict 1861 Page: <<   < prev  1 [2]
Login
Message << Older Topic   Newer Topic >>
RE: Nation in Conflict 1861 - 11/17/2020 2:37:47 PM   
Raindem


Posts: 696
Joined: 7/15/2000
From: Arizona
Status: offline
The combat density penalty is set to zero. But you can still only stack three corps into a hex due to the hard limit of 9. This change would allow an entire army to combine into one hex. I'm hoping players would be more motivated to concentrate as you suggest. During play testing, however, the tendency seemed to be to keep spreading out. I call it "frontage creep".

Ben, yes the scenario would lose some of its historical flavor since all those corps HQs named for the commander would disappear, as would the differences between individual divisions. I would probably have to allow reconstitution in this case if it didn't upset the balance too much.

_____________________________

Grab them by the balls. Their hearts and minds will follow.

(in reply to Curtis Lemay)
Post #: 31
RE: Nation in Conflict 1861 - 11/17/2020 4:46:26 PM   
golden delicious


Posts: 5575
Joined: 9/5/2000
From: London, Surrey, United Kingdom
Status: offline
quote:

ORIGINAL: Curtis Lemay


Forces only spread out in those circumstances for foraging purposes (which you're probably not able to model, yet).


Not at this scale- but for a campaign one could distribute temporary supply points around the map. The player gets into a new area and up pops a supply point- for two turns or whatever.

Of course the difficulty is one can also forage for artillery shells etc. One would want a workaround for that. Then map it at perhaps 1 mile per hex and you could maybe model something like that Gettysburg campaign.


< Message edited by golden delicious -- 11/17/2020 4:48:33 PM >


_____________________________

"What did you read at university?"
"War Studies"
"War? Huh. What is it good for?"
"Absolutely nothing."

(in reply to Curtis Lemay)
Post #: 32
RE: Nation in Conflict 1861 - 11/18/2020 7:56:28 PM   
Raindem


Posts: 696
Joined: 7/15/2000
From: Arizona
Status: offline
Back to the action...

Winter 1863-64
Turns 70-76

Here is a shot of the entire playing area and updated positions of the significant troop groupings. As you can see, the Confederacy has been cut in half along the Mississippi, but still holds on to its heartland. The Union covered a lot of ground in 1863, but it didn’t translate into VPs. The year started with a 55 VP Confederate advantage. By year’s end that had only been reduced to a 49 VP edge. In the east, the Union was no closer to Richmond than they were two years ago.


In early February 1864 the Union launched a trans-Mississippi campaign to clean up pockets of Confederate resistance. For this campaign the Union had the Department of Kansas (Curtis) in Springfield, the Department of Arkansas (Steele) in Little Rock (as soon as they got back from helping to chase down Forrest in northern Mississippi), and XVI Corps (Hurlbut) from the Army of the Tennessee. The Department of Kentucky (Buell) was not far out of theater, but they were needed to guard against cavalry raids. There was also the Department of Missouri (Schofield) in Jefferson City, but they were reluctant to leave the state while Quantrill’s Raiders were still on the loose.

The Confederacy had the Army of Arkansas (Price) in northern Arkansas and the Missouri State Guard in Fayetteville. The Army of the West (A.S. Johnston) was split. A detachment was at Fort Smith and the main army at Shreveport. In Monroe there were 3 divisions of stragglers from the Department of the Gulf that were trapped on the west side of the Mississippi when the Department withdrew to Meridian. Last but not least, the omnipresent Van Dorn cavalry corps was in Camden. If all of these forces had been consolidated then they could have fought the Union to a standstill. But the Confederacy gave up on coordinated operations in the trans-MS theater after Little Rock fell.

The Union did not know exactly where the Confederate troops were deployed. But they knew where the VP cities were. So the plan was simply to move on to the next objective and deal with whatever Confederate troops were encountered along the way. Supply was going to be tricky. The Yanks are not as good at living off the land as the Rebs. So a rail crew was brought in to repair the Jackson-Monroe line. The rest of the necessary supply would be made up with supply depots, of which the Union had six.

The Department of Kansas started off the show by marching its 11,000 men on Fayetteville. A frontal attack failed. A follow up flanking maneuver was blocked. They then pulled back to the Missouri border to lick their wounds. Next out of the gate was XVI Corps which crossed the Mississippi at Vicksburg and drove towards the enemy grouping at Monroe. A flanking maneuver was likewise blocked. But with the help of over 50 gunboats from Admiral Foote’s Western Flotilla, the Rebels were defeated and fled to Shreveport. The next Union target was Camden. The Union Department of Arkansas struck out from Little Rock while XVI Corps headed northwest from Monroe. The only Confederate troops in Camden were Van Dorn’s cavalry, which was ill-suited to defend against an attack by this much infantry approaching from different directions. Accordingly, they fled south to Shreveport to join the other defeated Confederate forces that have gathered there. Camden fell without a fight.

The campaign ended with only a portion of its goals realized. Camden and Monroe were taken. But Fayetteville, Ft. Smith, Shreveport, and all of Texas were still in Confederate possession.


It’s late enough in the game that Victory Conditions need to be considered. There are a total of 100 VPs which the Confederacy controls at the start. In most games the Union would be able to capture enough VPs to win by TOAW scoring methods. So extra VPs are awarded to the Confederacy at regular intervals during the game as long as they hold Richmond. This gives the Union incentive to capture the Rebel capital and models the political pressure that Union generals were under to go “On to Richmond!”

Each side also has a chance for Sudden Death Victory (SDV). For the Union, they must reach a certain VP level prior to the start of 1865. For the Confederacy, they must drive the EEV high enough that it fails one of the event checks that are made at specific points in the game. For either player to achieve a SDV he must perform significantly better than his historical counterpart. If both players perform historically it should end in a draw or marginal Union victory depending on the loss penalty for each side.


_____________________________

Grab them by the balls. Their hearts and minds will follow.

(in reply to golden delicious)
Post #: 33
RE: Nation in Conflict 1861 - 11/19/2020 6:51:07 AM   
Cfant


Posts: 473
Joined: 12/12/2010
Status: offline
How does the scenario play out? I mean, in TOAW it's somehow strange to keep your units together like an army of the Civil War. And supply can completely cut off by cavalry raids. Does it feel plausible? A friend of mine once made a TOAW scenario about the roman conquest of britain in 42 a.c. It didn't work out for the same reasons.

(in reply to Raindem)
Post #: 34
RE: Nation in Conflict 1861 - 11/19/2020 12:57:04 PM   
Raindem


Posts: 696
Joined: 7/15/2000
From: Arizona
Status: offline
Not sure I get your question. Are you asking does the scenario encourage ACW era tactics? It does. Let's look at the Confederate problem first, since they are on the defensive most of the game.

They physically don't have enough units to form a front line from Richmond to Memphis (combination of scale, scenario settings, and the fact that most units can't divide). So they are going to have to pick and choose where to concentrate their forces. They know the Union needs those VP cities. They know the Union's supply situation keeps them close to the rail lines. Finally, the Confederacy doesn't have the manpower reserve to allow their units to get picked off one by one from being too spread out. The end result is that they are better off keeping the forces together. The entire army might be a little more spread out than it was in real life, but not by a large margin.

Now let's look at the Union problem. They are unable to take advantage of those huge gaps in Rebel lines. Supply settings keep them tethered to the rail heads. So when they approach an objective they might try to flank it (not bypass it completely) to leverage the defenders out. Sometimes the Confederates can block them and sometimes they can't. In these situations a small front line may start to form. But as soon as the Union realizes the defenders can't be flanked, the proper course of action is direct concentrated attacks. As for those cavalry raids you mentioned, the Union can't stop them. The best way to deal with them is to leave some forces in the rear to guard supply.

Players new to the scenario, especially if they are used to WW1 or WW2 scenarios, may find it odd at first to fight with open flanks. So there's a bit of a learning curve as far as tactics go. But both players will find that it's beneficial to keep their armies in close proximity.

Hope that answers your question.

_____________________________

Grab them by the balls. Their hearts and minds will follow.

(in reply to Cfant)
Post #: 35
RE: Nation in Conflict 1861 - 11/20/2020 10:00:31 AM   
golden delicious


Posts: 5575
Joined: 9/5/2000
From: London, Surrey, United Kingdom
Status: offline
How do you handle recon? In a real campaign, I would expect a large army to have scouts out in every direction to find out the location of enemy forces, well beyond the single hex sight range of the unit, but well below the level of a whole unit moving out at this scale.

I wouldn't want to have to keep sweeping cavalry units across my front as this would be both annoying for the player and unrealistic as the scouting forces would be much smaller. However you can't rely on theatre recon as this would show just as well what's going on deep in enemy territory as it would movements within range of scouts.

_____________________________

"What did you read at university?"
"War Studies"
"War? Huh. What is it good for?"
"Absolutely nothing."

(in reply to Raindem)
Post #: 36
RE: Nation in Conflict 1861 - 11/20/2020 1:08:17 PM   
Raindem


Posts: 696
Joined: 7/15/2000
From: Arizona
Status: offline
Theater Recon is set to 0% for both sides. So for now it's handled with cavalry sweeps. It's not that annoying. All you really need to know is where the main concentration of the enemy is. Discover one corps and the others won't be far away.

As the Union, you sweep directly in front of your advancing army so you have an idea of what's waiting for you at the next objective. Of course, the defenders may have their own cavalry screening the army so then it becomes more difficult. As the Confederacy, the cavalry sweeps should include to the sides to uncover anyone trying to sneak around your flank.

I like it this way because it encourages the players to use cavalry in an historical role. Not as shock troops. And the need for recon adds risk to those deep cavalry raids the Confederate player loves to do. It leaves your army blind. "Where is J.E.B. Stuart?", Robert E. Lee at Gettysburg.


_____________________________

Grab them by the balls. Their hearts and minds will follow.

(in reply to golden delicious)
Post #: 37
RE: Nation in Conflict 1861 - 11/20/2020 2:15:54 PM   
golden delicious


Posts: 5575
Joined: 9/5/2000
From: London, Surrey, United Kingdom
Status: offline

quote:

ORIGINAL: Raindem

Theater Recon is set to 0% for both sides. So for now it's handled with cavalry sweeps. It's not that annoying. All you really need to know is where the main concentration of the enemy is. Discover one corps and the others won't be far away.

As the Union, you sweep directly in front of your advancing army so you have an idea of what's waiting for you at the next objective. Of course, the defenders may have their own cavalry screening the army so then it becomes more difficult. As the Confederacy, the cavalry sweeps should include to the sides to uncover anyone trying to sneak around your flank.

I like it this way because it encourages the players to use cavalry in an historical role. Not as shock troops. And the need for recon adds risk to those deep cavalry raids the Confederate player loves to do. It leaves your army blind. "Where is J.E.B. Stuart?", Robert E. Lee at Gettysburg.


OK, are the cavalry at division scale too or are they smaller? Otherwise I feel like you will wind up mounting a major opposition just to find out where the other guy is.

Do you recommend hex ownership visibility on or off? I would think that if one has taken the time to pacify the countryside and deposit garrisons over the place, it would be hard to a field army to sneak up without making a lot of noise; conversely if you've just advanced into enemy country you really don't know what is out there. Cavalry raids would be another matter- it might be worth considering having hex ownership visible but give cavalry the guerrilla icon.

_____________________________

"What did you read at university?"
"War Studies"
"War? Huh. What is it good for?"
"Absolutely nothing."

(in reply to Raindem)
Post #: 38
RE: Nation in Conflict 1861 - 11/20/2020 4:44:59 PM   
Raindem


Posts: 696
Joined: 7/15/2000
From: Arizona
Status: offline
quote:

ORIGINAL: golden delicious
OK, are the cavalry at division scale too or are they smaller? Otherwise I feel like you will wind up mounting a major opposition just to find out where the other guy is.


Currently, cavalry are at division level also. No breakdowns. I can always use the real division icon and allow breakdowns for them. Or if I wind up going to corps sized units I have the option to leave the cavalry the way they are. In actual games I haven't noticed any difficulty in keeping track of the enemy. And it has proven to be difficult to sneak up on them with a large force. But I'll take a closer look at it.

quote:


Do you recommend hex ownership visibility on or off? I would think that if one has taken the time to pacify the countryside and deposit garrisons over the place, it would be hard to a field army to sneak up without making a lot of noise; conversely if you've just advanced into enemy country you really don't know what is out there. Cavalry raids would be another matter- it might be worth considering having hex ownership visible but give cavalry the guerrilla icon.


Hex possession is currently set to Off in the designer presets. Also note that the MP cost to convert enemy hexes is higher than default in this scenario. Combine those two factors and it is just not feasible for the Union to go off looking for clusters of enemy controlled hexes. And it's not that important in this scenario. They need the cities and rail lines and that's about it. So what if there are a bunch of disgruntled locals in the rear?

I've considered the guerilla icon for cavalry units. Actually, I first tried using it as a secondary icon but never finished evaluating the effects. Certainly worth exploring further. I agree cavalry do need some kind of special ability beyond moving faster. I don't think the Recon flag in the database does enough to empower them in this era of warfare.

_____________________________

Grab them by the balls. Their hearts and minds will follow.

(in reply to golden delicious)
Post #: 39
RE: Nation in Conflict 1861 - 11/20/2020 6:13:03 PM   
golden delicious


Posts: 5575
Joined: 9/5/2000
From: London, Surrey, United Kingdom
Status: offline

quote:

ORIGINAL: Raindem


I've considered the guerilla icon for cavalry units. Actually, I first tried using it as a secondary icon but never finished evaluating the effects. Certainly worth exploring further. I agree cavalry do need some kind of special ability beyond moving faster. I don't think the Recon flag in the database does enough to empower them in this era of warfare.


What recon % do they wind up with? You could consider cutting the strength of the cavalry equipment in the units but boosting the numbers, which should leave the unit more or less the same as it was but with a higher recon %. Then you guarantee them fast movement into enemy hexes and you make it really painful to withdraw from an enemy with superior cavalry.

_____________________________

"What did you read at university?"
"War Studies"
"War? Huh. What is it good for?"
"Absolutely nothing."

(in reply to Raindem)
Post #: 40
RE: Nation in Conflict 1861 - 11/20/2020 7:18:01 PM   
Raindem


Posts: 696
Joined: 7/15/2000
From: Arizona
Status: offline
The in-game recon % is not very high. Around 20% for a full-strength cavalry division and 3% for a comparable infantry division with no cavalry attached.

Not sure what you mean by cutting the strength and boosting the numbers. For example, Stuart's cavalry division has 69 cavalry co and a recon rating of 23%. Within the same corps, Jones' cavalry division has only 16 cos and a recon rating of 4%. So it seems like the only way to increase the recon numbers is to increase the cavalry strength.

Just to make sure we're on the same page, the goal here is to increase the recon ability of cavalry so they see things around them without actually having to gallop off and have a look. Correct?

_____________________________

Grab them by the balls. Their hearts and minds will follow.

(in reply to golden delicious)
Post #: 41
RE: Nation in Conflict 1861 - 11/21/2020 12:43:25 PM   
golden delicious


Posts: 5575
Joined: 9/5/2000
From: London, Surrey, United Kingdom
Status: offline
quote:

ORIGINAL: Raindem

The in-game recon % is not very high. Around 20% for a full-strength cavalry division and 3% for a comparable infantry division with no cavalry attached.

Not sure what you mean by cutting the strength and boosting the numbers. For example, Stuart's cavalry division has 69 cavalry co and a recon rating of 23%. Within the same corps, Jones' cavalry division has only 16 cos and a recon rating of 4%. So it seems like the only way to increase the recon numbers is to increase the cavalry strength.

Just to make sure we're on the same page, the goal here is to increase the recon ability of cavalry so they see things around them without actually having to gallop off and have a look. Correct?


Well cavalry will only ever see what's in the adjacent hex no matter how high the recon is. You suggested that the recon effect was not as high as you'd like- though a higher recon % would only improve:
- movement cost to enter enemy held hexes
- disengagement effects
- first round combat bonus

If you did want to increase recon, you'd take your "cavalry company" equipment type and rename as "cavalry half-company", cut the anti-personnel and defence strengths in half and double the number of "cavalry half-companies" in each cavalry unit. As far as TOAW is concerned an item of equipment has a fixed recon level so the recon level of the unit should be doubled, but the fighting strength would stay the same.

< Message edited by golden delicious -- 11/21/2020 12:44:36 PM >


_____________________________

"What did you read at university?"
"War Studies"
"War? Huh. What is it good for?"
"Absolutely nothing."

(in reply to Raindem)
Post #: 42
RE: Nation in Conflict 1861 - 11/21/2020 1:47:39 PM   
Raindem


Posts: 696
Joined: 7/15/2000
From: Arizona
Status: offline
Oh, no, I'm fine with the current recon effects. Units in contact are visible. Enemy units moving through friendly territory are usually visible. Most everyone else is hidden, which I think is correct for the era. The cavalry have to move around to see what's out there but I think that's appropriate also.


_____________________________

Grab them by the balls. Their hearts and minds will follow.

(in reply to golden delicious)
Post #: 43
RE: Nation in Conflict 1861 - 11/21/2020 9:17:00 PM   
Raindem


Posts: 696
Joined: 7/15/2000
From: Arizona
Status: offline
Spring 1864
Turns 75-82

The instant the weather broke the Union resumed its attacks on Confederate positions in front of Chattanooga. The situation hadn’t changed much since the Confederate counteroffensive the previous Fall. The Union now had a bridgehead across the Tennessee and was still pounding away at Rebel strongholds in the mountain passes. To help leverage the defenders out of their positions, the Army of the Tennesse (minus the XVI Corps on loan to the trans-MS theater) reactivated and began an invasion of central Alabama. Meridian and Selma fell in short order. As the Summer season began the Union was poised to drive on Montgomery. At the same time, the Department of the Gulf (Banks) marched on Mobile. But due to static orders from failed command checks it would take this force an extended amount of time to reach its destination.

For the Confederate Army of Tennessee, the number of enemy troops about to fall upon its flank was greater than the number facing its front. And to send reinforcements to central Alabama would simply increase the risk somewhere else. So the Chattanooga position had to be abandoned. They set up a new defense anchored at Kingston GA, about half way between Chattanooga and Atlanta. This would buy them some time since the Army of the Cumberland was more interested in continuing on to Knoxville than pivoting southeast.


The Union’s 1864 campaign in the east did not start until late spring. It began with Union attacks in the “wilderness”, the forested area west of Fredricksburg. These met with the same result as previous Union attacks upon prepared positions of Lee’s army. Which is to say they went nowhere. Then Sheridan’s cavalry was dealt a sharp defeat in their attempt to circle around behind Staunton. The Department of Virignia (Pope), advancing from its base in Charleston WV, swerved into the opposing Confederate cavlary to provide some relief for Sheridan. It worked just well enough to allow Sheridan to escape with heavy losses. But at the cost of giving up the chance for a quick capture of Lynchburg.

A new army, the Army of the James (Butler), was being formed at Fort Monroe. This army struck out from the fort in another attempt to roll up Confederate defenses on the peninsula. And again, the advance ground to a halt after a few miles. There was no open route to Richmond. The Union would have to either resort to blunt force tactics or bring in more reinforcements to flood the zone. They chose the latter. If they brought up all their reserves, and committed units on defensive duty in the north (Departments of Susquehanna, Washington, and the Middle) then they’d force the Confederates to choose between spreading out to cover those gaps or to pull back closer to Richmond. There were still plenty of costly frontal attacks the Union would have to make, but for now this route seemed better. It would be another two months before these additional units were at their assigned station.


_____________________________

Grab them by the balls. Their hearts and minds will follow.

(in reply to Raindem)
Post #: 44
RE: Nation in Conflict 1861 - 11/23/2020 2:39:04 PM   
Cfant


Posts: 473
Joined: 12/12/2010
Status: offline
Thanks :) Looks like an interesting scenario. I asked because in TOAW small units are sometimes hard to destroy if they are not surrounded. So small detachments may cut off full armies from supply and surviving a lot of attacks, always being pushed back and blockading roads and rails :) Just asked myself if this would be an issue. In that case it would absolutly matter, if there are a pack of grumpy rebs behind your lines ;)

(in reply to Raindem)
Post #: 45
RE: Nation in Conflict 1861 - 11/23/2020 3:51:31 PM   
Raindem


Posts: 696
Joined: 7/15/2000
From: Arizona
Status: offline
There is certainly "behind the lines" activity going on, but it's directed at the supply network. Not at the armies themselves. It's actually difficult to completely surround a unit in this scenario. Besides the lack of units, the MP cost of converting enemy controlled hexes is very high. Encirclements, if they happen, occur in slow motion and the target will have plenty of time to step back if it wants to.

Notice in the previous session report how both Jackson and Stuart attempted to surround Union General Sheridan. Even though the Confederate cavalry rode fast, they couldn't close the back door and Sheridan slipped away. The lack of disengagement penalties, and the relatively low cost of moving through friendly territory, makes it fairly easy for units to extricate themselves from predicaments like these.

< Message edited by Raindem -- 11/23/2020 4:00:57 PM >


_____________________________

Grab them by the balls. Their hearts and minds will follow.

(in reply to Cfant)
Post #: 46
RE: Nation in Conflict 1861 - 11/24/2020 1:18:39 PM   
Raindem


Posts: 696
Joined: 7/15/2000
From: Arizona
Status: offline
Summer 1864
Turns 83-89

The Department of the Susquehanna (Cadwalader) moved forward and engaged Jackson at New Market. Several attacks were repulsed, but the action allowed the Department of Virginia (Pope) to disengage and return to its line of march on Lynchburg. The Union would have to be a little more cautious now about how it approached Confederate positions, to avoid getting flanked and picked off piecemeal like what happened to Sheridan. The attacks in the Wilderness and on the Peninsula were paused for a short time while the Union completed maneuvers in the Shenandoah Valley.

The Confederacy responded with typical aggressive counterattacks. Jackson plowed right through the center of the Department of the Susquehanna (whose units were brigade strength, not divisions) but was stopped by the Department of Washington (Heintzelman) which had moved over to support the Union effort. As Jackson advanced he was leaving Union forces on his flanks so Stuart left Lynchburg to set up station on his wings. The Confederates knew that Union forces were trying to get around Lynchburg, so they gathered up what they could from the Department of Richmond (Elzey) and assigned them to cover the mountain passes coming in from West Virginia. The local counterattack against Sheridan had now grown into a large Confederate push back up the Shenandoah. The Union, not tolerating even the slightest threat to Washington DC, dispatched reinforcements to make sure the Confederate thrust could not break to the east. But it didn’t stop the Union from continuing their sweep around Lynchburg, and troops from the Department of Virginia started investing it on July 16.

The Union had enough troops to do three things at once (attack in the east, defend Washington, and sweep around the Shenandoah). The Confederacy did not. After a few weeks of fighting, Jackson’s corps, Stuart’s cavalry, and the other troops that got swept up in the momentum, all retired to a defensive line between Lynchburg and Culpepper. The Army of the James resumed it’s attacks on Magruder’s Corps and finally started to gain some ground. The noose around Richmond just got drawn a little tighter.


Initial attacks on Knoxville were repulsed. The surrounding terrain was too rough to flank the defenders, and there was no one in position to cut the Wytheville-Knoxville rail line. So what began as a sideshow with a couple corps from the Army of the Cumberland gradually involved nearly the entire army as units were recalled from Georgia and thrown into the attack. When that still didn’t work, additional rail repair crews were brought in to repair the Chattanooga-Knoxville line. That would provide enough additional supply to permit a limited flanking manuever against the defenders. The Rebels could see what was going on but were powerless to stop it. They tried to sortie out from city and block the flanking maneuvers but there were just too many Yankees. With the main defenses thus weakened, the attacks on Knoxville proper were starting to take a toll. It seemed like a good time for the entire Department of Kentucky to fall back to Wytheville. A more valiant stand there was none. And it put the Union seriously behind schedule. They should have been attacking Atlanta by now. The 1864 election was approaching and the capture of Atlanta would have guaranteed a Lincoln victory. Now the issue was in doubt.

The Army of the Tennesse continued its march across Alabama. If they had known how weak the Confederates really were in this area they would have sprinted instead of marched. But they were also slowed by lack of supply. At one point the entire army had to pause while rail and supply units were transferred back over from the trans-Mississippi theater. Mobile was captured after a short battle on July 30. That pushed the Confederate supply stockpile down to 19. At that level troops can only operate in short spurts. It becomes costly to move into enemy territory and even more so to attack. The Confederates could still field decent numbers as far as troop ratios were concerned. But they couldn’t afford to go more than a few rounds in any one location.


The trans-Mississippi campaign had all but ended. Failing to capture Fayetteville, the Department of Kansas returned to its barracks in Springfield. The Department of Arkansas, too weakend to even try to capture Shreveport, left a garrison in Camden and returned to Little Rock. The XVI Corps headed back to the rail head at Monroe where they entrained to rejoin the army in Alabama.

At Shreveport, the Confederacy had a motley collection of stragglers from all over the theater. There was no direct supply to Shreveport since the Union controlled the Red River by virture of their occupation of Simmesport. Supply had to trickle in overland from Texas so it would be quite some time before these troops were fit for battle again. Still, it was a sizable force (40,000 men. Even more if the Department of Texas was included) and would be able to mount an impressive counterattack when the time came.


_____________________________

Grab them by the balls. Their hearts and minds will follow.

(in reply to Raindem)
Post #: 47
RE: Nation in Conflict 1861 - 11/28/2020 1:51:47 PM   
Raindem


Posts: 696
Joined: 7/15/2000
From: Arizona
Status: offline
Fall 1864
Turns 90-95

The following image shows the extent of Union advance over the entire playing area. Arrows indicate the route of advance of Union armies from their starting positions in April 1861.


While the Army of the James rested 30 miles from Richmond, Union offensive action resumed in the Wilderness. Progress was slow. After resupply, the troops in the upper Valley also resumed their attacks and managed to take Staunton before the first snow hit. Further down the Valley, the Department of Virginia outran its supply trying to get around Lynchburg and had to pull back closer to West Virginia. They would be out of the fight until Spring.

The Army of Northern Virginia fought hard against the main body of the Union army coming down from Fredricksburg, as well as against the Army of the James on the Peninsula. In the Shenadoah Valley, however, their positions were starting to break apart and their entire left wing needed to be tucked in lest it get chopped off. Stuart’s cavalry pulled back to a position 30 miles southwest of Richmond. They would not be conducting any more raids. Their job was to keep track of the Union right flank and check any penetrations into the perimeter. The Department of Richmond relocated back closer to Richmond. The Department of Kentucky (a western theater force up until now) left a single division as a garrison at Wytheville and moved the rest of their forces over to cover Lynchburg and the left flank of the Confederate army.


The Army of the Cumberland belatedly launched its Atlanta campaign. The Army of the Tennessee would assist when they got their supply situation straightened out. For now they were stuck in Montgomery. There was no time for fancy flanking maneuvers so frontal attacks were attempted on the first obstacle… the Kingston Line. Pleasonton’s cavalry also attempted a sweep around the Confederate right flank. They encounter no resistance but were nevertheless forced to stop short due to supply shortages. The terrain and deteriorating weather made supply off the main rail line very difficult.

The Confederates adopted the tactic of defend-retreat, defend-retreat, allowing the Union to inch forward. The goal was to try and hold on to Atlanta through the winter. To help slow the Union advance, Wheeler conducted a series of raids on the rail lines between Nashville and Atlanta. The Union had plenty of rail crews on hand, and even without this distraction was already moving at a glacial pace. So it was doubtful that these raids accomplished anything besides a further depletion of Confederate cavalry strength.


The trans-Mississippi theater has become active again. The Confederate Army of Arkansas (Price) launched a large raid into Union-held Missouri. They were assisted by Quantrill’s Raiders, who secured roads and key river crossings ahead of them. Price’s army was mostly cavalry so it moved fast. Van Dorn should have been in on this raid also, but he was still convalescing in Shreveport.

The first Union troops they encountered was the garrison at Ironton, which was destroyed after a short fight. The Confederate raiders then moved on to St. Louis where they found the Department of Missouri (Schofield) already entrenched and waiting for them. Knowing that his light cavalry would not do well against entrenched infantry, Price rode off torward Jefferson City. Quantill headed back to the mountains. At this point in the campaign there was little his mounted partisans could do to help.

After conducting a raid on Jefferson City, Price headed back to Arkansas before the Union’s Department of Kansas had a chance to move up and trap them. As it turned out the Department of Kansas had static orders during the entire raid. E.g. their commander refused to move.


On the political front, the most significant event of Fall 1864 was that Lincoln won reelection. This meant no SDV for the Confederacy. Barring any unforseen disasters, the Union was committed to see this through to the end. The Confederacy was still clinging to a marginal victory (+29 VPs), but no one expected it to hold.

_____________________________

Grab them by the balls. Their hearts and minds will follow.

(in reply to Raindem)
Post #: 48
RE: Nation in Conflict 1861 - 11/28/2020 2:07:40 PM   
golden delicious


Posts: 5575
Joined: 9/5/2000
From: London, Surrey, United Kingdom
Status: offline

quote:

ORIGINAL: Raindem

On the political front, the most significant event of Fall 1864 was that Lincoln won reelection. This meant no SDV for the Confederacy. Barring any unforseen disasters, the Union was committed to see this through to the end. The Confederacy was still clinging to a marginal victory (+29 VPs), but no one expected it to hold.


Just how much better does the CSA have to do than history for the Peace Democrats to be in with a chance in 1864? The situation in this play through, while differing from history, doesn't feel like one which favours the Union any less.

What would be interesting for colour is if you can spare the events to output the results of the electoral college based on the EEV.

_____________________________

"What did you read at university?"
"War Studies"
"War? Huh. What is it good for?"
"Absolutely nothing."

(in reply to Raindem)
Post #: 49
RE: Nation in Conflict 1861 - 11/28/2020 3:21:38 PM   
Raindem


Posts: 696
Joined: 7/15/2000
From: Arizona
Status: offline
quote:

ORIGINAL: golden delicious
Just how much better does the CSA have to do than history for the Peace Democrats to be in with a chance in 1864? The situation in this play through, while differing from history, doesn't feel like one which favours the Union any less.

What would be interesting for colour is if you can spare the events to output the results of the electoral college based on the EEV.


Not enough events to cover the cost of Lincoln's legal team ;)

Actually that's not a bad idea. There are already a bunch of events monitoring the EEV. Easy enough to add some newstrings. What this game really really needs from a design standpoint is multiple EEVs. I could have one dedicated to the election and affected by control of each state. The possibilities are limitless.

But this whole idea of a SDV based on an election is something I struggled with, and continue to tweak. It's purely conjecture on what exactly would have been required for Lincoln to lose. And I don't think that it's a done deal that McClellan would have instantly offered terms. Yet every respectable simulation of this conflict includes that possibility. So I felt obliged to do so also.

I set the bar quite high for this to happen. Simply failing to maintain a historical rate of advance is not enough. The Confederacy would have to invade the north and cause considerable damage. They wouldn't have to capture Washington, but a couple of the other major cities might do it. The Union can always prevent this if they choose to do so. It's only when they ignore the threat that they risk allowing the Confederacy to drive the EEV high enough for SDV events to kick in.


_____________________________

Grab them by the balls. Their hearts and minds will follow.

(in reply to golden delicious)
Post #: 50
RE: Nation in Conflict 1861 - 11/30/2020 8:46:09 AM   
golden delicious


Posts: 5575
Joined: 9/5/2000
From: London, Surrey, United Kingdom
Status: offline
quote:

ORIGINAL: Raindem

What this game really really needs from a design standpoint is multiple EEVs.


Absolutely. Should be reasonably easy to code something like that, too.

quote:

But this whole idea of a SDV based on an election is something I struggled with, and continue to tweak. It's purely conjecture on what exactly would have been required for Lincoln to lose. And I don't think that it's a done deal that McClellan would have instantly offered terms. Yet every respectable simulation of this conflict includes that possibility. So I felt obliged to do so also.


While I agree that Lincoln losing doesn't mean the war ends, I think the game needs something like this and it can be justified on two grounds:
1) A less vengeful Union in 1865 is likely to be good news for the treatment of the South postwar, even if the South ultimately loses anyway. One might even have a negotiated peace which denies the right of secession, but does something to enshrine the rights of the state in the constitution
2) Clearly the Union player's war policy has failed if the electorate says it has failed

quote:

I set the bar quite high for this to happen. Simply failing to maintain a historical rate of advance is not enough. The Confederacy would have to invade the north and cause considerable damage. They wouldn't have to capture Washington, but a couple of the other major cities might do it. The Union can always prevent this if they choose to do so. It's only when they ignore the threat that they risk allowing the Confederacy to drive the EEV high enough for SDV events to kick in.


I see. To be honest it sounds quite unlikely that it would occur at all, but is more of an honesty tool to prevent the Union player simply ignoring Confederate raids. I have something similar in my Poland scenario as you may recall: if the Poles do raid East Prussia it needs to be impossible for the German to ignore.

< Message edited by golden delicious -- 11/30/2020 8:47:59 AM >


_____________________________

"What did you read at university?"
"War Studies"
"War? Huh. What is it good for?"
"Absolutely nothing."

(in reply to Raindem)
Post #: 51
RE: Nation in Conflict 1861 - 11/30/2020 1:31:23 PM   
Raindem


Posts: 696
Joined: 7/15/2000
From: Arizona
Status: offline
Yes, similar to your Poland scenario. The fear was real, if not well founded. In actuality, Washington was so well fortified by 1863 I don't think the South ever could have captured it. But in the Scenario I made a lot of those troops mobile (Department of Washington), thus giving the Union player an opportunity for a stroke of genius or a huge blunder.

_____________________________

Grab them by the balls. Their hearts and minds will follow.

(in reply to golden delicious)
Post #: 52
RE: Nation in Conflict 1861 - 11/30/2020 1:33:46 PM   
golden delicious


Posts: 5575
Joined: 9/5/2000
From: London, Surrey, United Kingdom
Status: offline

quote:

ORIGINAL: Raindem

thus giving the Union player an opportunity for a stroke of genius or a huge blunder.


Excellent

_____________________________

"What did you read at university?"
"War Studies"
"War? Huh. What is it good for?"
"Absolutely nothing."

(in reply to Raindem)
Post #: 53
RE: Nation in Conflict 1861 - 12/1/2020 12:38:04 PM   
Raindem


Posts: 696
Joined: 7/15/2000
From: Arizona
Status: offline
Winter 1864-65
Turns 97-102

The Union dispatched a fleet to capture Fort Fisher (protecting the port of Wilmington). They lost 6 ships subduing the fort’s guns and 1,500 men in the land battle against the garrison. But the fort was taken and Wilmington was effectively blockaded. This pushed the Confederate supply stockpile down to 17.

In the west, the Union completed the rail line as far as Selma, AL, so the Army of the Tennessee was well supplied now. As soon as the weather broke they marched on Columbus, GA. After chasing out the garrison the Army split in two. Half went south to invade Florida, which coincided with the Department of the Gulf (Banks) advance on Pensacola and Department of the South (Gilmore) advance on St. Augustine. The other half went northeast to capture Macon and cut one of the two main rail lines going into Atlanta. The Army of the Cumberland resumed its attacks on the Confederate forces in front of Atlanta while Pleasonton finally completed his sweep around their right flank. This cut the Augusta-Atlanta line, the last rail line going into Atlanta.

There was a supply point in Atlanta so the Rebs didn’t have to worry about starving. But if they stayed where they were they’d be trapped between two major Union Armies and headed for certain destruction. The deep south was already lost so the most sensible choice was to retreat into the Carolinas. But they also needed to hold on to Savannah, which was the last major unblockaded port still in their possession. So Breckenridge’s corps boarded the last train out of Atlanta and headed for the coast. The rest of the army fell back towards Augusta. What remained of Wheeler’s cavalry fought a rearguard to screen the retreat.

After the Army of the Cumberland captured Atlanta (defended now only by a 5,000 man garrison), they pivoted east to pursue the main body of the Confederate Army of Tennessee into South Carolina. The occupation of the remainder of Georgia was left to the Union Army of the Tennessee as time permitted. There would be no historic “March to the Sea”.


_____________________________

Grab them by the balls. Their hearts and minds will follow.

(in reply to golden delicious)
Post #: 54
RE: Nation in Conflict 1861 - 12/1/2020 1:02:10 PM   
golden delicious


Posts: 5575
Joined: 9/5/2000
From: London, Surrey, United Kingdom
Status: offline
Another nice illustration of how warfare ought to work in this period: independent but mutually-supporting armies are able to force a defender out of position by threatening their line of communications, rather than by direct flanking or assault.

Of course the ability to do this is somewhat muted by the high cost of hex conversion. If we were looking at the Franco-Prussian war (just a few years later) one would want the Germans to be much more agile as the French repeatedly found themselves cut off from their lines of retreat, which I don't think could happen here.

_____________________________

"What did you read at university?"
"War Studies"
"War? Huh. What is it good for?"
"Absolutely nothing."

(in reply to Raindem)
Post #: 55
RE: Nation in Conflict 1861 - 12/4/2020 7:44:57 PM   
Raindem


Posts: 696
Joined: 7/15/2000
From: Arizona
Status: offline
Spring 1865
Turns 103-End

The scenario nominally ends on Turn 106 (April 22, 1865). But there is an event which can end it up to 4 turns earlier or later. This puts a little uncertainty into the scenario ending and helps discourage last turn suicide attacks.

Winter’s final snows hadn’t even yet melted when all Union forces in the east resumed offensive operations against Confederate positions around Richmond. The first part of the shell to crack was on the Peninsula. After four years of holding back Union forces there, the line finally gave way and troops from the Army of the James (Butler) arrived at the outskirts of Richmond. Longstreet was sent to bolster the line. A successful counterattack stabilized the positions east of Richmond. But with Longstreet’s corps gone, the positions north of Richmond started to falter as well.

The Union Department of Viriginia then started applying pressure on the west facing of the perimeter by attacking at Lynchburg. Next, the small force at Beaufort, organized as the Union Department of North Carolina (Foster), broke away from the coast and captured New Bern. The Confederate Department of North Carolina (Holmes) was in Raleigh and rushed forces to Goldsboro to check any further Union advance.


The game ended just a couple turns after the above screenshot was taken (Turn 104, March 25, 1865), and resulted in a Draw. The Confederacy had a 17 VP advantage. They needed 20 for a win.


Total casualties were as follows:

Union: 481,826 men, 398 guns, 77 warships
Confederacy: 313,924 men, 1,424 guns, 8 warships

Proportionally, this isn’t too far off from historical results (Union: 350k Conf: 250k). But it always gets a little muddy translating TOAW equipment destroyed into actual KIAs. In this scenario each infantry type Company represented 100 men and each gun was served by a crew of 12 (24 if it had horse drawn transport). Each warship was considered to have a 100-man crew.

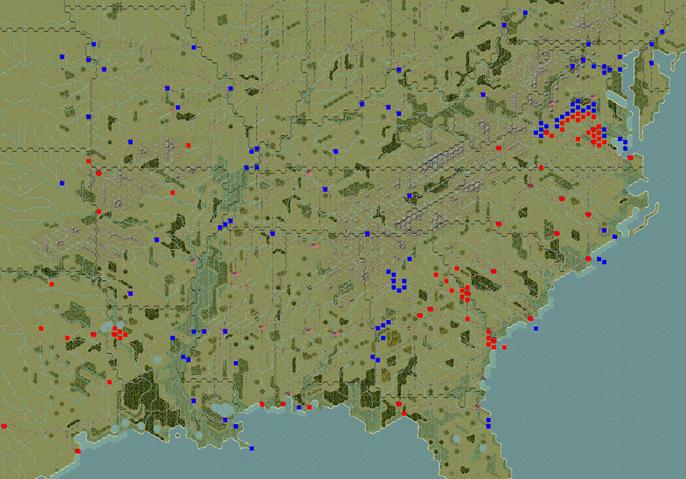
The screen shot below shows the ending location of all units for both sides. In addition to the border states, all of Tennessee, Mississippi, and Alabama were Union occupied, as were the largest cities in Arkansas and Louisiana. Florida and Georgia were still about 50/50.


Some would argue this should be a Confederate victory since they kept the Federals out of Richmond and most of the Carolinas. Others might argue for a Union victory since two-thirds of the South had been overun, their armies defeated, and 4 of their largest 5 cities captured. Victory conditions are always a challenging component of scenario design, especially in a conflict such as this where historically one side did achieve an overwhelming victory. I attempted to strike a balance here between matching historical results and achieving actual results. The Union clearly didn’t deserve a victory here by historical standards. But the fact that the Confederacy didn’t get whooped as bad as they did in real life wasn’t enough to warrant a victory for them either. Hence, a draw.

It should be noted that the Confederacy had a 5 point loss penalty and the Union had zero. Loss penalties in this scenario tend to range between 0 and 20. If the Confederacy had reduced its casualties or inflicted a few more on the Union, it might have been enough to give them the victory.

Post Game Analysis

The primary reason for the Union underperforming was the delays they encountered in the western theater. By the skillful use of a fluid defense, the Confederacy can usually hold on longer than they did in real life at places like Nashville, Memphis, and Chattanooga. If that happens then the Union has to make it up elsewhere. Options abound. They could go for an early capture of Richmond. They could try to start a second front in the Carolinas. They could finish the conquest of the trans-Mississippi theater by going all the way to Austin. The Union did none of those in this game. And their zero loss penalty reveals that I played them rather conservatively. I probably should have pushed the Army of the Tennessee immediately forward after the capture of Montgomery, instead of waiting for supply to catch up. They had a clear road all the way to Savannah (although I wouldn't have known that in a competitive match).

Finally, I’d like to request that anyone who plays this scenario, whether PBEM, solitaire, or vs PO, to email me their final end game *.sal file so I can continue to tweak the victory conditions and evaluate the effects of the EEV.

Thanks

Curt


_____________________________

Grab them by the balls. Their hearts and minds will follow.

(in reply to Raindem)
Post #: 56
RE: Nation in Conflict 1861 - 12/7/2020 10:48:57 AM   
golden delicious


Posts: 5575
Joined: 9/5/2000
From: London, Surrey, United Kingdom
Status: offline
quote:


Finally, I’d like to request that anyone who plays this scenario, whether PBEM, solitaire, or vs P


Thanks for the enjoyable AAR. It's especially relevant for me since, as I've mentioned elsewhere, I'm about 1/2 way through my own Civil War in American Front 1914 as the Entente. Happily, the Union has not taken four of my five largest cities.

< Message edited by golden delicious -- 12/7/2020 10:49:33 AM >


_____________________________

"What did you read at university?"
"War Studies"
"War? Huh. What is it good for?"
"Absolutely nothing."

(in reply to Raindem)
Post #: 57
RE: Nation in Conflict 1861 - 12/7/2020 12:16:00 PM   
Cfant


Posts: 473
Joined: 12/12/2010
Status: offline
Thanks. Looks interesting! I enjoyed your AAR very much!

(in reply to golden delicious)
Post #: 58
Page:   <<   < prev  1 [2]
All Forums >> [New Releases from Matrix Games] >> The Operational Art of War IV >> After Action Reports >> RE: Nation in Conflict 1861 Page: <<   < prev  1 [2]
Jump to:


New Messages No New Messages
Hot Topic w/ New Messages Hot Topic w/o New Messages
Locked w/ New Messages Locked w/o New Messages
 Post New Thread
 Reply to Message
 Post New Poll
 Submit Vote
 Delete My Own Post
 Delete My Own Thread
 Rate Posts


Forum Software © ASPPlayground.NET Advanced Edition 2.4.5 ANSI

0.984