Daniele
Posts: 1812
Joined: 2/7/2015
Status: offline

|
Chapter 7 Barbarossa Attacks
Attacks in Mar/Apr 1941
This post covers land combat in Russia in the last impulse of Mar/Apr 1941 and the entire May/June 1941 turns. As such, it shows all 6 land attacks by Germany against the USSR in that initial impulse of Barbarossa. The turn ended immediately thereafter. Picking up the thread, the story then continues with the Allied and Axis impulses in May/June 1941 through to that turn’s conclusion.
Figure 7-1 displays all 6 German land combats in impulse #11 of Mar/Apr 1941. Each of the Land Combat Resolution forms lists all the combats in the upper left, with one of them selected/highlighted. The selected hex is shown in the small insert detailed map. At the bottom of the form, the defending and attacking units involved in the combat are displayed separately. A few of the combats have air units providing ground support, which appear as +XX Air above the attacking unit depictions.
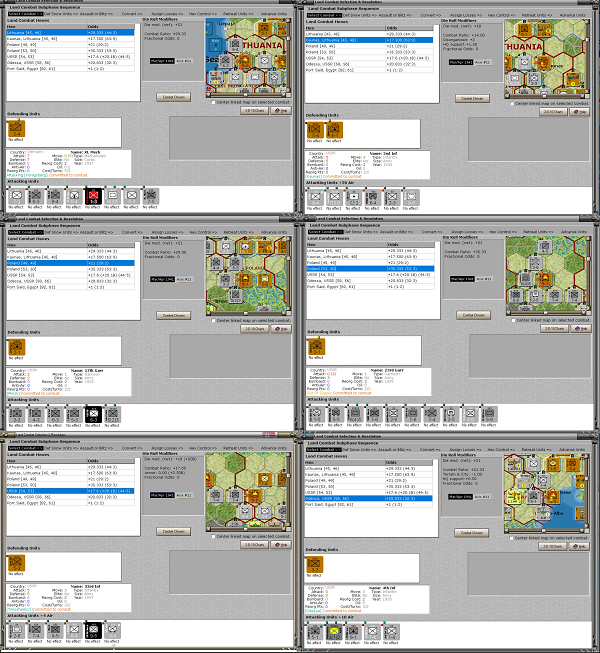
Look at the top center of the 6 Land Combat Resolution forms in the figure. Directly under the bold text Die Roll Modifiers is the net/final die roll modifier for the selected combat. The 6 German attacks were all at excellent odds, as is to be expected in Fine weather during the surprise impulse following a declaration of war. +21 is guaranteed success: all the defenders are destroyed, none of the attackers are harmed in the least, and the advance after combat is 1 or 2 hexes. The latter only happens when the Blitz combat result table is chosen.
Four attacks were at +21. There were two lesser attacks: +18 on Kaunas (upper right corner of the figure) and a +20 blitz on hex [54, 53] (lower left corner). A +18 is guaranteed to take Kaunas since there are only 2 defending units in the hex. Likewise the +20 blitz will get a B* result, killing off the sole defender in that hex. The attacking armor and mechanized units will then be able to advance 2 hexes, overrunning and destroying the 1-4 Russian division to the northeast of the attacked hex. The 7th attack listed in each of the 6 screenshots is the feeble invasion by the Italians on Port Said - it failed.
The North May/June 1941
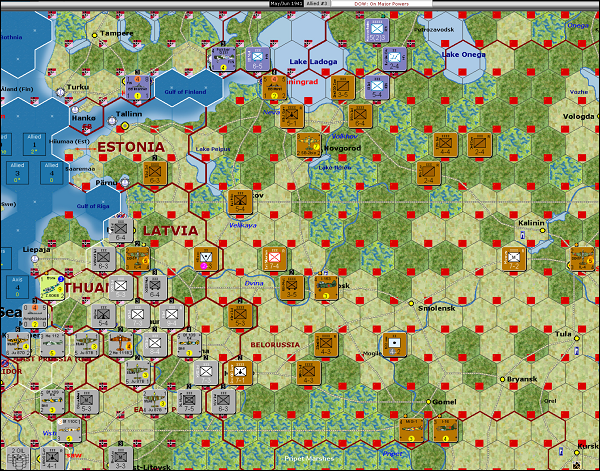
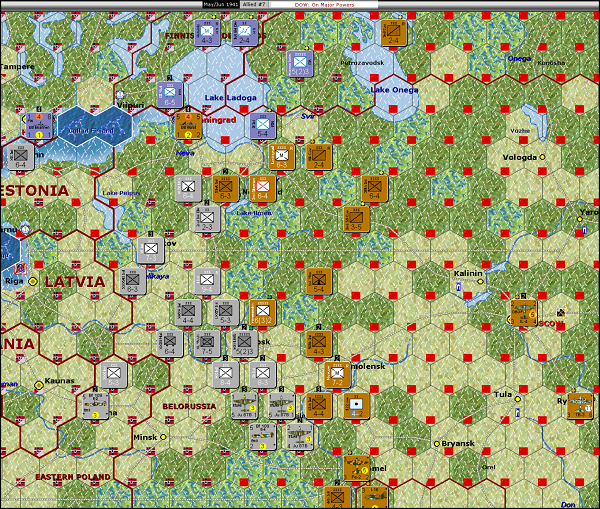
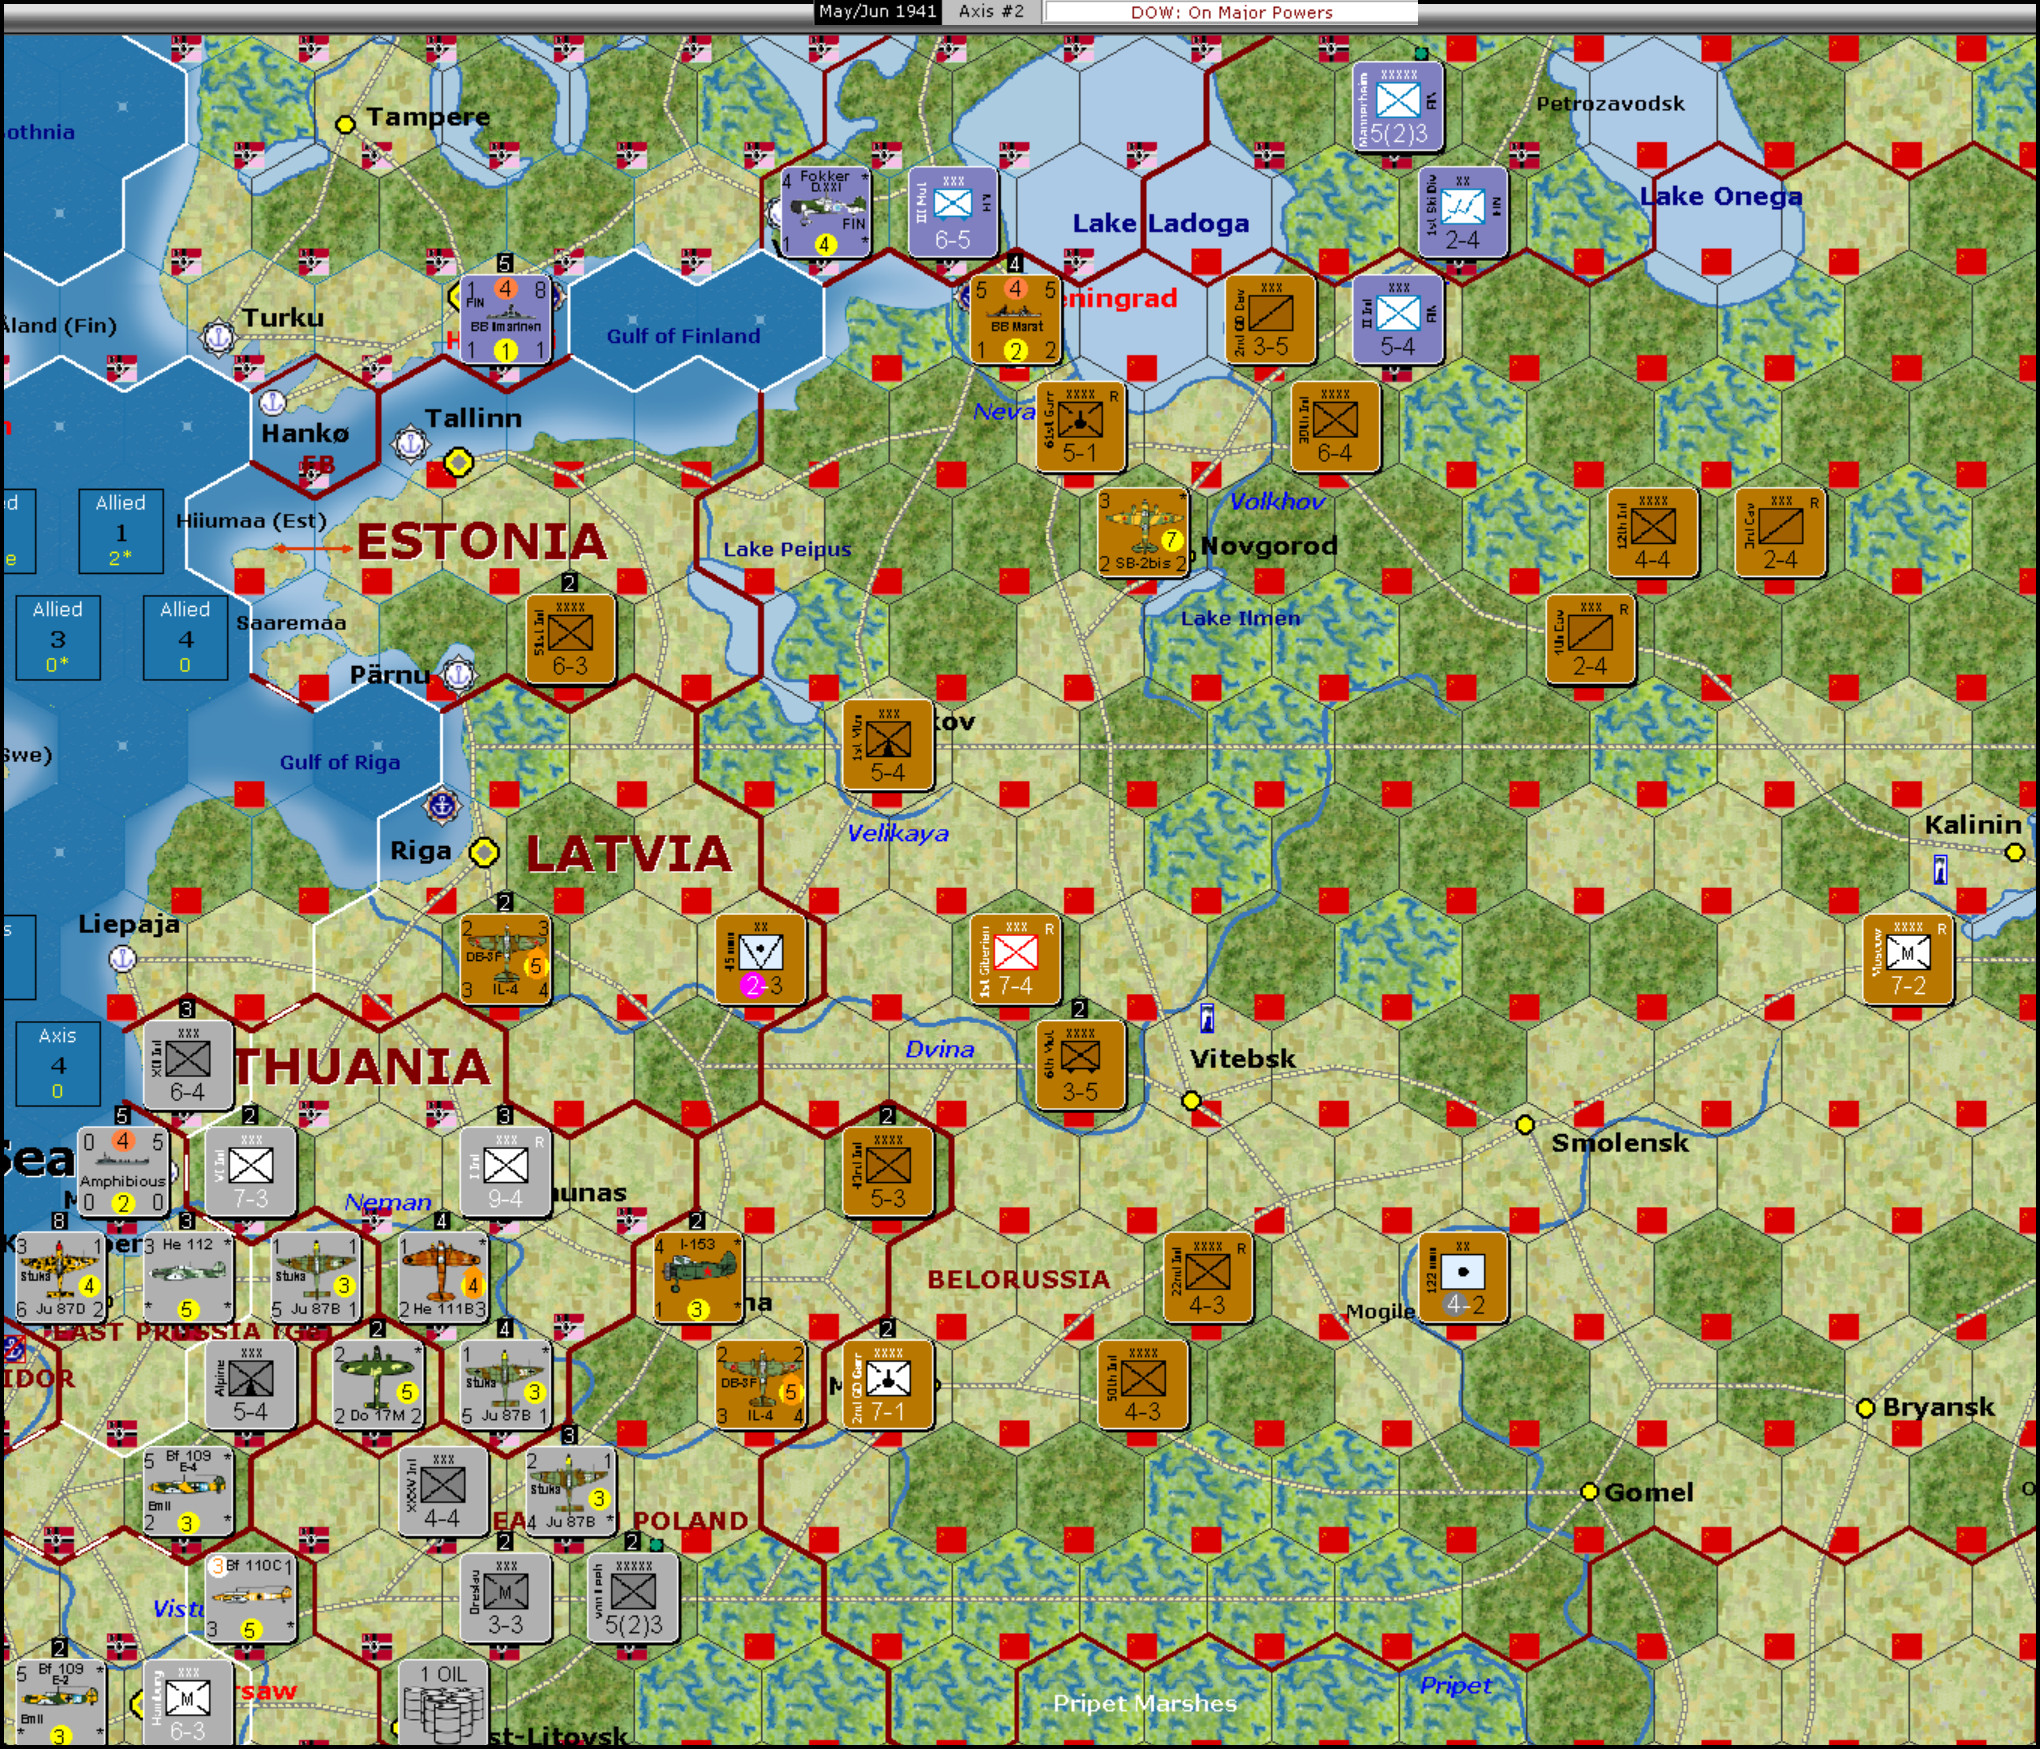
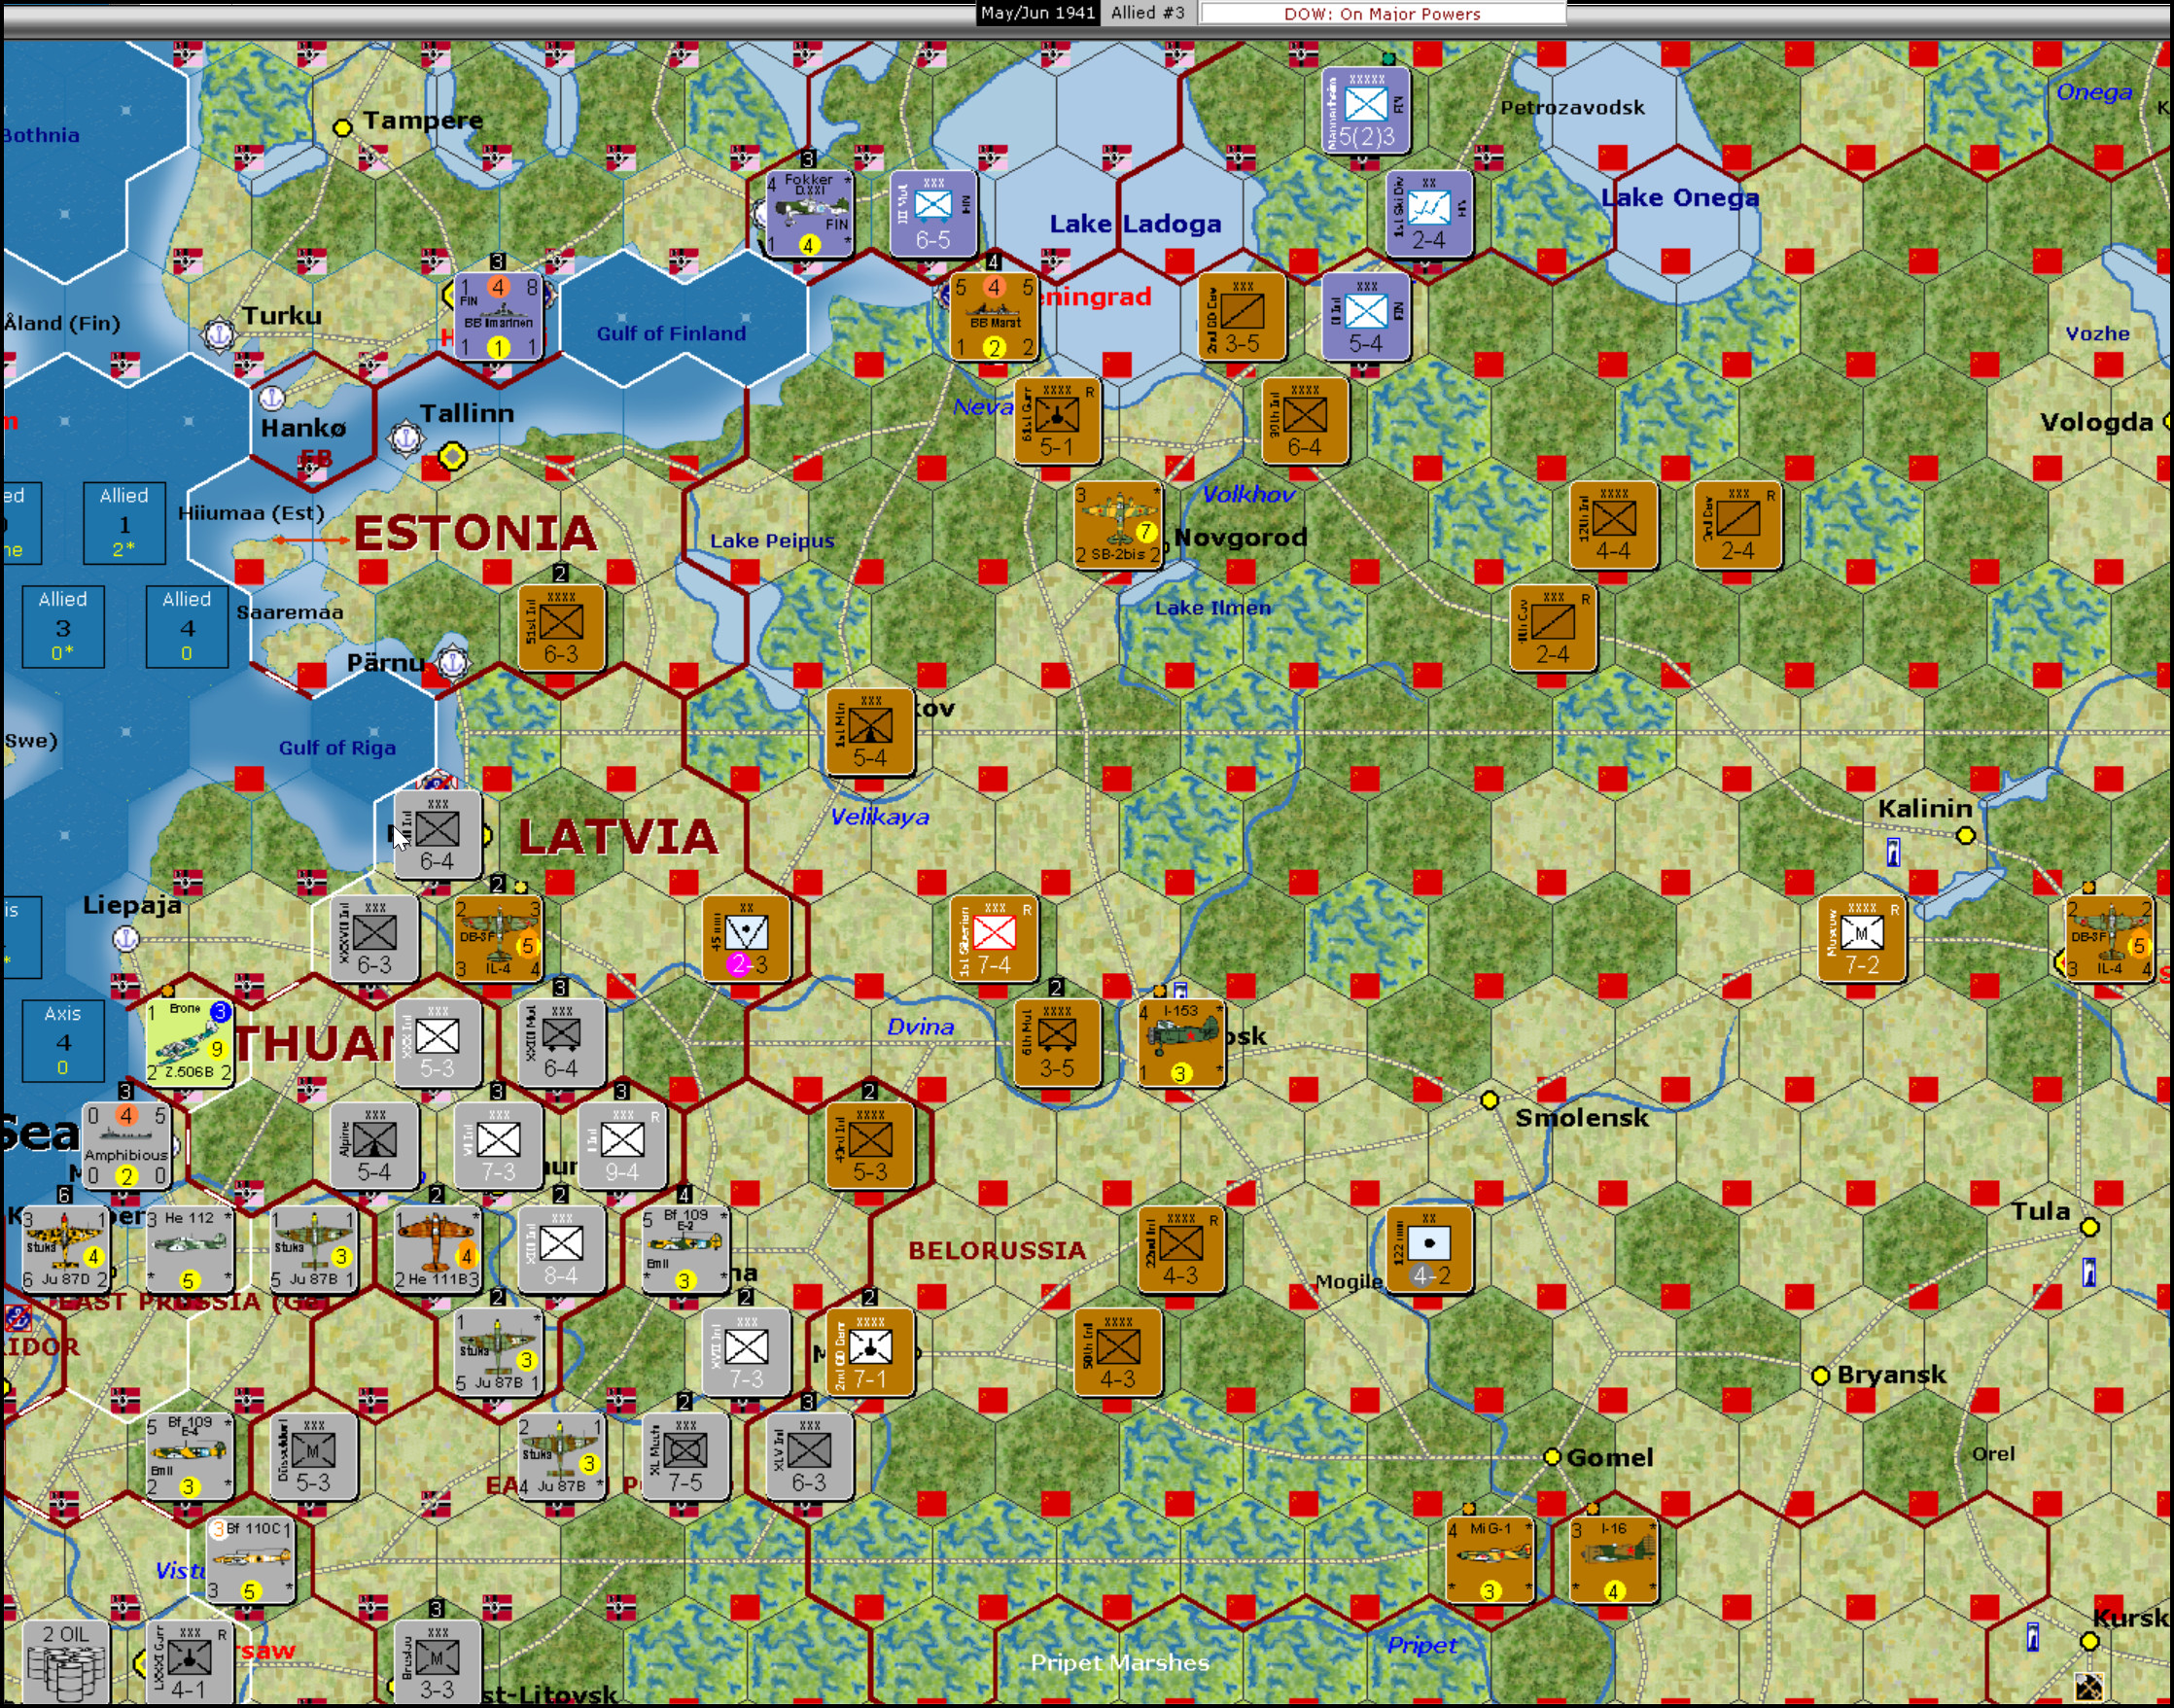
As stated above, the turn then ended (50% probability). The Allies won the initiative and chose to move first in the next turn. Figure 7-2 shows where they retreated in the north. The position is for Axis to move in the second impulse of the May/June 1941 turn. 5 Russian corps are blocking the Finns in the north from moving any further south. Actually, the supply line for the Finnish HQ (Mannerheim) is already stretched to its limit (4 hexes to a rail line connected to Helsinki). The two other Finns near the Finnish HQ could wander 4 hexes from the HQ and still be in supply, if the path were not interrupted by Russian units or their ZOCs.

The general German advance from the bottom left of the screenshot to the north and east, was halted by three Russian controlled hexes: next to Riga, Vilna, and Minsk. Although the Russian bomber alone in the hex can be overrun, it will merely rebase up to 30 hexes away. G would have done that already if not for the limit on how many air missions (3) he could fly during a Land Action. Other Russian units are scurrying to the rear, getting out of range of the German bombers whenever possible.
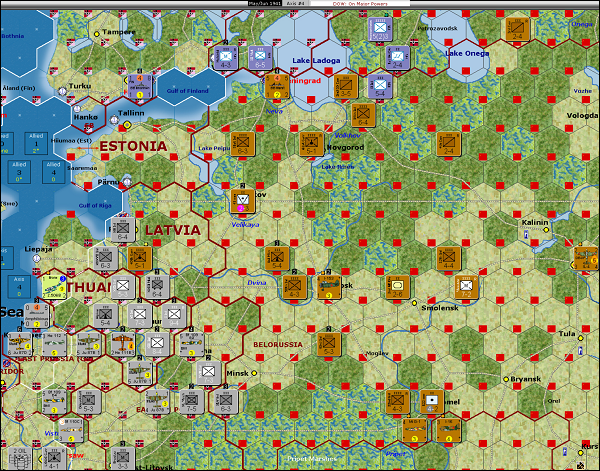
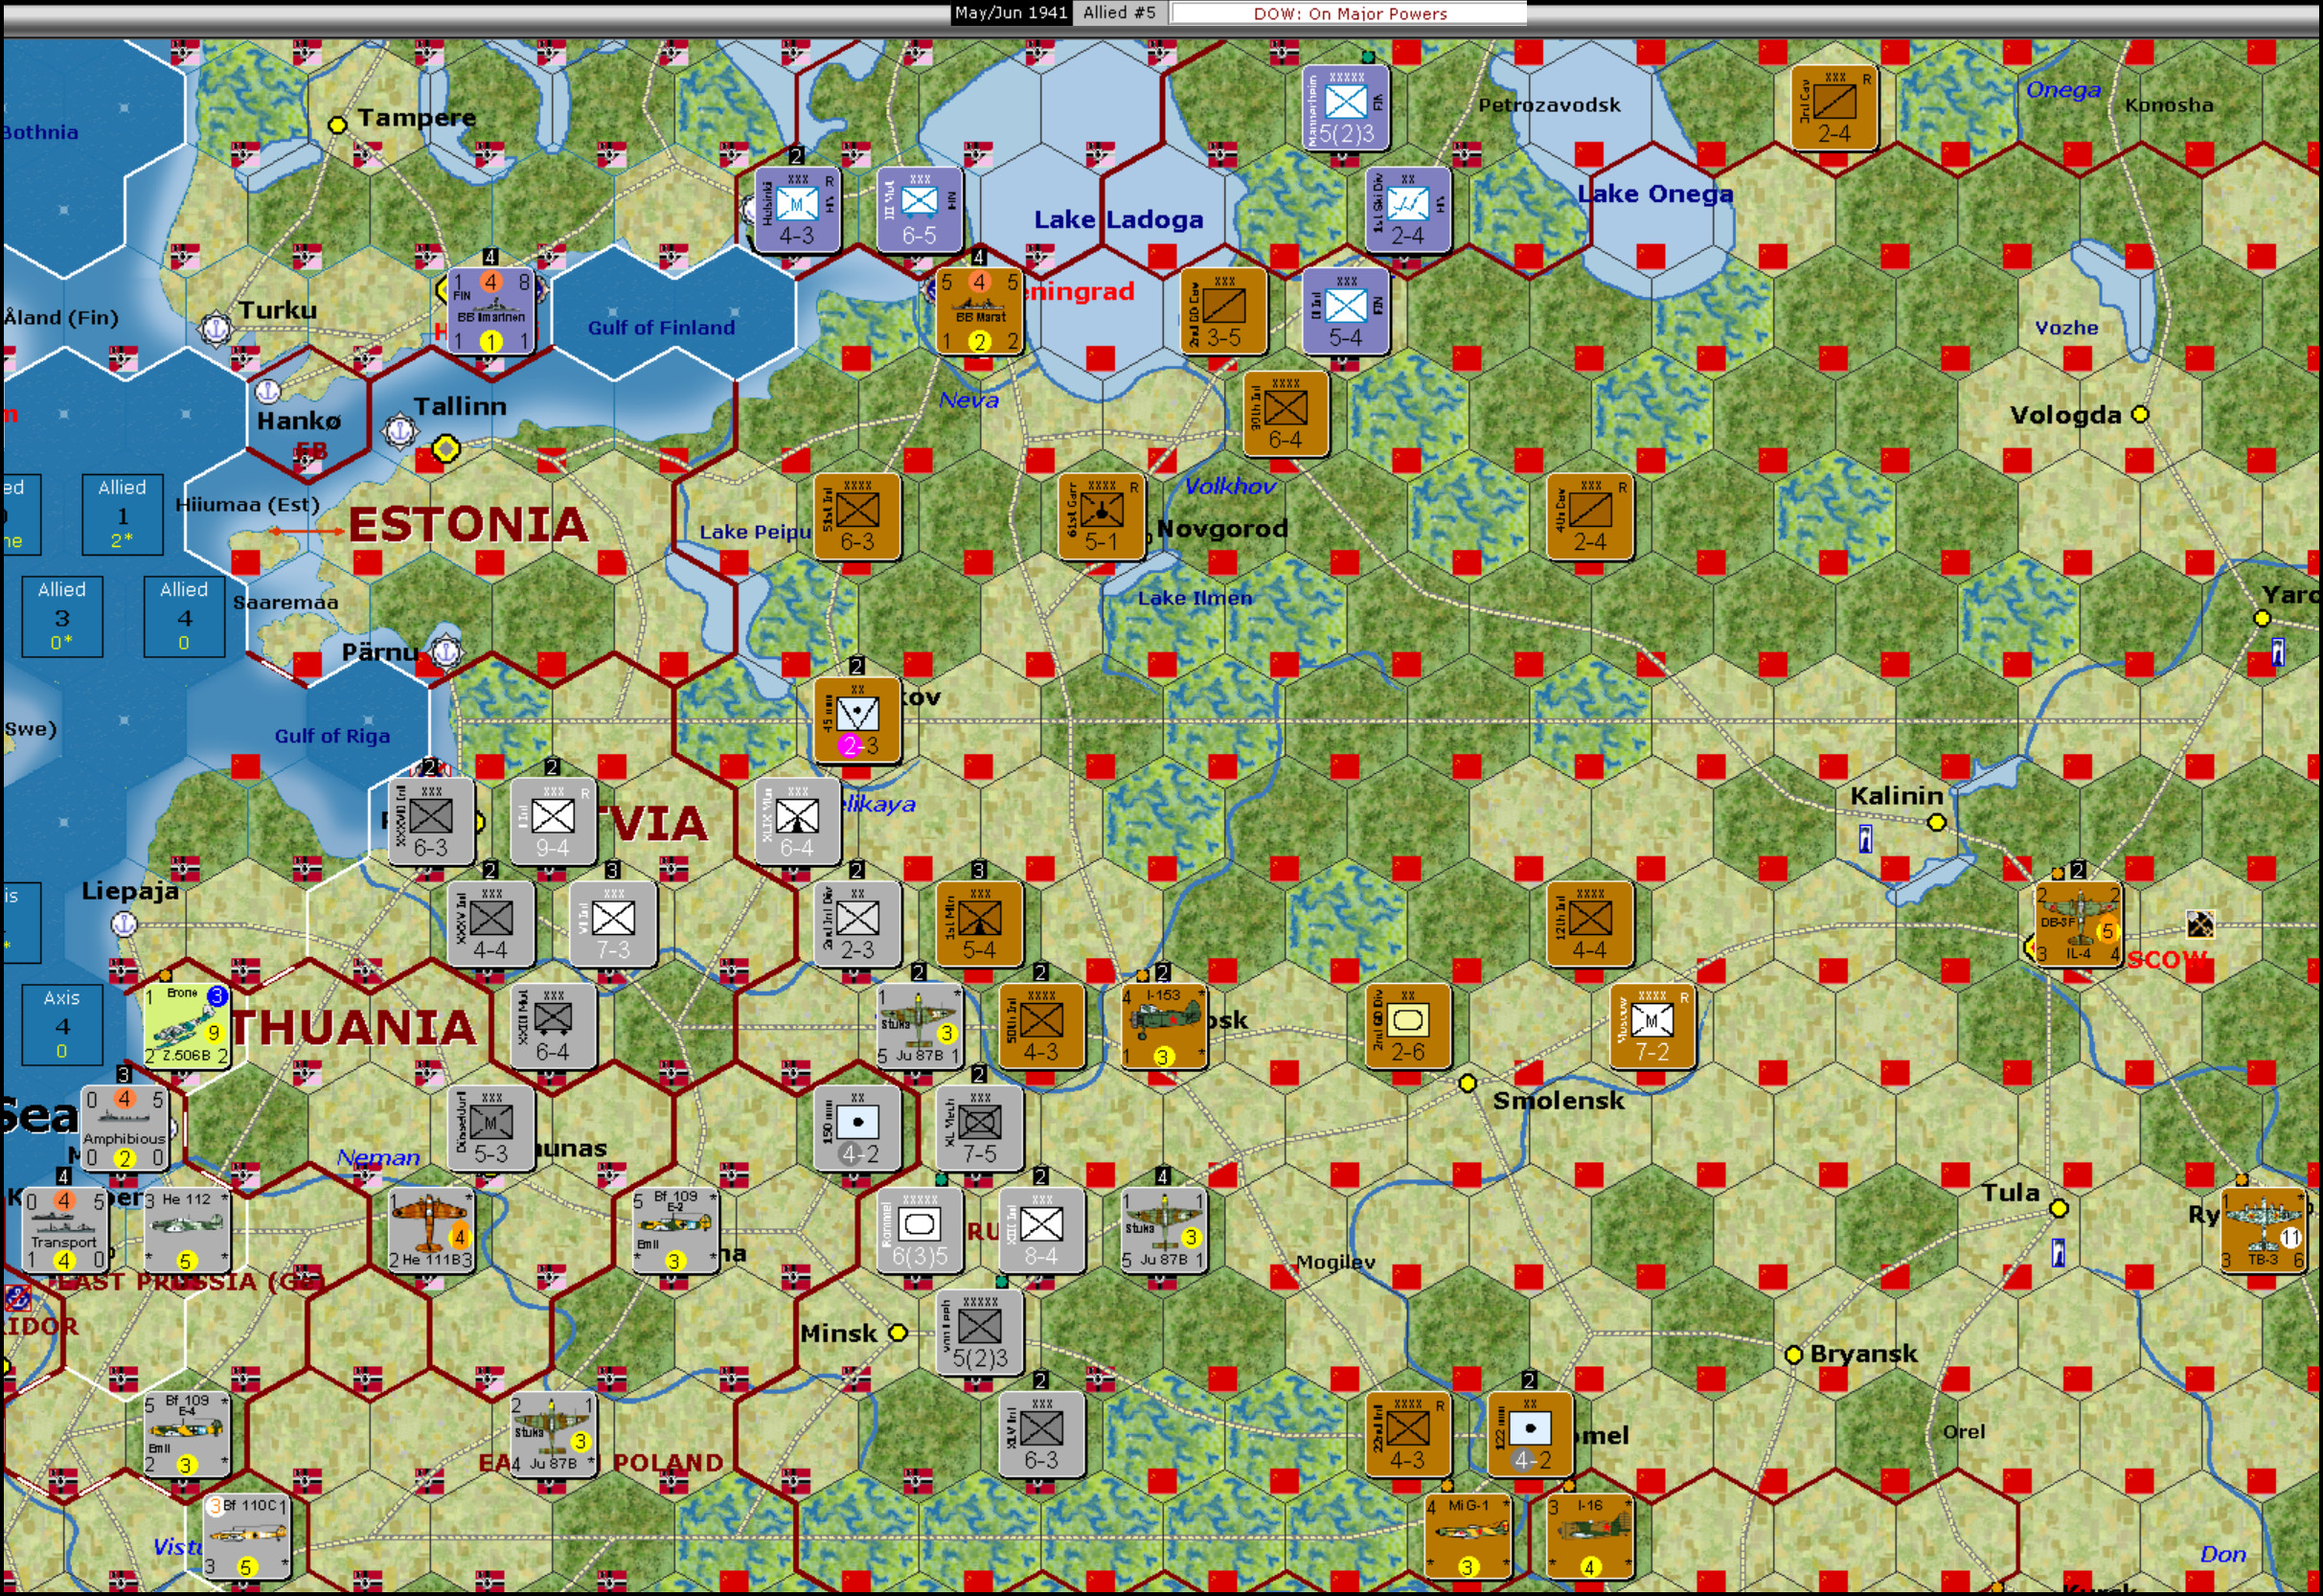
Continuing the narrative of what happened in the north, Figure 7-3 shows the Allies to move in impulse #3. There is a strip of land to the west of Riga (at the time, G said he was aware of this; but now he is not sure if he was) which let the German units avoid the ZOC of the Russian corps and move into Riga from the hex to its west. Like Kaunas, Riga is the capital of a minor country and gaining control of it by the end of the turn will liberate those countries. Tallinn is the third of the Baltic States and Germany hopes to capture that this turn, completing the liberation of the set of three: Lithuania, Latvia, and Estonia. They will then be aligned to Germany and their capitals will act as secondary supply sources for German units (but not Italian or Finns). The successful assault on Vilna was the only other attack that Germany made in the previous impulse. Now the Russians intend to pull back farther.
Which they did, as shown in Figure 7-4: Axis to move, impulse #4. The 5-1 garrison unit next to Riga was out of supply (small yellow circle above the unit), cut off by German ZOCs. If it had moved, it would have become disorganized, still been out of supply, and had its defensive combat strength reduced to 1. Remaining where it was left it at full strength. However, it will be destroyed by units crossing to the far side of the Dvina, so their combat factors won’t be halved when they attack.
G has chosen to evacuate Minsk - not something I would have done. This was in keeping with his main goal in the north to lose as few units as possible. Any left in Minsk would have died. Two Stukas were present to perform either ground strikes or ground support with fighter protection from the Bf 109 E2. As it is, those bombers now have no one to hurt this impulse. Instead, Germany took on the 2 Russian corps in the forest hex due south of Vitebsk - without air support. There were only two hexes adjacent from which to launch that attack and though it was a blitz attack, no DRM modifiers applied. Those are only given to the attacker for blitzing a clear terrain hex which doesn’t contain a city.
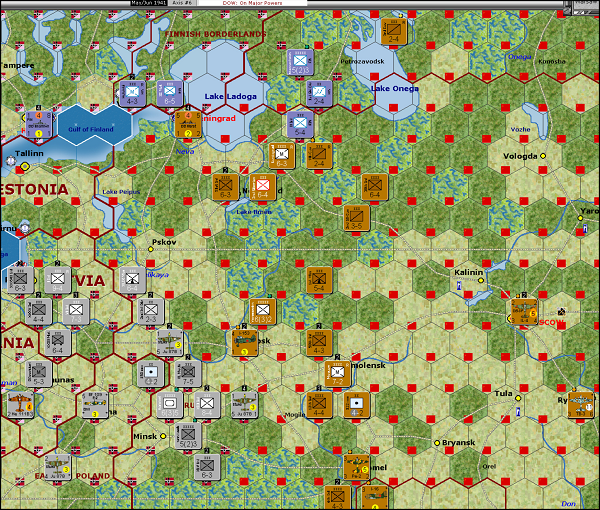
Onward, ever onward, to the rear. That is the USSR marching song at the beginning of the war against Germany. See Figure 7-5, Allies to move. Danger! the Stukas have rebased farther forward. Luckily for the USSR the attack in the forest south of Vitebsk had a mediocre poor result for the Axis. A German SS mechanized division was lost and half of the other attacking units became disorganized. The Russians lost both defenders from the map, but they were merely shattered and magically reappeared as reinforcements in the next turn. The Germans should have brought wooden stakes to drive through the Russian hearts. Or used silver bullets. I’m not sure which would have worked best in this case. Despite that quasi success, the Russians have oodles of problems. Germany has units across the Dvina in force. At the moment the way across the upper Dnieper (through Mogilev) is wide open. Even Smolensk, a key city for the Russian defensive line, is vulnerable to the advancing Germans.

In Figure 7-6 you can see how the USSR rebuilt the front line in front of Smolensk and behind the upper Dnieper. A volunteer stepped forward to hold Vitebsk, but Pskov was deserted en masse in favor of holding Novgorod. Between those two cities swamp hexes prevent the Germans from moving through the line. Swamp hexes disorganize all units that enter them except cavalry that have a 5 movement point allowance. Well, that’s not always true. In Snow weather, swamps are transformed into the equivalent of forest hexes. Then leg infantry can move freely through them at a cost of 1 movement point. That’s something to keep in mind when the weather gets cold. All the Germans can do here is occupy the two empty city hexes and overwhelmingly attack Vitebsk. Many of their units can’t even reach hexes adjacent to any Russians.
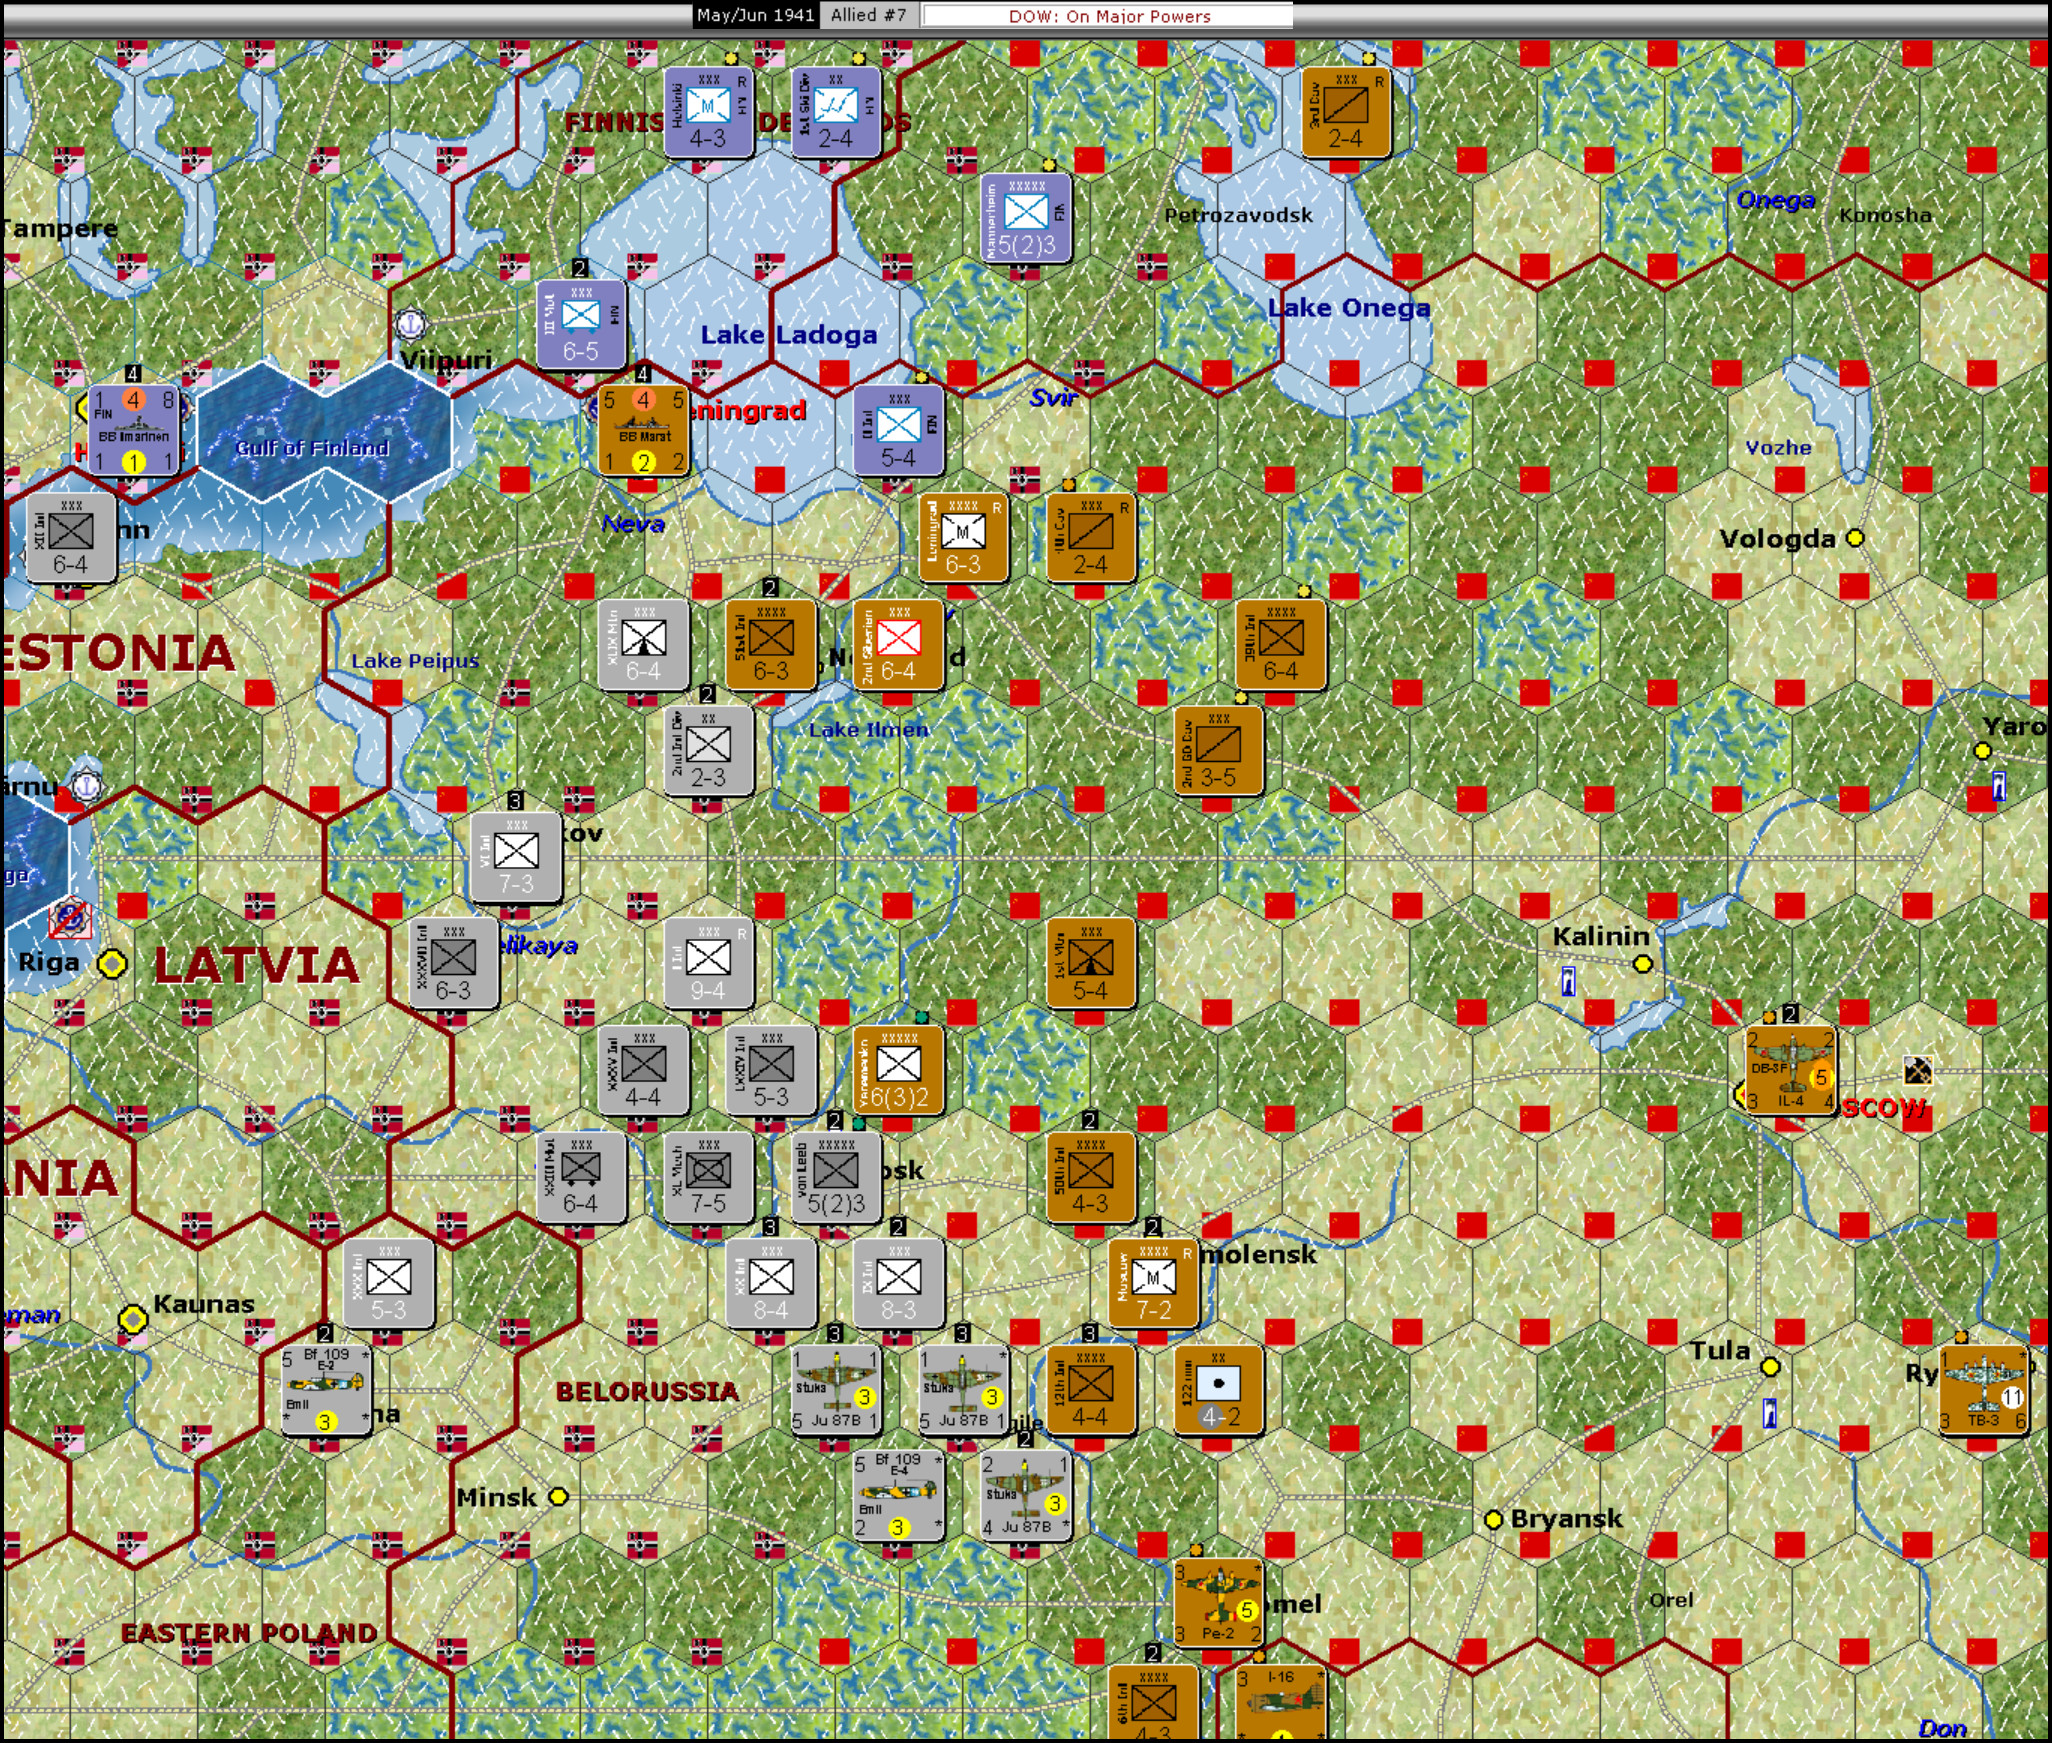
At last the weather roll was something other than Fine in both the Arctic and Northern Temperate weather zones. Figure 7-7 shows the USSR deciding to move in the 7th impulse of the turn. Snow doesn’t hinder movement of land units but is does have a major impact on land combat: -4 DRM. Leningrad has become vulnerable to attack. The lake hexes have frozen and are treated as if they were clear hexes (although the attack factors of units in frozen lake hexes are halved). While Snow will give the defender in Leningrad a -4 DRM, it also gives each attacking German mountain and Finnish unit a +1 DRM. There are 8 of those units available to attack Leningrad. Von Bock is just south of Novgorod and can not only join in the attack on Leningrad, he can also maneuver close enough to Mannerheim to put that HQ in supply too.
Vitebsk has fallen and the Germans see an empty hex across the Dnieper. Gomel is also vacant. How to rearrange his defenders is a difficult decision for G. But it didn’t matter all that much because G had all the Allied major powers except the USSR choose Pass Actions. That increased the probability of the turn ending from 10% to 20% and the gods of the dice smiled upon the Allies, ending the turn.
G says: It is important for the Allies to plan on pass actions, except Russia, during the summer of 1941. The Axis should strive to move on the other fronts to force the Russian allies to not pass. Here the Allies took the opportunity this turn and it worked.
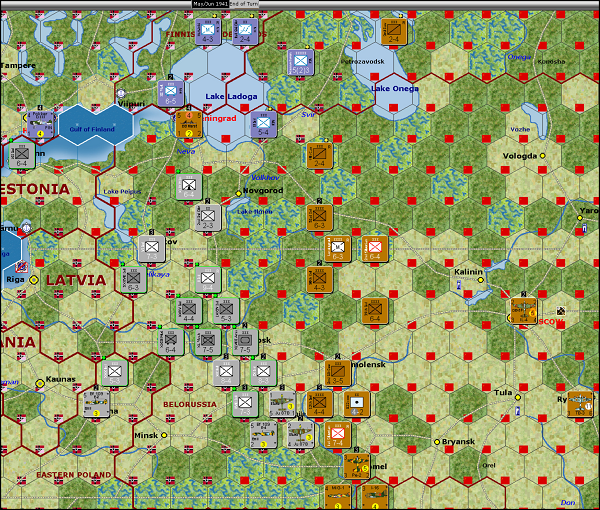
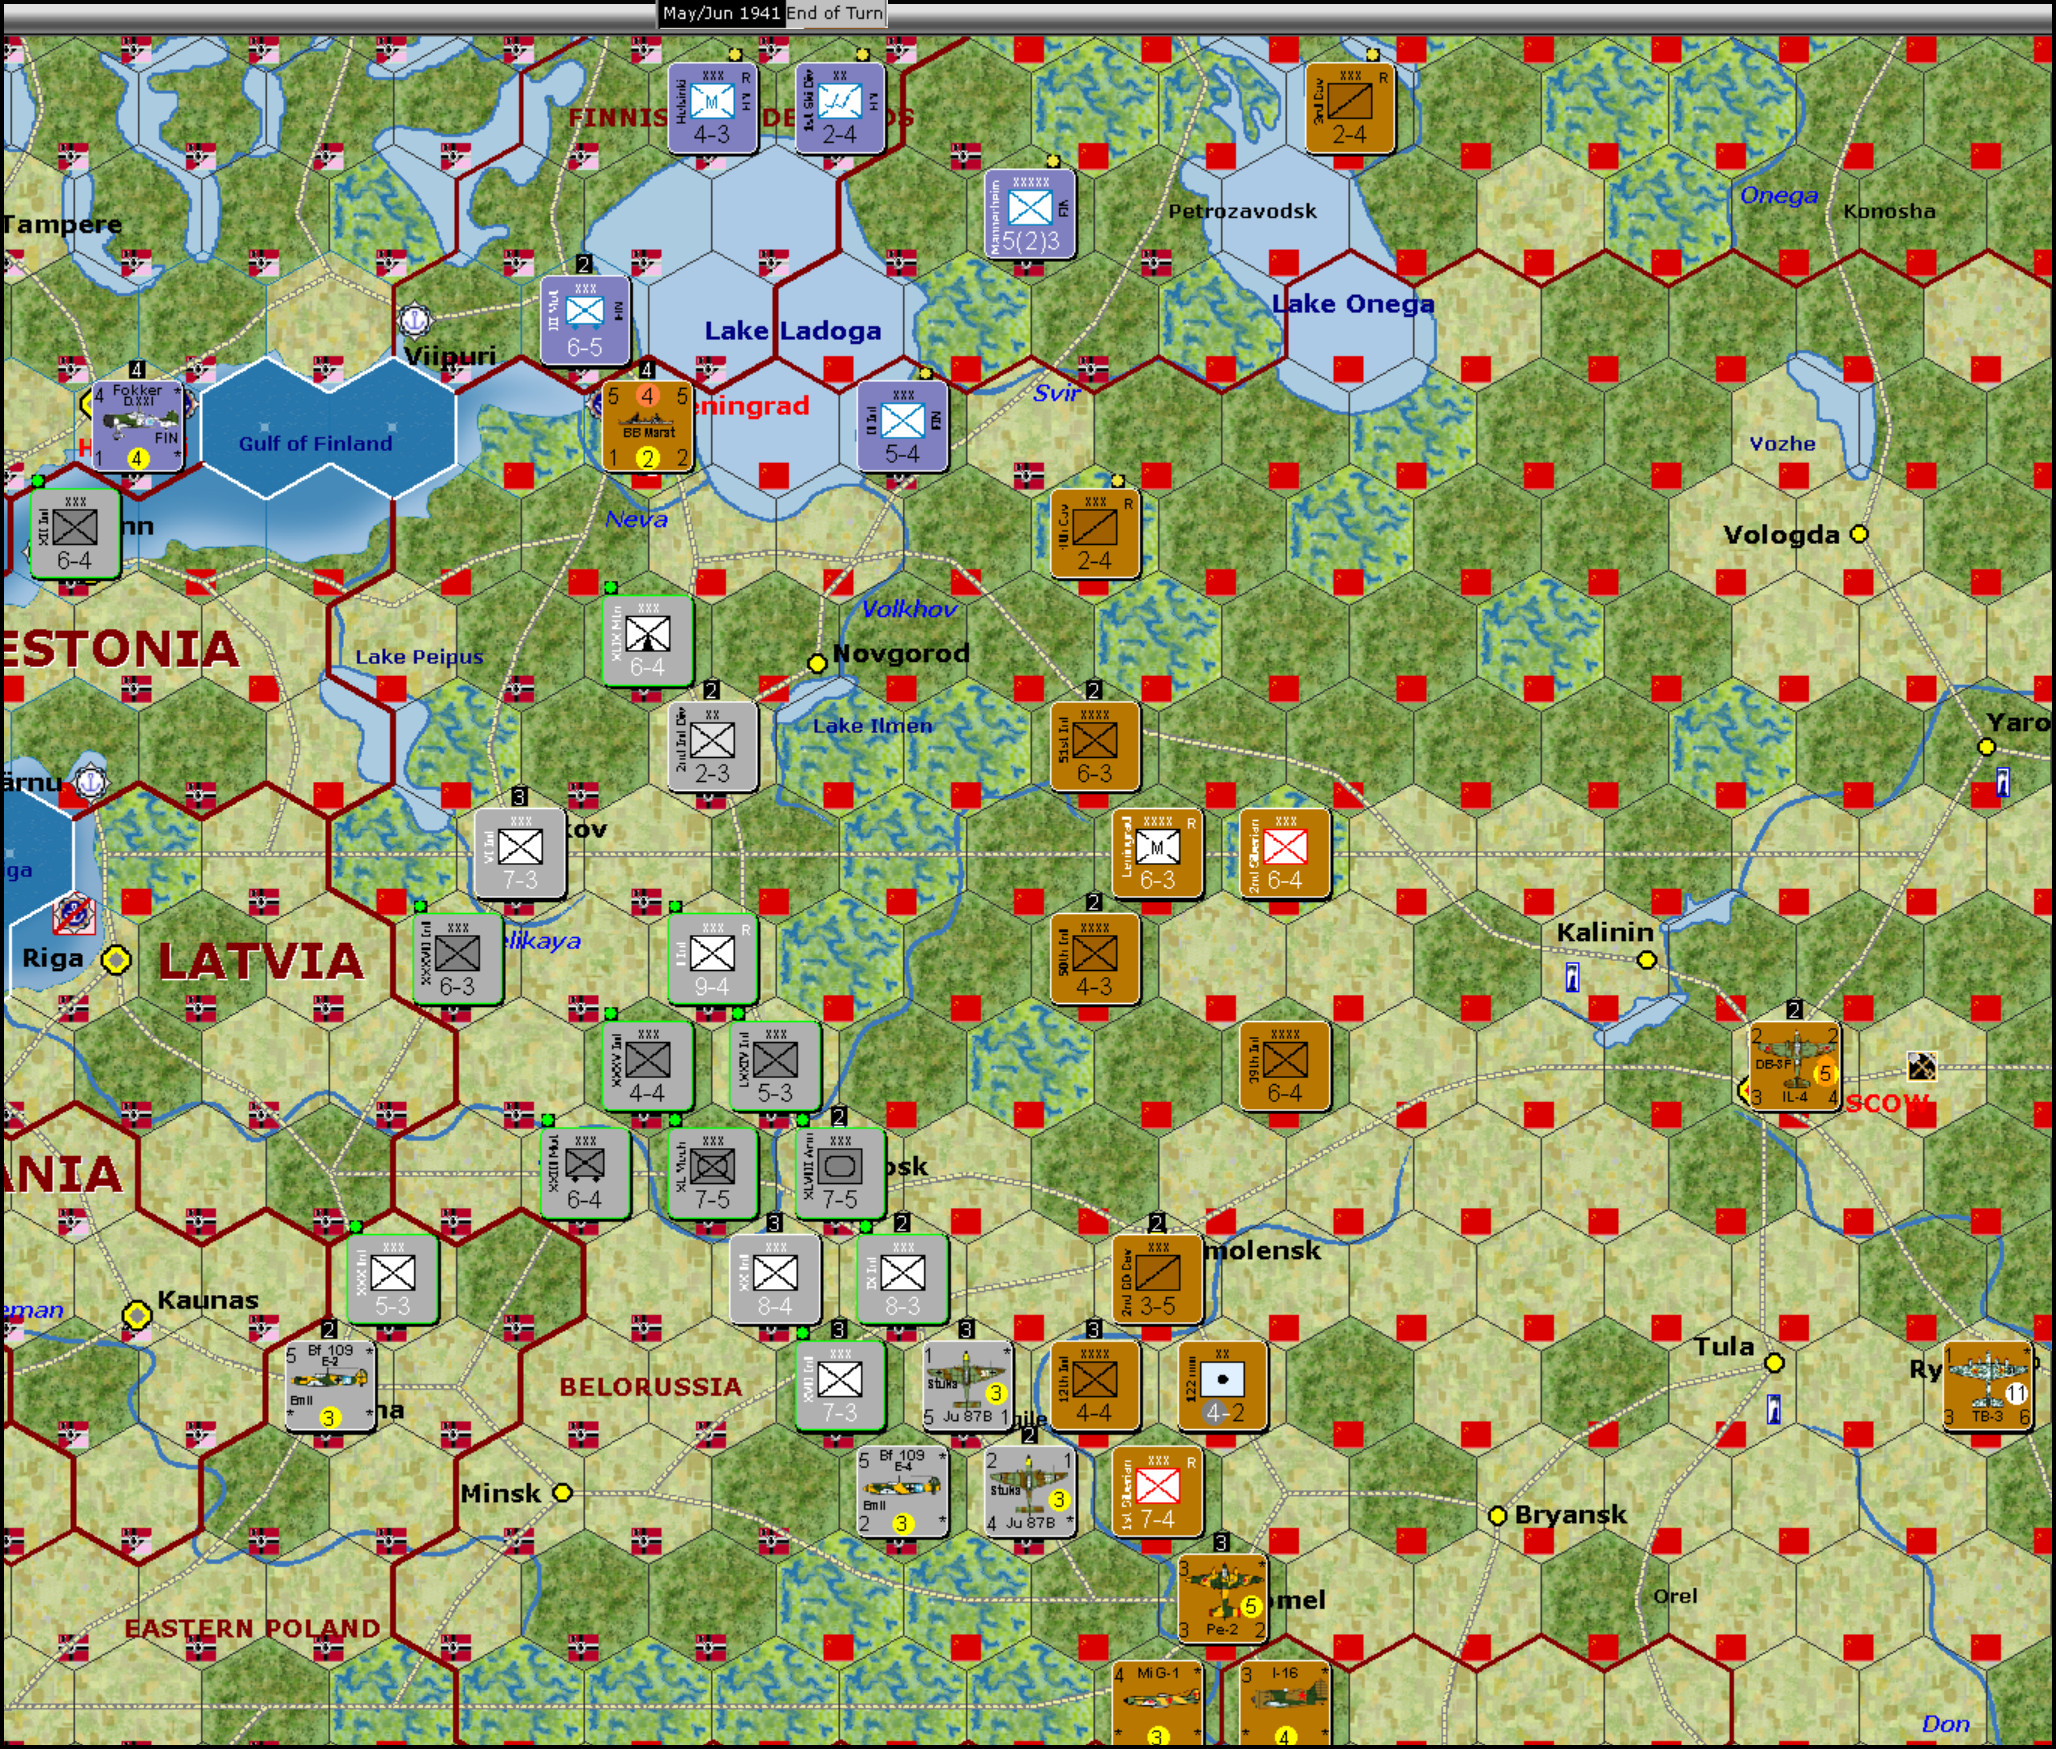
Figure 7-8 shows the position in the north at the end of turn May/June 1941. I have turned off the
weather overlays to make the screenshot easier to understand. The USSR has abandoned Novgorod. Leningrad will get a corps reinforcement, which will return it to its normal impregnable status over the coming summer turn (July/Aug 1941). The rest of the Russian line in the north looks pretty solid, especially after some reinforcements arrive in the cities immediately to the rear. In the north the USSR has survived the first summer turn of 1941 in good shape, even if the Axis moves first in the next turn.
The South May/June 1941
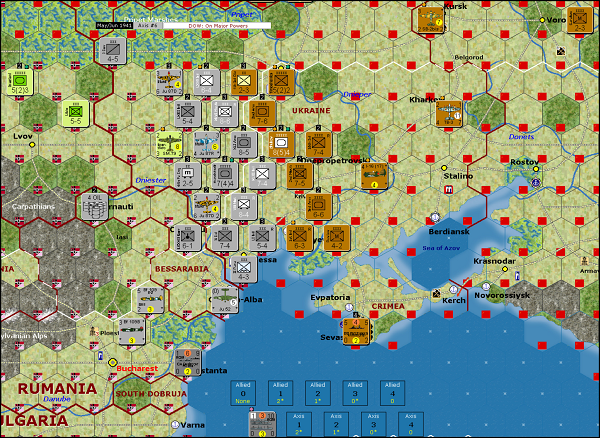
So what about the Ukraine? In Figure 7-9 we turn back the clock to the second impulse of May/June 1941 with the Axis to move. What a pretty line the Russians have formed! The Russian fighter alone in the hex adjacent to the Black Sea is invulnerable presently. The hexside to its west is an impassable all-sea hexside so any German units wanting to reach the fighter’s hex will be stopped by the ZOC of the mechanized corps to its north. Similarly, a swamp hex prevented the Germans from moving into the forest hex in the north, near Kiev. Basically, the Germans could occupy only the 5 clear hexes adjacent to the Russian front line.
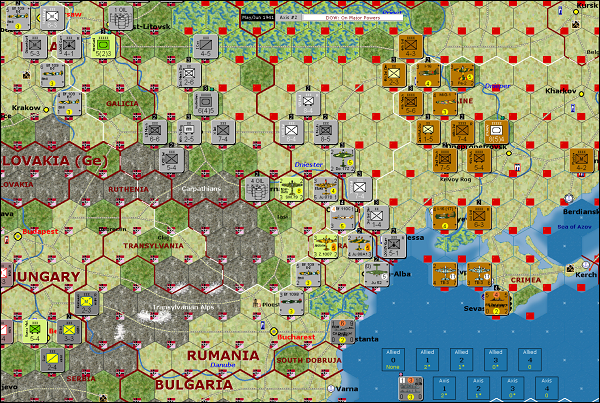
The air force, on the other hand, was free to bomb the numerous Russians within range, if they were willing to risk being shot down by the Russian fighters. They weren’t. [G: Very important to pull Russians out of bomber range and/or out of Axis fighter cover. The one weakness the Axis have is the limited number of air actions during an impulse: only 4 with a Land action.] Germany wants friendly fighter cover for its bombers whenever possible. To do so, they needed to rebase fighters farther forward, which couldn’t happen until the end of the impulse.
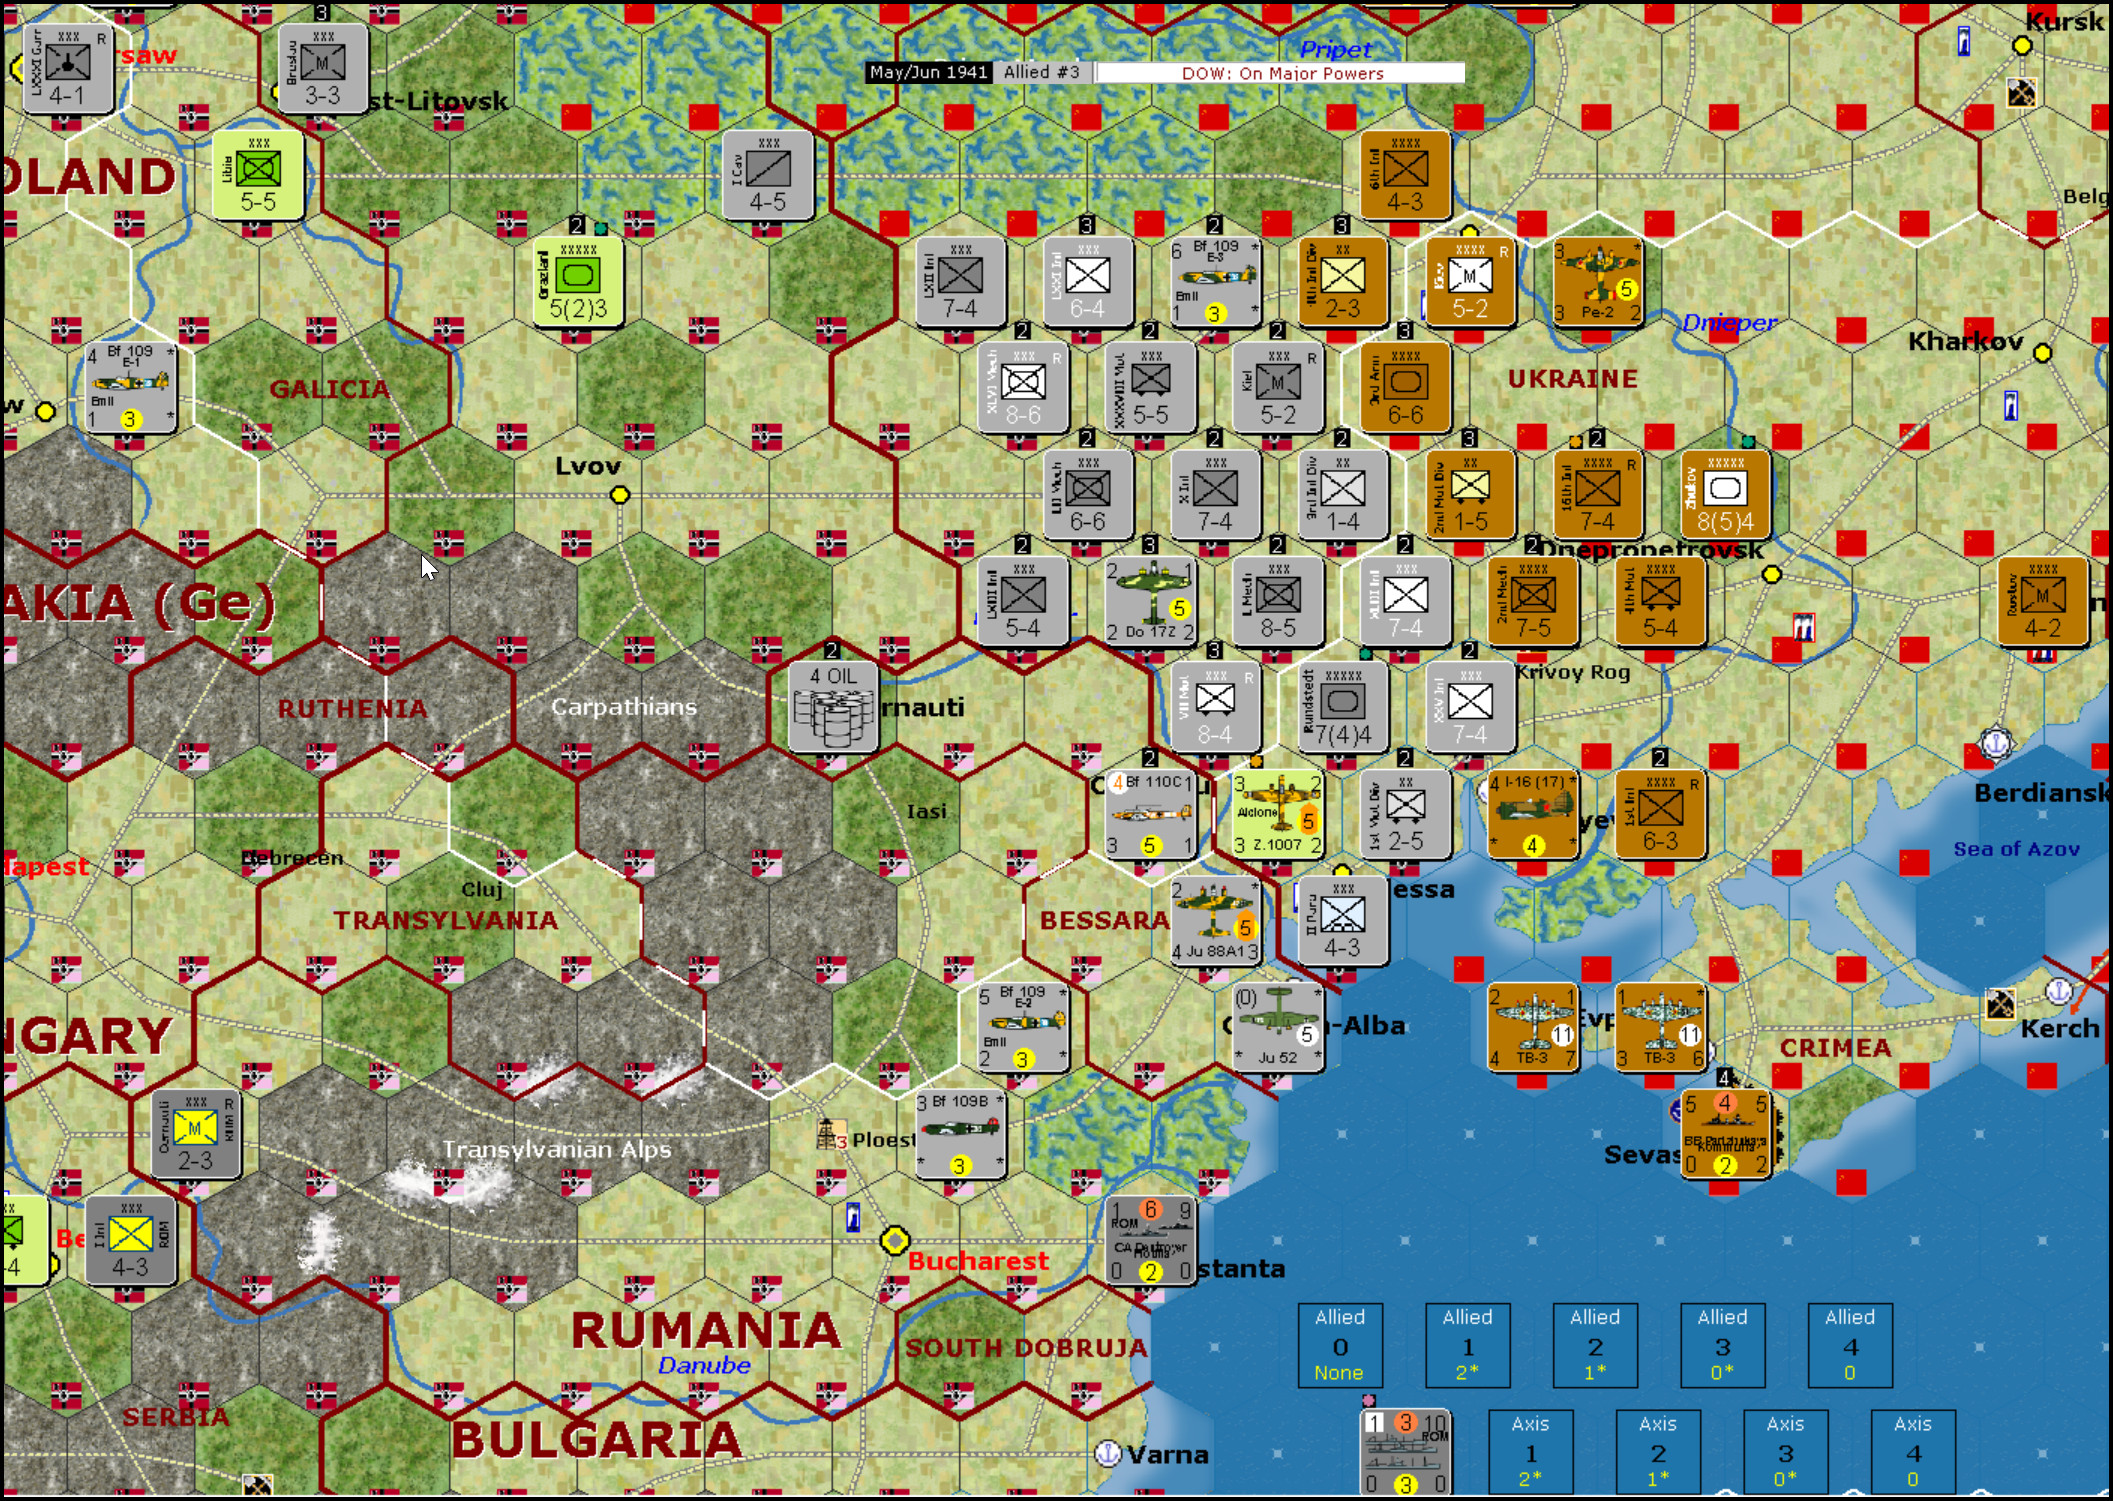
So the Germans advanced up to the Russian line and loudly rev’ed the motors of their armor units to intimidate the Russians. See Figure 7-10. An argument could be made that my move here was a mistake. I agree that placing a 7-6 mechanized unit in the top right hex with only the 6 factor fighter to keep it company was unwise. But creating the other weak hexes in the front line, pure infantry, was intentional. Why this intentional weakness? I didn’t want the Russians pulling back behind the Dnieper. They could have formed a sound defensive line where all the German units would have been forced to make assault attacks or be halved for attacking across the river. I was seriously considering having to use the offensive chit to double the attack factors of 8 units to force a breech in the Soviet defensive line if it looked solid behind the Dnieper. There were also all the Russian bombers and fighters still available for the Russian defense.

G saw an opportunity to attack and did so with a vengeance. He used his offensive chit on Zhukov to double the attack factors of 10 units and threw all his armor and mechanized units against the German infantry. That gave him 3 good attacks: (1) on the 7-6 mechanized at the top of the line, (2) on the hex with the 1-4 German infantry unit, and (3) on the hex containing the 7-4 German infantry corps at the point of the German front line. The combat die roll results were, respectively: excellent, awful, and good. [G: I would normally not have done it, but with Russian losses so minor up to this point I took the chance. It was not a good decision.]
Not only did the 7-6 mechanized get vaporized, a wonderful Stuka, that was sent as ground support, was destroyed (with its pilot) in the preceding air-to-air combat, thereby eliminating ground support for the doomed German mechanized corps. In the middle attack, disaster for G. I think the die roll was a 4 on the 2D10 table. In any event, the Germans only lost the divisional unit and the other defender was unaffected. But all the attacking Russian units became disorganized. That included Zhukov. If Zhukov had remained organized, he would have reorganized 10 of the Russian units - a benefit of the expended offensive chit. Without him, the Russian line was vastly weaker: easy to attack and unable to move or counterattack later in the turn. [G: This was a very bad result with consequences for the future.] The attack on the bottom hex was mostly successful for the Russians, forcing the Germans to retreat and leaving only half the attackers disorganized.
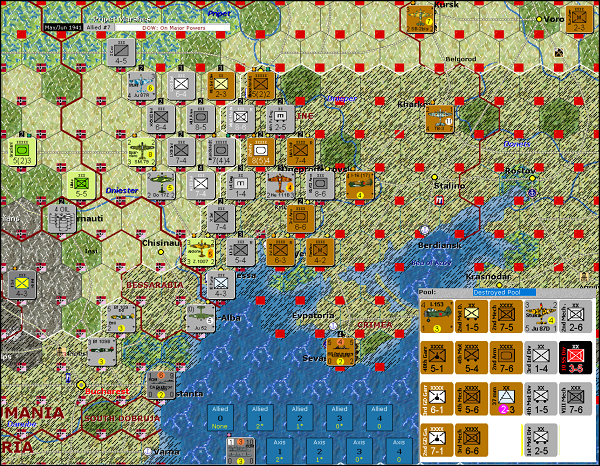
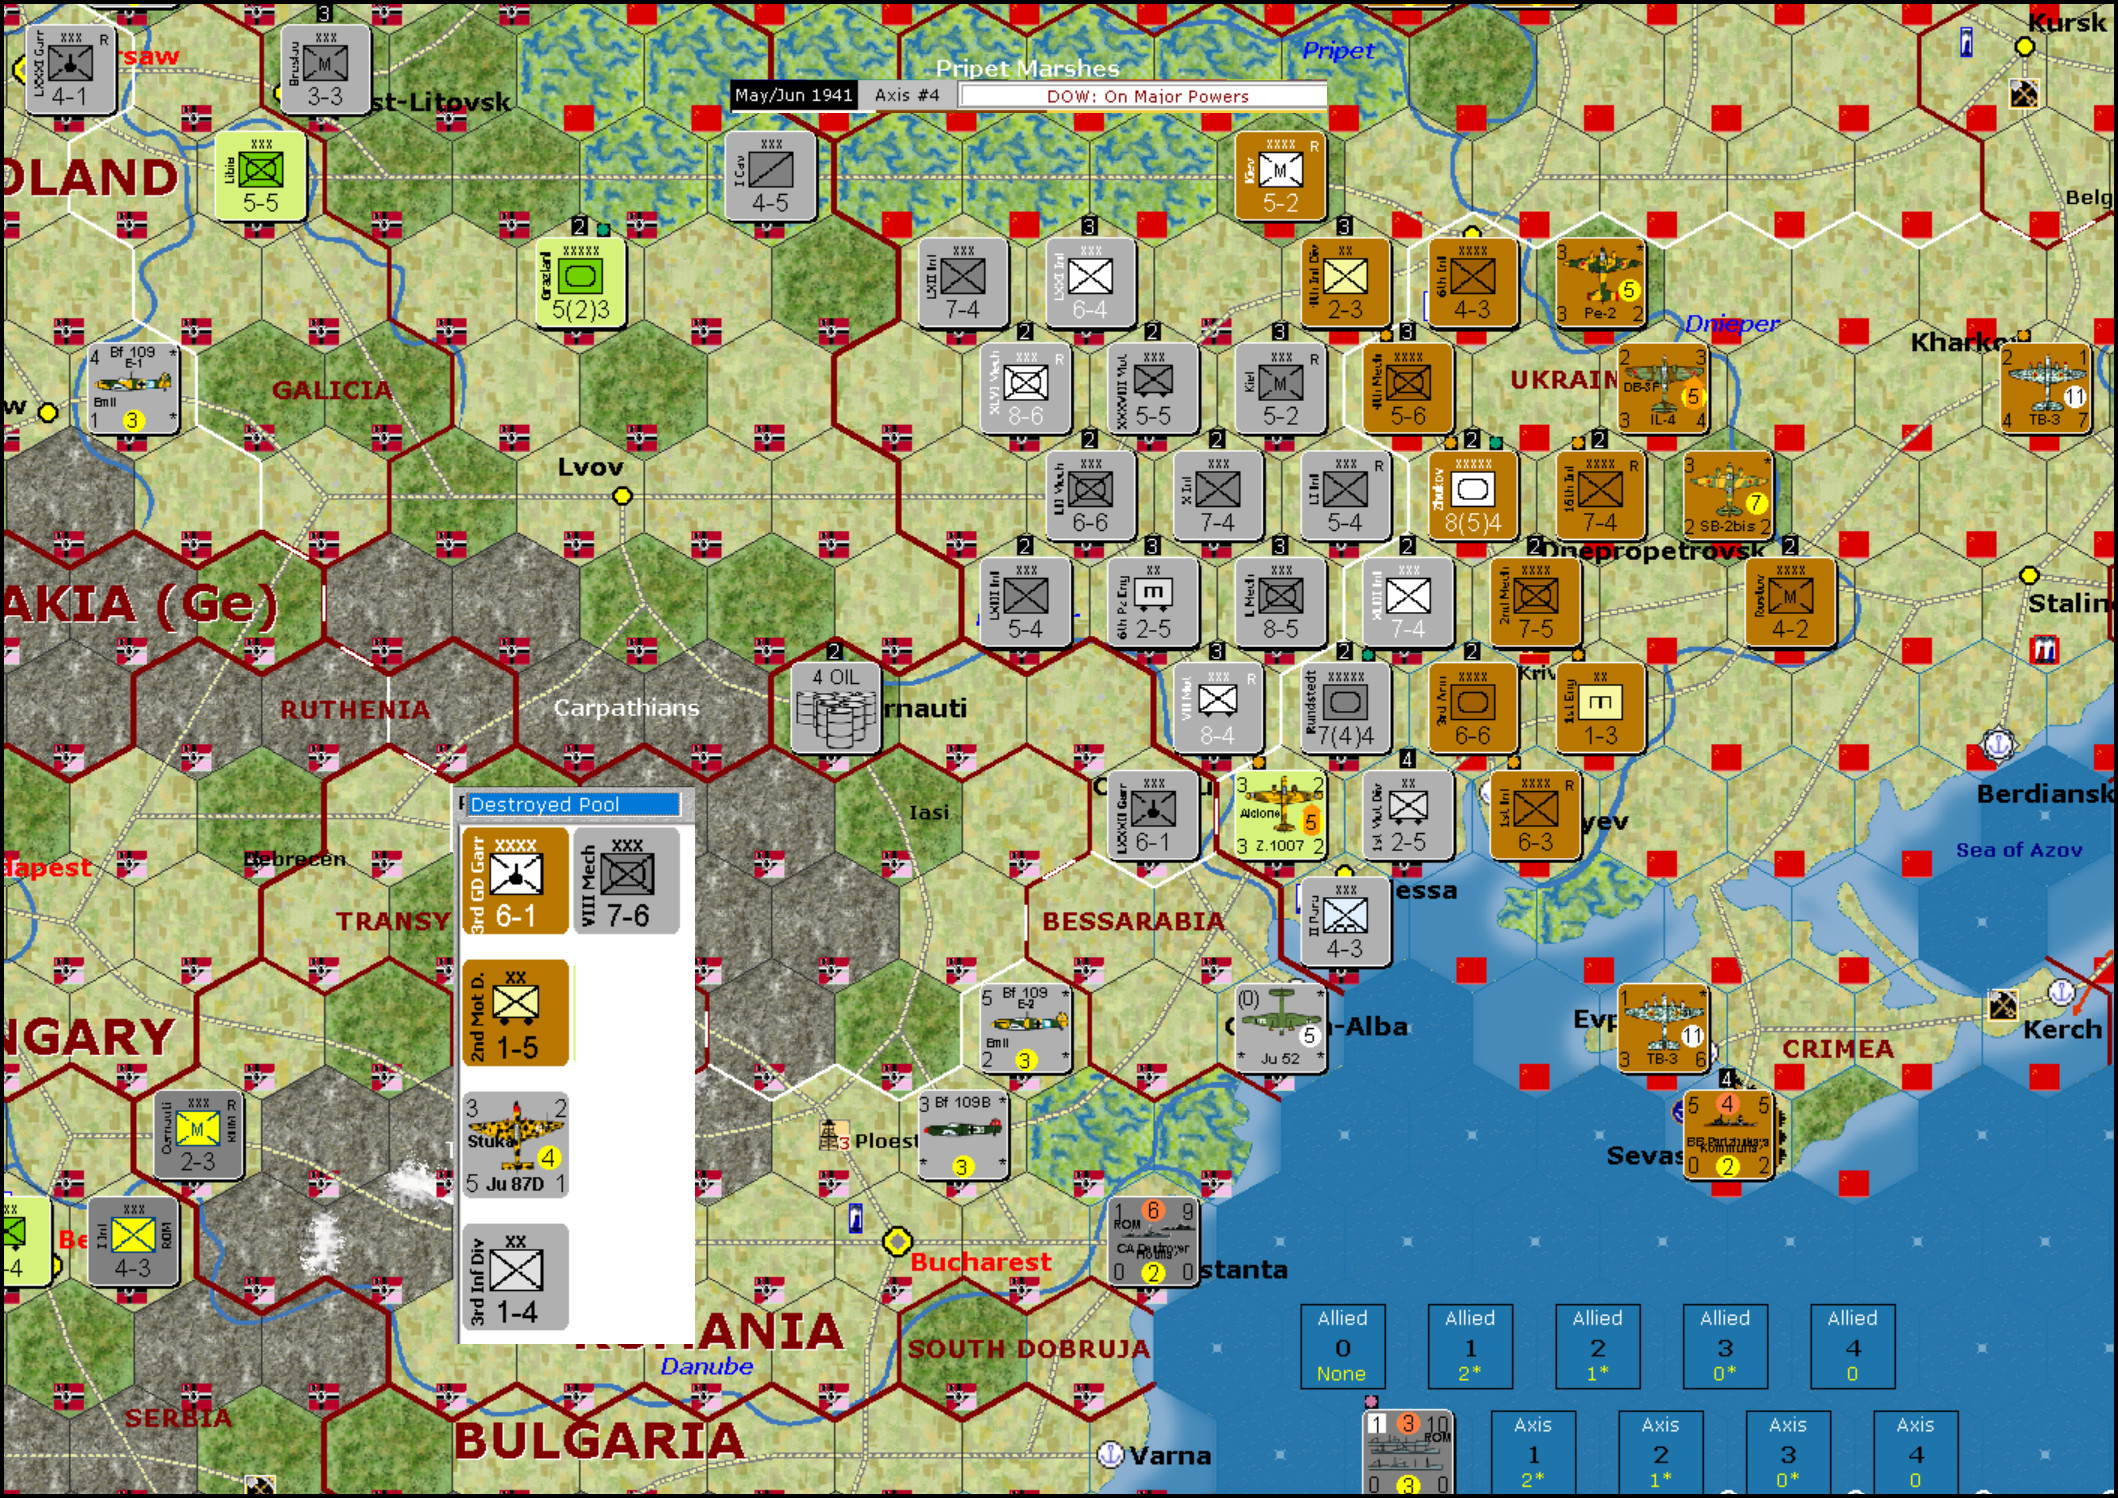
Figure 7-11 shows impulse #4, with the Axis to move. The insert shows the losses at that point. The USSR 6-1 garrison was destroyed in the north. Licking my wounds, I chose to attack the hex with the 5-6 mechanized unit. All 3 defending units were disorganized, giving me a +5 DRM. I could also get enough armor on the hex to force it to be a Blitz attack and gain some more +DRM from the attacking armor and mechanized units. Taking a crazy chance on rolling well, I made a second attack on the 5-2 militia unit alone in the forest hex. That was also a blitz attack but no die roll modifiers applied.
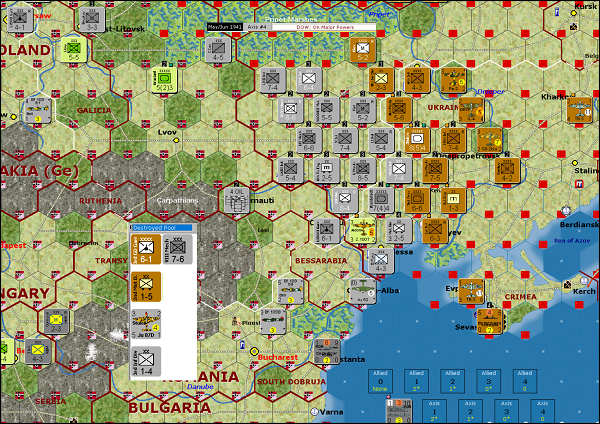
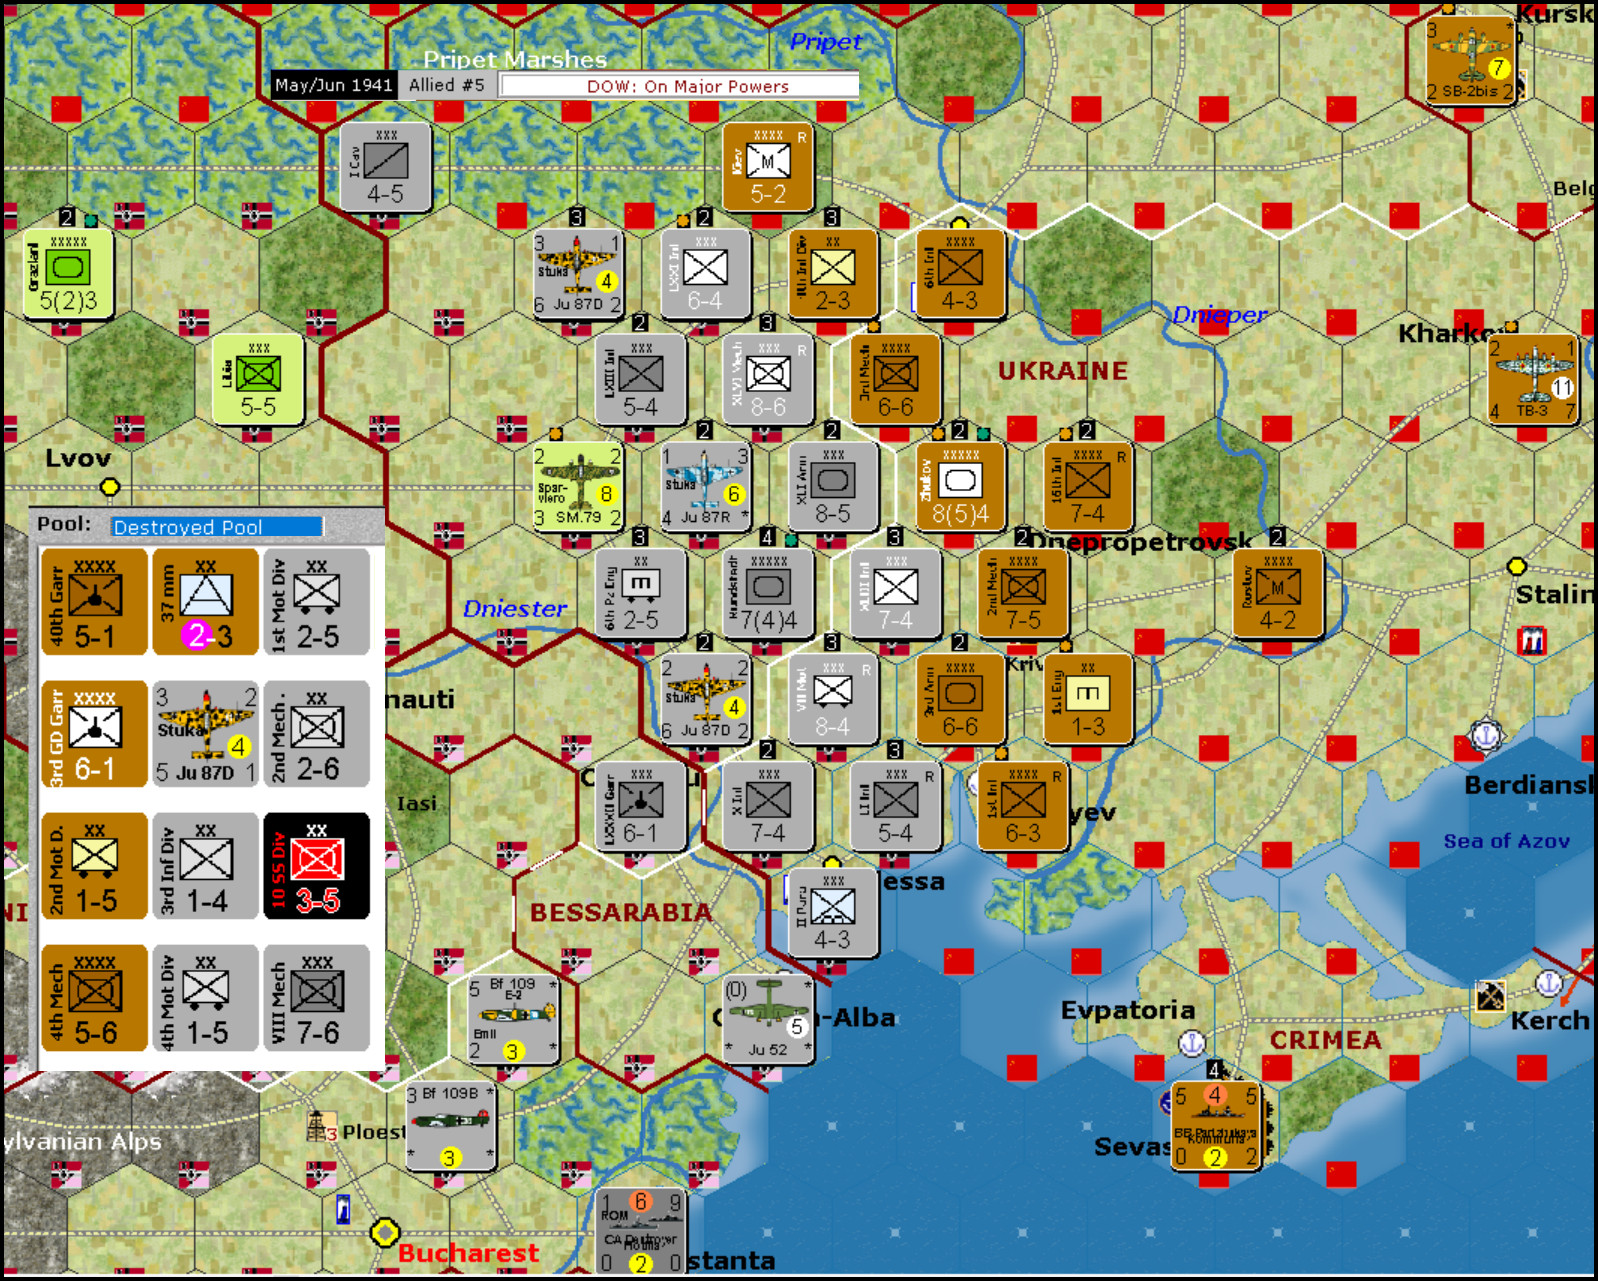
The attack on the militia failed, costing the Germans the maximum casualties: one motorized division and two disorganized corps. The USSR did fly a bomber to provide ground support, so at least that was a partial gain for the Axis (all air units that fly combat missions are disorganized immediately thereafter). The result of the attack on the Russian mechanized unit (and friends) also wasn’t very good. Germany lost two divisions: another motorized and a mechanized. In recompense, two Russian units were destroyed: an AA division and the 5-6 mechanized. The hex remained Russian controlled. Figure 7-12 shows the position with the Allies to move. The insert list of destroyed units includes the 3-5 SS mechanized division which had just died in the north. All the other German losses were in the south. Not visible here is that Guderian was voluntarily disorganized in order to reorganize the 4 German armor and mechanized corps in the front line that had just attacked.

Moving on to impulse 6, Axis to move, the Russians have pulled back one hex in the bottom of their line. See Figure 7-13. They have added a 7-6 armor corps to join the disorganized 6-6 mechanized corps north of Zhukov. I decided on two attacks here, against the hexes on both sides of Zhukov. The goal was to surround him and attack him later from 4 hexsides. He was disorganized and not going anywhere. A couple of more Stuka reinforcements had rebased down from Konigsberg at the end of the previous Axis impulse, so there are 16 tactical factors available. At this point I believe all the Russian fighters have flown missions and are disorganized. The cavalry unit is continuing its slow, uneventful progress along the rail line through the swamp hexes in the top of this screenshot.
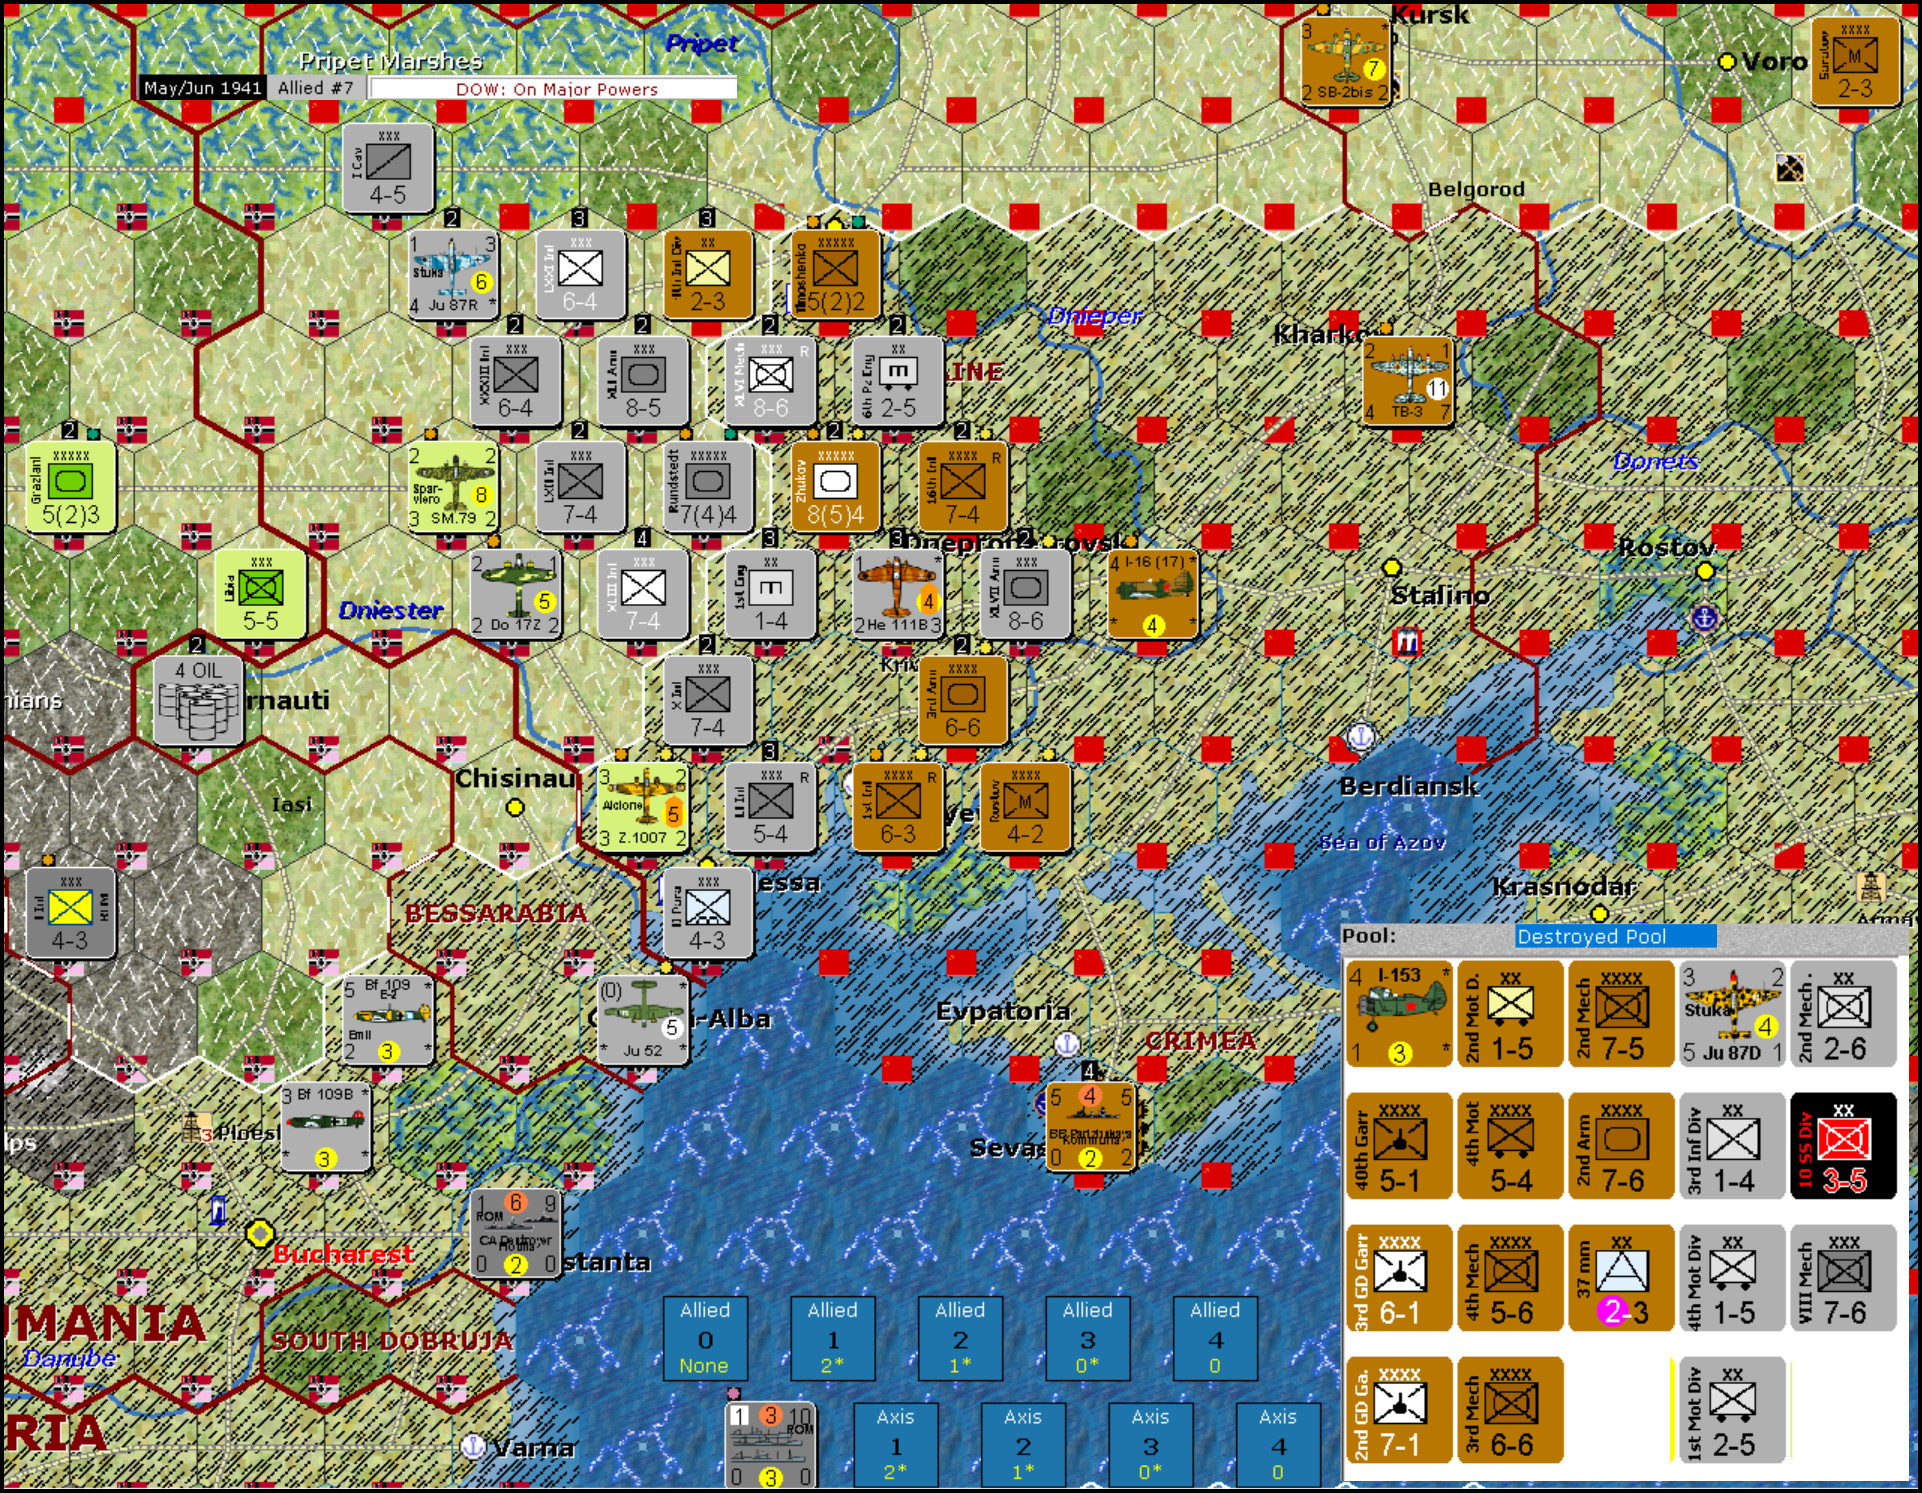
The attacks were very successful, as shown in Figure 7-14. Both of them achieved Blitz results and advanced two hexes eastward. Now the weather has turned very nasty, leaving the Germans next to Dnepropetrovsk out of supply (3 hexes away from Rundstedt). Zhukov and the hex next to him are both out of supply too. They would have been cut off by German ZOCs even if the weather had stayed Fine. At this point the Russian position in the south looks hopeless. But it’s not so terrible that ending the turn, bringing in reinforcements, and going first next turn can’t fix it. That is what happened. The body count for the two sides is shown in the lower right corner of the picture.
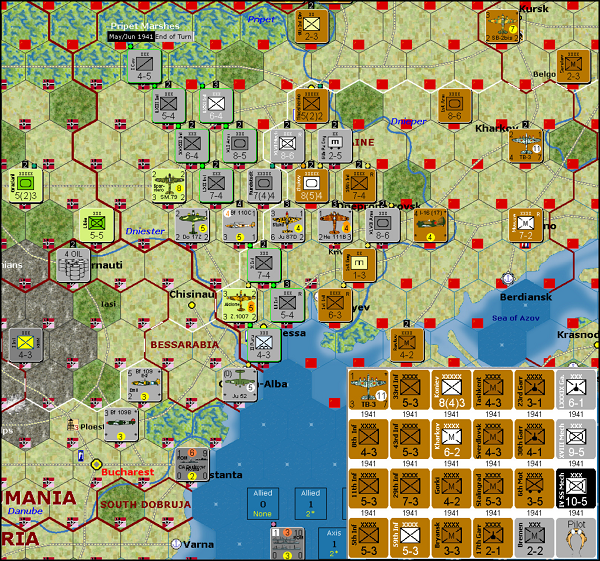
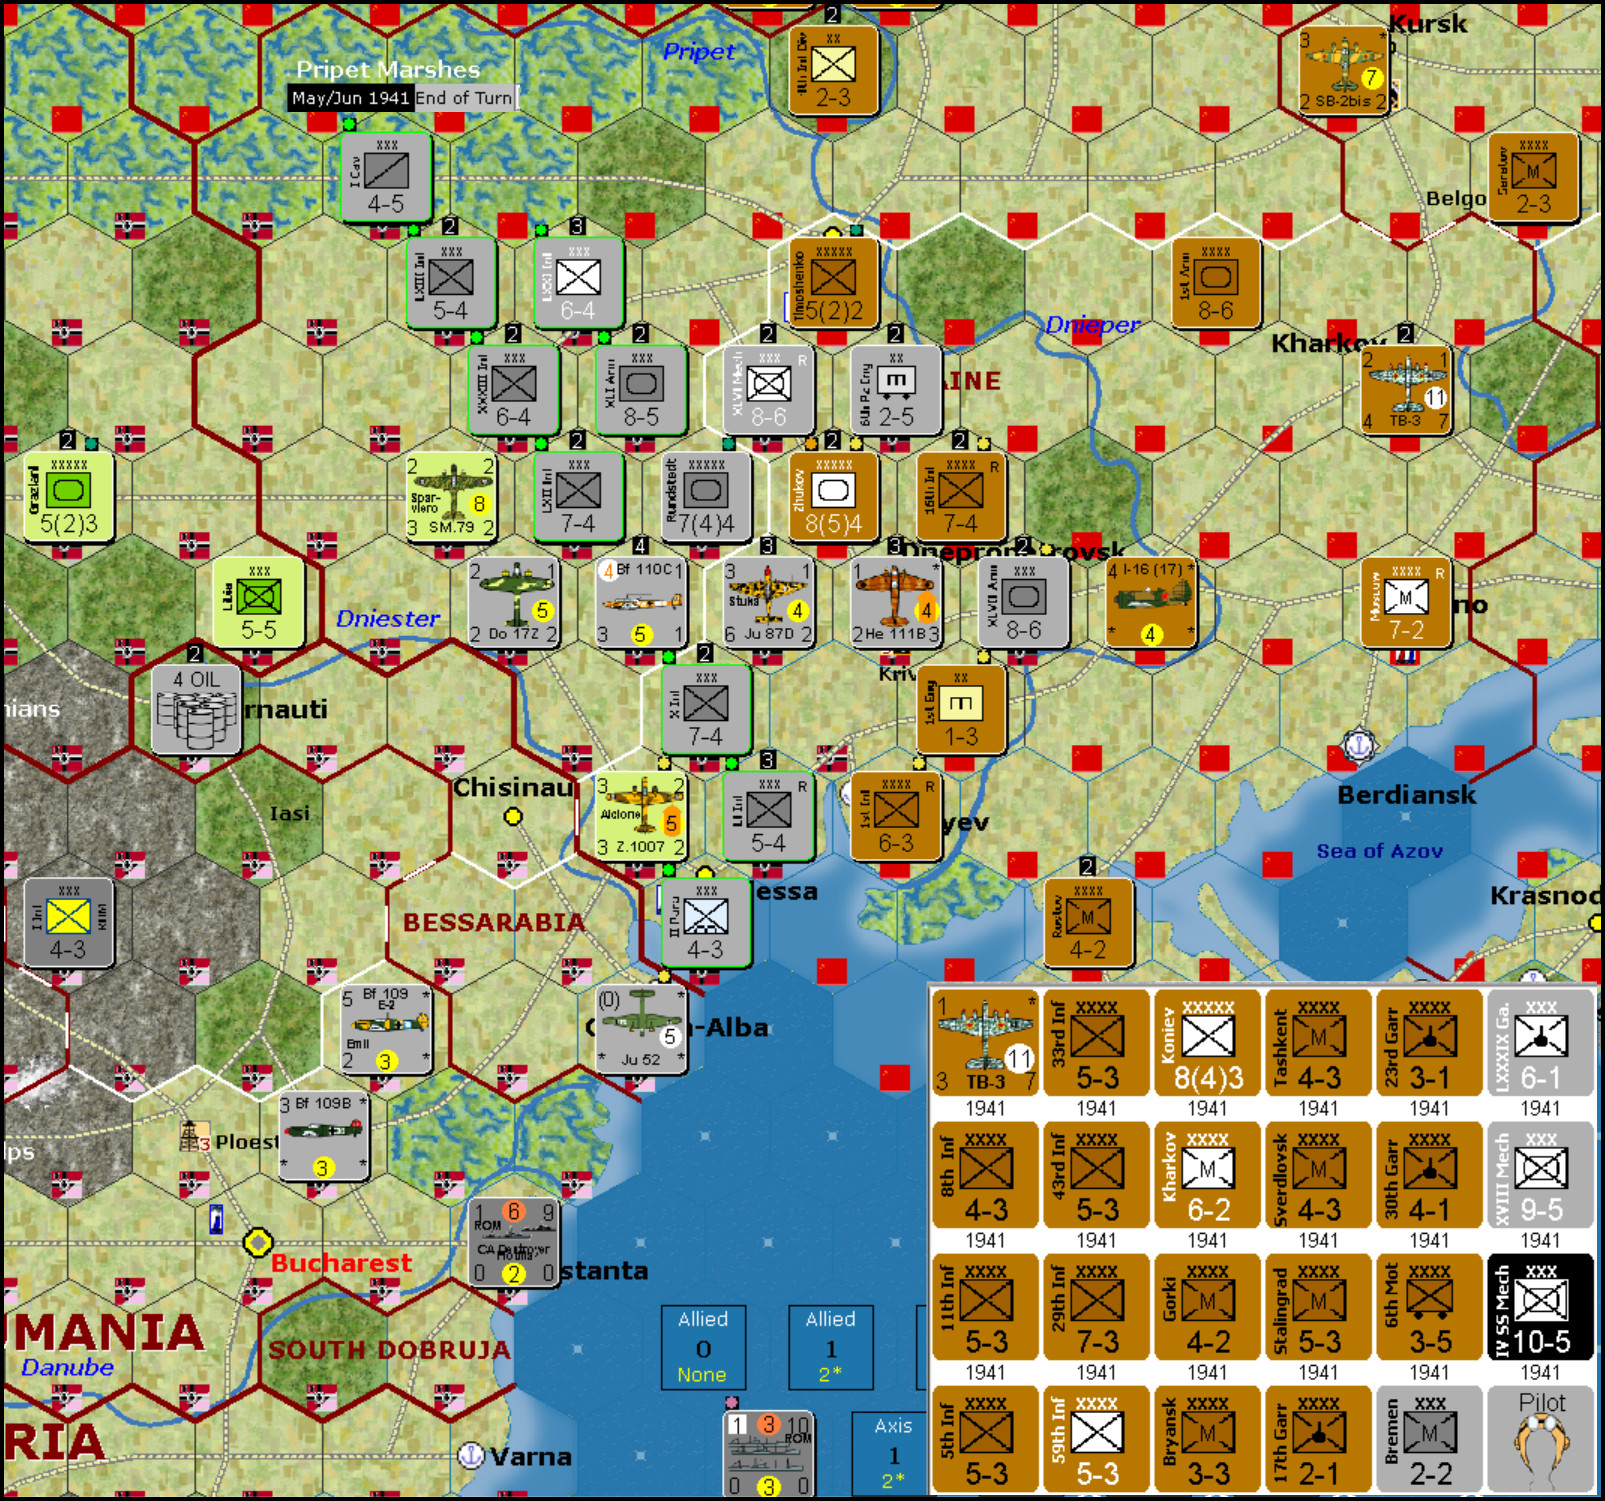
Concluding the account of the war in the south in May/June 1941, Figure 7-15 shows the ending position (the weather overlays have been turned off for clarity). The Russians have pulled back where they could and some units in the rear have moved towards the front. Ye gods! Look at the reinforcements the Russians are getting: 18 corps (inserted picture). Some of those are arriving because they were shattered in the previous turn. 6 of them are militia units that have just been built. Joining that mass are the units that G built in advance, knowing that they would be needed come July/Aug 1941. Oh well, at least Zhukov and the mechanized corps keeping him company will stay disorganized. They are cut off from reaching necessary oil resources by German ZOCs.
Conclusion
Germany killed off a lot of Russian units including very valuable armor and mechanized corps. They took some losses, but not very many. They advanced up to the Dnieper in both the north and the south. But the war is far from over. Smolensk, Kiev, and Dnepropetrovsk are still held by the Soviet Union. No German unit is across the Dnieper. The Russian line is intact behind a river line from the Black Sea up to Smolensk. Leningrad has yet to be taken. One more long turn of summer remains and then comes the fall, followed by winter. Whom will the gods of the dice favor?
G says: What a difference it would have made if the Zhukov attack roll had been average. But orders from Moscow have to be obeyed.
I hope you have enjoyed this abbreviated AAR. Missing from it are:
- The incessant strategic bombing of the European Axis by the Commonwealth.
- The Commonwealth wearing down the Italian navy in the Mediterranean and their successful invasion of Iraq and Persia.
- The Japanese exploits in China, where they reduced the Chinese to zero build points but were unable to capture Kunming or Lan Chow.
- The earlier than necessary DOW by the Japanese on the US, the Commonwealth, and Free France, and their struggle to eventually take the Netherlands East Indies, Singapore, Burma, and the Philippines.
- The progress of the US across the Pacific, controlling the Marianas, the Coral Sea, and the Bismarck Sea, which led to the recapture of Rabaul by the US.
- And of course, the continuing war between Germany and the USSR.
|
 Printable Version
 AAR NetPlay Ready - Chapter 7: Barbarossa Attacks -


 New Messages
 No New Messages
 Hot Topic w/ New Messages
 Hot Topic w/o New Messages
 Locked w/ New Messages
 Locked w/o New Messages
 Post New Thread