Matrix Games Forums

Forums  Register  Login  Photo Gallery  Member List  Search  Calendars  FAQ 

My Profile  Inbox  Address Book  My Subscription  My Forums  Log Out

Nation in Conflict 1861

 
View related threads: (in this forum | in all forums)

Logged in as: Guest
Users viewing this topic: none
  Printable Version
All Forums >> [New Releases from Matrix Games] >> The Operational Art of War IV >> After Action Reports >> Nation in Conflict 1861 Page: [1] 2   next >   >>
Login
Message << Older Topic   Newer Topic >>
Nation in Conflict 1861 - 10/28/2020 4:45:12 PM   
Raindem


Posts: 696
Joined: 7/15/2000
From: Arizona
Status: offline
Decided to run a solitaire game to highlight some of the features of my latest scenario, which can be downloaded here:

https://www.matrixgames.com/forums/tm.asp?m=4904080

The scenario is a strategic level simulation of the American Civil War on a 10 mi/hex map with bi-weekly turns. For purposes of this AAR historical strategies will be used for both sides.

Spring 1861
Turns 1-4

The scenario begins on April 12, 1861 with the attack on Fort Sumter. All the states that eventually will form the Confederacy are assumed to have already seceded. A small number of forces are available to each side, representing the fact that both sides essentially had to build an army from scratch. The Union chooses the Blockade option from the list of Theater Options. This will withdraw a naval squadron which will be reassigned to blockade duties. At this point the blockade has no effect on Confederate supply. But as the game progresses additional Theater Options will appear to strengthen the blockade. Eventually it will start to take a toll.

The only action at the start of the game is in Missouri. A Union force moves out of St. Louis to take control of key cities within the state. Confederate forces are mobilizing in Independence and Springfield, and a cavalry force under Van Dorn is on its way up from Arkansas.


The following screenshot shows the mobilization locations of major armies, as well as the theater designations I’ll be using in this AAR. Note that Kentucky starts neutral and is surrounded by excluded hexes.


_____________________________

Grab them by the balls. Their hearts and minds will follow.
Post #: 1
RE: Nation in Conflict 1861 - 10/29/2020 10:18:20 PM   
Raindem


Posts: 696
Joined: 7/15/2000
From: Arizona
Status: offline
Summer 1861
Turns 5-11

McClellan, commanding the Union’s IX Corps, occupied West Virginia while Union and Confederate forces clashed at Manassas. McDowell’s III Corps (11,300 men) and Howard’s XI Corps (4,000 men) attacked a Confederate division under Wilcox (7,300 men) with artillery support from A. Hill’s Corps HQ. Union losses were heavy and they failed to dislodge the defenders. They suffered 3,500 casualties while Confederate losses were negligeble. The opening round goes to the Rebels!


Union troops occupied Jefferson City without resistance, but were delayed by static orders due to a failed command check. This resulted in Van Dorn winning the race to Independence. 10,000 men from the Army of the West (A.S. Johnston) moved into southwest Missouri to reinforce the Missouri State Guard (which formed from the militia that mobilized there). The stage was set for the battle for Missouri.

No action in the west as Kentucky is still neutral. Both sides have a Theater Option to invade Kentucky, which would lift the exclusion zone. But it comes at a political cost. Kentucky will enter the war on its own in early 1862. For now, both sides were willing to wait.

The political cost for invading Kentucky mentioned above would be a modification to the Event Engine Variable (EEV), which in this scenario tracks Union war weariness. As the EEV goes up so does war weariness, and that will start to affect Union replacements. Eventually a pestilence factor will kick in representing desertions later in the war. If the EEV gets high enough it could trigger Confederate sudden death victory. The EEV is modified both by political decisions and battlefield events.

While on the subject, the Confederacy suffers a decline in public support as well. But it is tied to the victory level rather than the EEV. As Union armies advanced into the southern heartland, a massive amount of damage was caused to the southern economy. In the scenario the Confederacy starts out in control of all 100 objective points, which represents the sum total of their economic output (in addition to imports, but that’s a separate section of the rules). As the Confederate victory level goes down their replacements and supply will drop accordingly. Other things can drop supply like capturing or blockading certain ports. Like the Union, if things get bad enough a pestilence event will be activated to represent the rising desertion rate.

The political and economic subsystems described above are designed so that players operate under the same conditions and pressures as their historical counterparts. The Union must keep the ball moving forward. The Confederacy must preserve as much of their territory as possible while keeping their army intact.


_____________________________

Grab them by the balls. Their hearts and minds will follow.

(in reply to Raindem)
Post #: 2
RE: Nation in Conflict 1861 - 10/31/2020 1:32:32 PM   
Raindem


Posts: 696
Joined: 7/15/2000
From: Arizona
Status: offline
Fall 1861
Turns 13-17

In the east, the expanding Union army prompted the Confederates to pull back to the Rappahannock River. 24,000 troops under Longstreet, A. Hill, E. Smith, and Ewell deployed to cover the stretch between Fredricksburg and Culpepper, while Jackson with 12,000 men dug in at New Market. Stuart stationed his cavalry at Staunton.

Here’s how the Missouri campaign unfolded. 11,200 infantry and 3,600 cavalry from the Army of the Tennessee railed up to St. Joseph, and then approached Independence from the north. The Department of Kansas was supposed to swing in from the south but command lapses kept them from completing their assignment. Confederate forces saw what was developing and evacuated Independence to join the other cluster of troops in the southwest part of the state. Had the Kansas men acted sooner the Rebel force might have been trapped. Additional forces from the Union Army of the Tennessee joined up with the Department of Missouri to drive southwest towards Springfield.

The Confederates had the Missouri State Guard at Springfield, backed up by troops from the Army of the West. Van Dorn slid in behind them at the crossroads, to keep an eye on the Department of Kansas, which had finally started moving southeast. This type of defensive deployment is typical for this scenario, since everywhere but in the east you have to fight with open flanks. So you put your strong infantry up front while keeping something in the rear, preferably cavalry, to check any opposing moves to turn your flank.

The battle opened on October 11, 1861. The Union decided to go with a frontal attack with several divisions. A flanking manuever would have taken too long and they wanted to get the Army of Tennessee troops back into position for the coming Kentucky campaign. The defenders got the worst end of the casualty count, but held the ground. It was decided to abandon the position as unteneble. The Union had enough troops that the position would have been overwhelmed or flanked before long. The Missouri State Guard retreated to Fayetteville, the Army of the West to Fort Smith, and Van Dorn’s cavalry returned to Little Rock to rest up for the next phase. The Missouri campaign was over.


The Union attempted its first amphibious action of the war. Two squadrons under Farragut transported 10,000 men from the Department of Virginia to conduct a seaborne assault on Beaufort. All major Confederate ports have seaward facing defenses, but Beaufort is more lightly defended than the others. As it turned out, the assault destroyed the port’s guns but was unable to follow up with the landing, which would have to be completed following turn. The success of this operation encouraged a similar one against Brunswick a few turns later. And shortly after that, Jacksonville was captured. Most of the remaining ports are protected by heavily armed forts and would require a naval force larger than what is available at present.


_____________________________

Grab them by the balls. Their hearts and minds will follow.

(in reply to Raindem)
Post #: 3
RE: Nation in Conflict 1861 - 10/31/2020 5:55:12 PM   
cathar1244


Posts: 1003
Joined: 9/5/2009
Status: offline
Curt,

Looks to be a wonderful scenario.

One question. Forestation of mid 1800s USA looks a bit sparse?

Cheers

(in reply to Raindem)
Post #: 4
RE: Nation in Conflict 1861 - 11/1/2020 12:21:28 AM   
Raindem


Posts: 696
Joined: 7/15/2000
From: Arizona
Status: offline
Perhaps.

The period topographical maps don't provide much data on forestation. Battle and campaign maps can provide some. But then again most major battles avoided large wooded areas.

If you look at any of the traditional ACW board games out there (VG's Civil War, GMT's US Civil War, SPI's War Between the States) most of the terrain is clear. There might have been more forestation in the 1800s, but one can't be sure it would have been in a form that would have had an impact on a 10 mile hex. My guess is that it would have been more spread out and dispersed.

I'd consider beefing up the green in the scenario but I want to base it on a good reference.


_____________________________

Grab them by the balls. Their hearts and minds will follow.

(in reply to cathar1244)
Post #: 5
RE: Nation in Conflict 1861 - 11/1/2020 7:24:28 AM   
cathar1244


Posts: 1003
Joined: 9/5/2009
Status: offline
I hear you. That can be a problematic call even with modern maps and resources. If I find any maps that look useful, I'll post the links here.

Cheers

ETA. https://en.wikipedia.org/wiki/Deforestation_in_the_United_States#/media/File:Virgin_Forest_in_United_States,_1850.png

Hard to use as a resource for map making, but I'd guess the pure black areas are good candidates for forest hexes. Seems to mostly be mountain ranges and some of the river valleys.

If your design take on hills and mountains is to not put a forest tile on top of them, then you likely have most of the forests marked out.


< Message edited by cathar1244 -- 11/1/2020 8:07:11 AM >

(in reply to Raindem)
Post #: 6
RE: Nation in Conflict 1861 - 11/1/2020 12:54:08 PM   
Raindem


Posts: 696
Joined: 7/15/2000
From: Arizona
Status: offline
That link helps. It provides the growth pattern information I was lacking before. Thanks.

Not sure about the forest on top of the hill. I had always thought a hill or mountain hex assumed that trees were on it and adjusted the attributes accordingly. I could be wrong.

_____________________________

Grab them by the balls. Their hearts and minds will follow.

(in reply to cathar1244)
Post #: 7
RE: Nation in Conflict 1861 - 11/1/2020 2:27:16 PM   
cathar1244


Posts: 1003
Joined: 9/5/2009
Status: offline
quote:

Not sure about the forest on top of the hill. I had always thought a hill or mountain hex assumed that trees were on it and adjusted the attributes accordingly.


Curt, you certainly have a thousand times more scenario design experience than I.

That said, it seems like a scenario designer call. If the terrain of a given battle / campaign / war, warrant the extra difficulties of an added tile ... then, yes.

On map making in TOAW, I have come to prefer a cleaner look and would go with what you do. My only wish in this regard is that TOAW include a "designer tile" for which the scenario designer can specify the movement, combat, supply etc. effects.

Cheers

(in reply to Raindem)
Post #: 8
RE: Nation in Conflict 1861 - 11/1/2020 8:38:40 PM   
Raindem


Posts: 696
Joined: 7/15/2000
From: Arizona
Status: offline
Definitely agree with the need for a customizable terrain tile.

And now back to the action...

Winter 1861-62
Turns 21-27

Winter effects have been programmed into the scenario. Besides the scheduled temperature changes and resultant snow, during the middle part of the winter both sides are hit with a shock penalty. This has the tendency to throw units into reorg which, when combined with the Command and Control static orders effects, means that extensive operations becomes very difficult during the winter months.

This is probably a good time to talk about how supply is modeled in the scenario. The Union has a large supply stockpile but a small supply radius. They will be tied to the railways. Some river supply is also available. They also have an overextended supply setting of 5. This means that if the hex they are in drops to a supply level of < 5 the unit will start to lose strength. It is cycled back into the pool, but if you leave them overextended long enough the unit will evaporate (and units do not reconstitute in this scenario). Also, the winter shock effects reduce supply. And the sudden appearance of a snow or mud hex can abruptly place a unit in an overextended status.

The Confederacy has a much lower supply stockpile, but a larger radius. More importantly, they are not constrained by an overextended supply setting. This allows use of deep cavalry raid tactics which you’ll see later in the AAR.

Kentucky will be entering the war soon. The Event has a variable delay built in, but it usually occurs prior to February 1862. During the opening months of the war both sides have been accumulating forces along Kentucky’s borders in anticipation of the coming showdown. The Union has forces from the Army of the Tennessee (Grant), Department of Kentucky (Buell), Army of the Cumberland (Thomas) , and Department of Ohio (Burnside). The two armies are each broken down into several corps. The Confederacy fields the Army of Tennessee (J. Johnston) and Department of Kentucky (Buckner). Johnston has three corps under his command as well as large cavalry forces on his wings (Forrest on the left and Wheeler on the right).

For scenario purposes, “departments” are just smaller armies that contain garrisons and other non-combat troops. At full strength, an average department will field only 3-5 combat divisions. Whereas a full strength army has around 20 divisions. However, departments usually mobilize quicker. The armies don't come to full strength until 1863.

Not shown in the map below are Confederate forces in Arkansas and on the Gulf coast which could help out. Still, as you can see the South was significantly outnumbered on the eve of Kentucky's entry into the war.


_____________________________

Grab them by the balls. Their hearts and minds will follow.

(in reply to cathar1244)
Post #: 9
RE: Nation in Conflict 1861 - 11/2/2020 3:39:06 PM   
Raindem


Posts: 696
Joined: 7/15/2000
From: Arizona
Status: offline
Spring 1862
Turns 25-30

A lot of action this season, all of it in the west.

With control of the rail lines and waterways, and better access to the larger cities, Union troops quickly asserted dominance over Kentucky. Louisville, Frankfort, and Lexington were all occupied within a week. Grant was a little slow to get going in the west and unable to capture Columbus prior to Confederate militia being organized. However, Confederate General Breckenridge was also slow out of the gate, and arrived too late to support them. A Union attack captured the town.

The remainder of the Confederate Army of Tennessee was operating east of the river forts (Henry and Donelson). Hardee moved up to protect Clarksville. Polk moved into Kentucky to secure Bowling Green, the last major Kentucky city under Confederate control. He made it as far as Louisville but was unable to drive out the Union troops. Further east, the Confederate Department of Kentucky headed north out of Knoxville towards Lexington. A stalemate developed as neither side had sufficient force to drive back the other. Operating on the west side of the Mississippi River, forces from the Union Department of Arkansas (Steele) launched an unsuccessful attack on Island No. 10.

The problem the Confederacy faced at this point was that their right wing was too far forward. The Union had enough troops that they could hold them on the Lousiville-Frankfort-Lexington line, while continuing to push south along the Mississippi River. Grant dispatched the XVII Corps (McPherson) to capture Fort Henry. It was anticipated that if Fort Henry fell, Fort Donelson could not hold out for long. At that point the Confederates would have to abandon Kentucky.


We had our first ship vs ship naval engagement of the war in Arbemarle Sound, off the coast of North Carolina. The Union was landing a force at Plymouth when they discovered a Confederate river monitor guarding the harbor. The Union ships fired. The river monitor was hit and sunk. End of battle.

In late March the Union sent a force of 82 warships and 21,000 men against New Orleans. The map limitations prevented a direct sea assault on New Orleans, as was done in real life. So instead of running the guns of Fort Jackson, the Union had to assault it directly. On the initial approach the fort opened fire and the Union lost 20 ships. But from that point on Admiral Farragut’s fleet was able to suppress the fort’s guns, and the landing succeeded with light ground casualties. New Orleans itself would be captured a couple turns later by ground assault.

Note that a landing at Proctorville would have provided a shorter and more direct route to New Orleans. But Fort Pike was on the other side of the harbor and its guns would not have been silenced by the landing. It could have continued to fire upon follow up Union reinforcements landing at the port. It was felt that the Fort Jackson route, though longer, was the better choice since supply and reinforcements could land without interference.


By late April the situation had grown precarious for the Confederacy in the western theater. Island No. 10 and Fort Henry had fallen. Fort Donelson was being invested. There was nothing to stop Grant from reaching Memphis in the next couple weeks. So the Confederates pulled back their entire right wing and concentrated for a counterattack on the left. Hardee, Breckenridge, and Forrest mustered at Corinth. The Department of Kentucky fell back to Knoxville. The remaining forces held a perimeter in front of Nashville.

The Confederate attack caught the Union forces spread out between Columbus and Memphis. The only thing that kept them from reaching Columbus was the XVII Corps, which was on its way back to rejoin the Army after the Fort Henry expedition. Forrest’s cavalry engaged Grierson’s cavalry at Jackson and delivered a sharp blow. Breckenridge moved between Memphis and Grant’s lead units and forced them to fall back. Hardee sliced into McPherson’s left flank and knocked him off his line of march.

The attacks were successful, but not to the point of improving the overall situation. The Union left wing was now moving forward filling the space left by the retreating Confederates. Grant was temporarily checked, but western Tennessee could not be defended indefinitely. It was going to be a long war and there was a lot of southern land to protect, so it didn’t make sense to throw everything into the fight at this time. After a few more tactical victories the Army of Tennessee started falling back on Chattanooga. The Union followed up with the capture of Nashville and Memphis, and the campaign in the west moved into a new phase.


< Message edited by Raindem -- 11/2/2020 3:49:59 PM >


_____________________________

Grab them by the balls. Their hearts and minds will follow.

(in reply to Raindem)
Post #: 10
RE: Nation in Conflict 1861 - 11/3/2020 6:00:46 AM   
StuccoFresco


Posts: 546
Joined: 9/17/2004
From: Italy
Status: offline
Isn't a series of decisive battles early on the only chance of the Confederation?

(in reply to Raindem)
Post #: 11
RE: Nation in Conflict 1861 - 11/3/2020 11:57:36 AM   
golden delicious


Posts: 5575
Joined: 9/5/2000
From: London, Surrey, United Kingdom
Status: offline

quote:

ORIGINAL: StuccoFresco

Isn't a series of decisive battles early on the only chance of the Confederation?


I don't think so- based on the scenario description above I think if the Confederacy is able to hold out and prevent a clear victory, the political will of the Union will collapse (represented by the EEV) and they would ultimately be forced to come to terms.

The historical analogy would be the hypothetical whereby without Sherman's clear success in Georgia, Lincoln could have lost the 1864 election. Whether you agree that was possible or not, the scenario does apparently allow for the Confederacy to win a long war.

_____________________________

"What did you read at university?"
"War Studies"
"War? Huh. What is it good for?"
"Absolutely nothing."

(in reply to StuccoFresco)
Post #: 12
RE: Nation in Conflict 1861 - 11/3/2020 1:37:44 PM   
Raindem


Posts: 696
Joined: 7/15/2000
From: Arizona
Status: offline
Ben is correct. The scenario models the long term effects of the war. Without getting too much into how the events are set up, there are two blocks of events that check for Confederate sudden death victory (SDV) based on the Event Engine Variable (EEV). The first occurs during the 1864 election. The second can occur at any time and requires a higher level than the first. For the EEV to get high enough to trigger either event, the Confederacy will have had to occupy large areas of Union soil and/or capture some of their major cities. It matters not when that happens, and the early part of the game is the best time for the Confederacy to conduct a successful invasion of the North. So an early strategy is certainly viable.

Actually, the scenario is designed to offer the Confederacy the choice between two basic defensive doctrines: 1) a vigorous defense of the homeland, or 2) an offensive doctrine that causes the Union to offer terms. With the first doctrine the Confederacy preserves its territory (which keeps the VP level high) and causes heavy casualties to the Union (which also raises VPs through the loss penalty). The game would go the distance and the Confederacy would win on VPs. With the second doctrine the EEV is raised by occupation of northern territory (and some Theater Options). When the EEV gets high enough SDV is triggered.

The second defensive doctrine carries a risk. By invading the North the Confederacy is going to have to leave other areas under defended. If they don't achieve SDV they will almost certainly lose on points. Using the first defense is safer. It puts the burden on the Union player to keep the ball moving forward.


_____________________________

Grab them by the balls. Their hearts and minds will follow.

(in reply to golden delicious)
Post #: 13
RE: Nation in Conflict 1861 - 11/3/2020 3:15:50 PM   
Zovs


Posts: 6668
Joined: 2/23/2009
From: United States
Status: offline
Awesome work Curt!


_____________________________


Beta Tester for:
Flashpoint Campaigns: Sudden Storm
War in the East 1 & 2
WarPlan & WarPlan Pacific
Valor & Victory
DG CWIE 2
SPWW2 & SPMBT scenario creator

(in reply to Raindem)
Post #: 14
RE: Nation in Conflict 1861 - 11/3/2020 9:48:34 PM   
Raindem


Posts: 696
Joined: 7/15/2000
From: Arizona
Status: offline
Thanks.

_____________________________

Grab them by the balls. Their hearts and minds will follow.

(in reply to Zovs)
Post #: 15
RE: Nation in Conflict 1861 - 11/5/2020 1:36:10 PM   
Raindem


Posts: 696
Joined: 7/15/2000
From: Arizona
Status: offline
Summer 1862
Turns 31-37

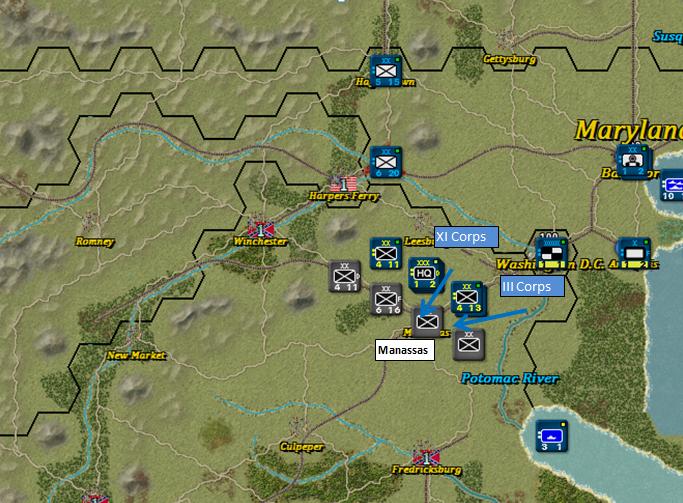
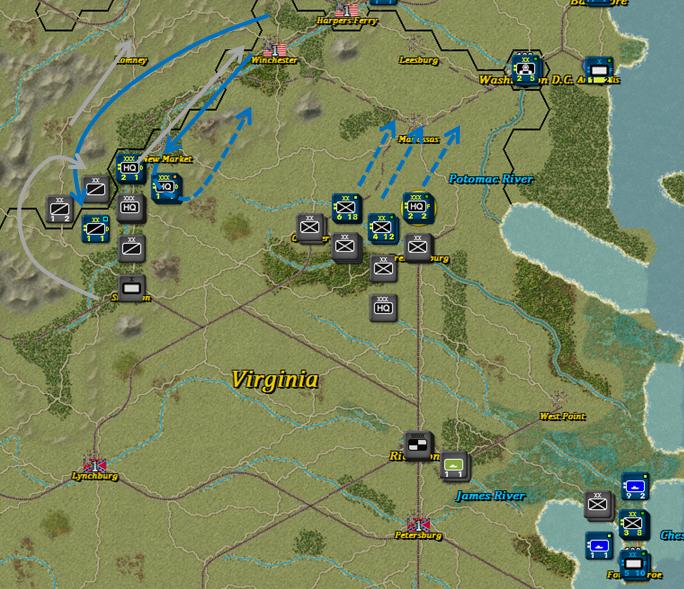
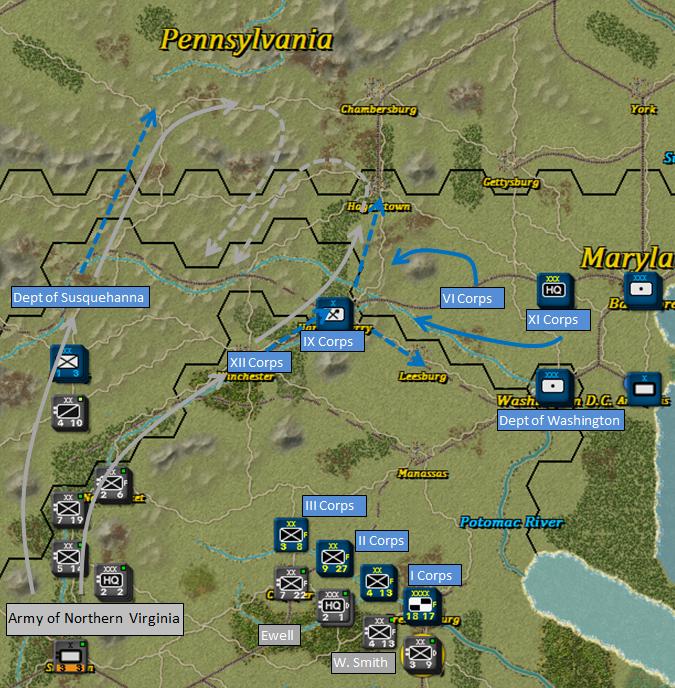
The Union moved up the Peninsula with 28,000 men from the VI Corps (Sedgewick) and XI Corps (Howard), based in Fort Monroe. Confederate General Magruder’s corps, detached from the Army of Northern Virginia, only had one division (McLaw) in the area. But that was enough to hold the Union advance until reinforcements were brought down. The Union could not break that line, even with help from Admiral Porter’s Potomac and James River Flotillas.

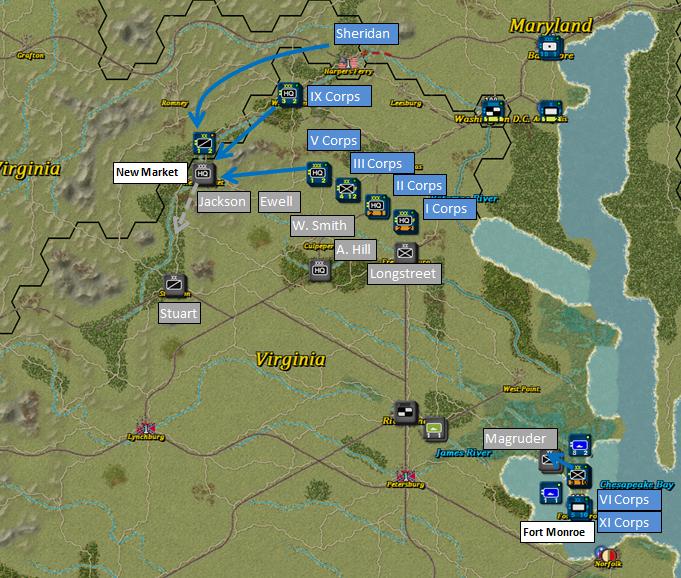
The remaining forces of the Army of the Potomac were I Corps (Hancock), II Corps (Couch), III Corps (McDowell), V Corps (Sykes), IX Corps (McClellan), and a small cavalry force under Sheridan. The other Confederate corps in Virginia at this time were Jackson, Longstreet, A. Hill, W. Smith, Ewell, and J.E.B. Stuart’s cavalry.

A Union cavalry recon discovered Jackson’s corps entrenched at New Market. So the IX and V Corps converged for an attack. The attack failed, but Jackson retreated anyway to avoid being flanked.


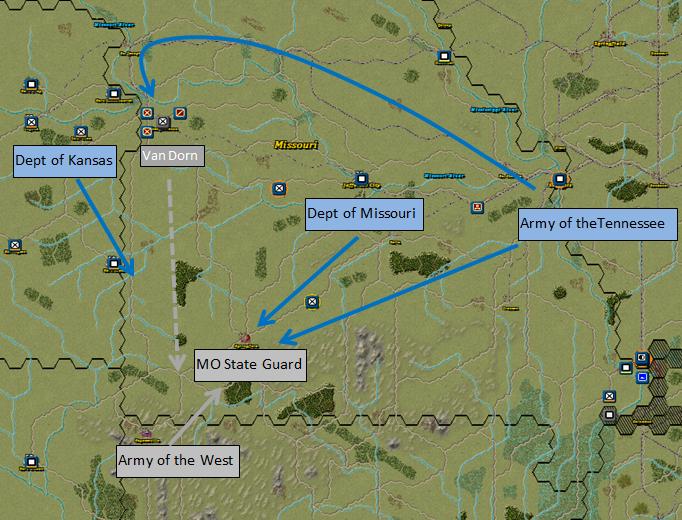
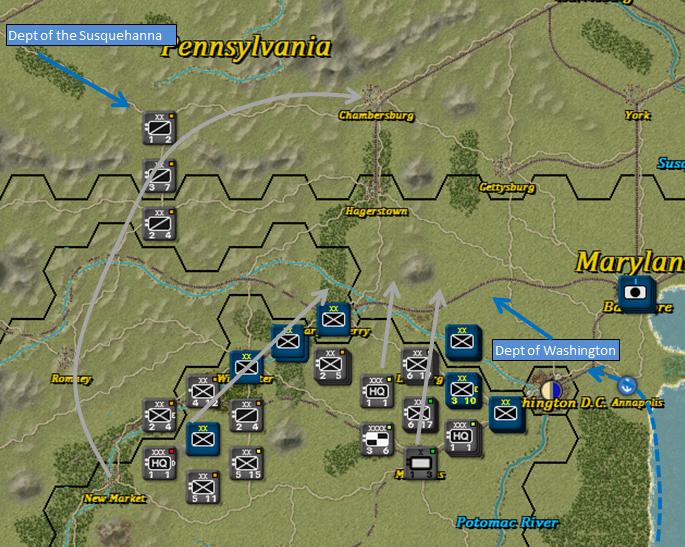
A quick note about how the scenario deals with frontages. In reality, a Civil War army would take up only 1 or 2 hexes at this scale. I removed stacking penalties, but TOAW’s stacking limits still means at best three corps in a single hex. But the natural tendency in TOAW is to spread units out to form a front. This was revealed during playtesting and produced unrealistic results. After that, I decided to make the units indivisible (by using the section size and modifying the graphic). This greatly reduced a players ability to cover everything. But as you can see above, there is still the inclination to do this, especially in the eastern theater which is naturally channeled by the mountains and the coast. However, in most places on the map you won’t be able to. As the Confederate, no matter how long you try to make your front the Union will always have enough extra units to flank you. And if you stretch yourself out too thin the Union will simply punch through in the center, capturing whatever objective you were trying to protect. So the mechanics of the scenario do encourage Civil War style tactics, even though the frontages and battlefields will still be much larger than historically so.

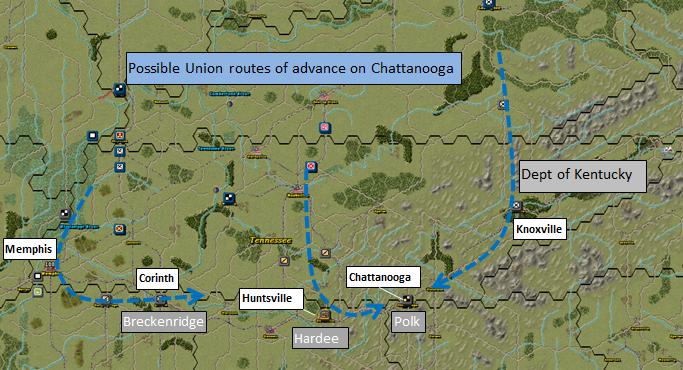
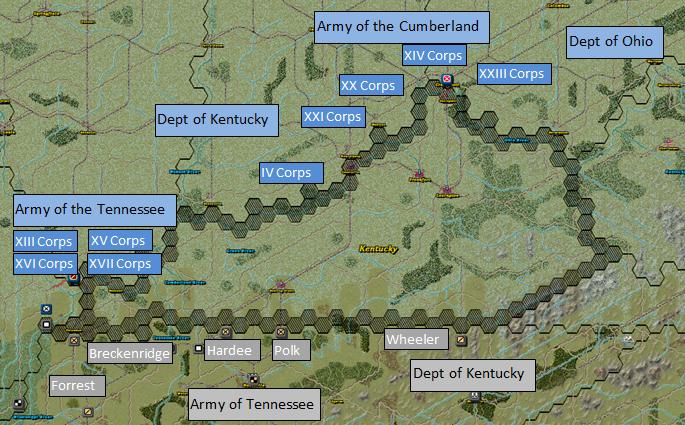
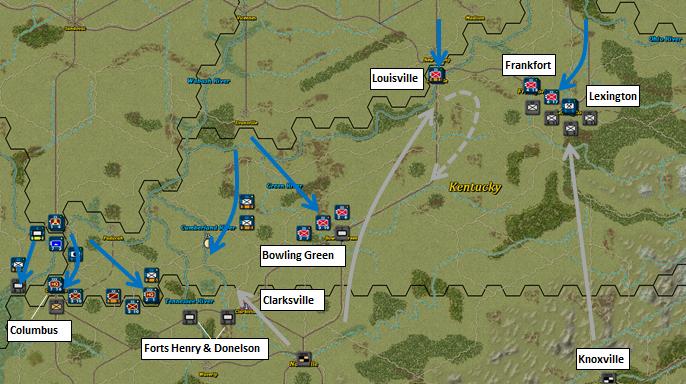
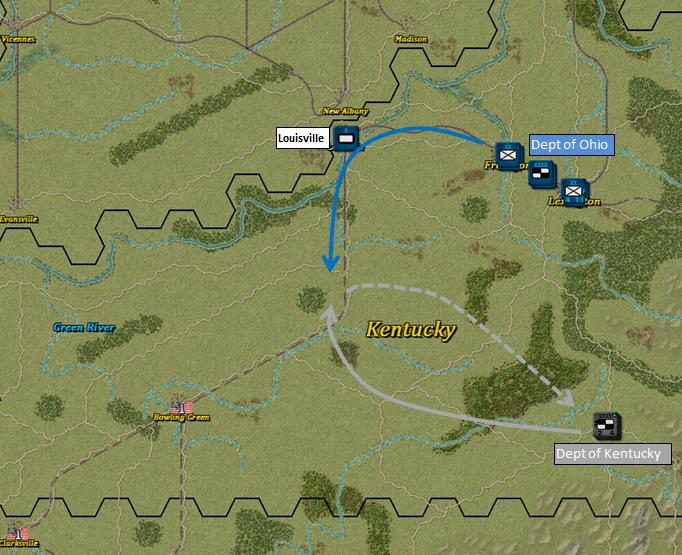
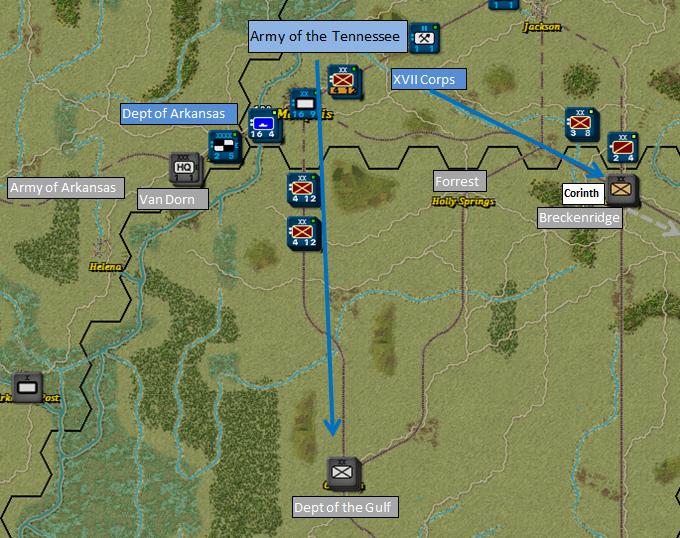
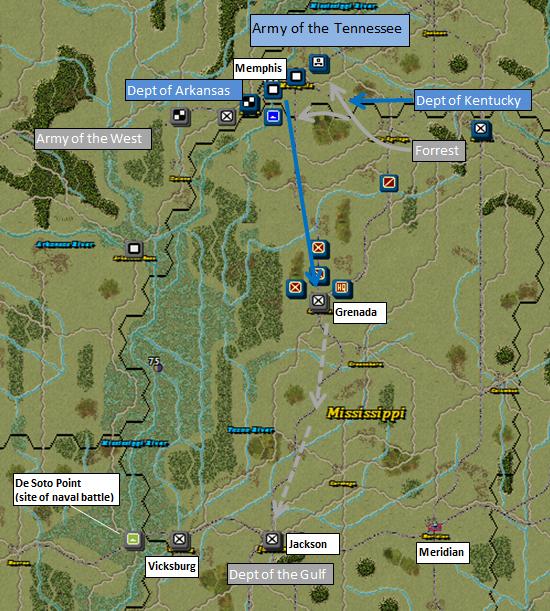
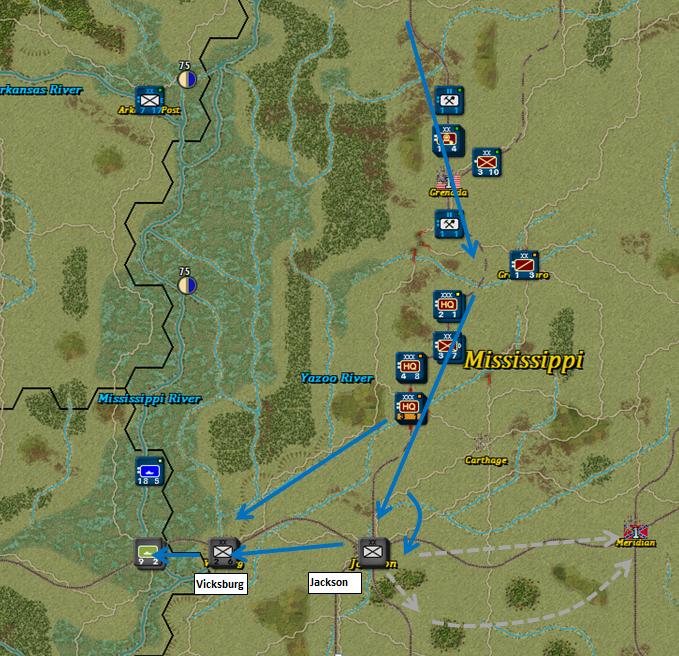
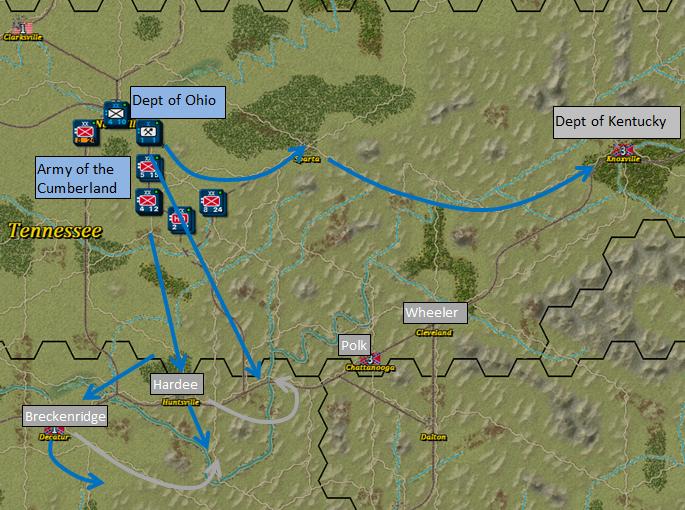
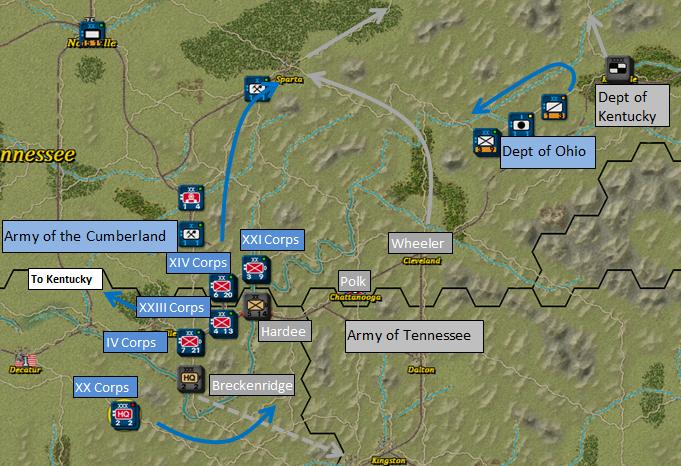
No additional battles occurred in the west as the Federals consolidated the gains from the previous few weeks. Meanwhile, the Confederates prepared the defense of Chattanooga. There were three possible avenues of attack. If the Army of the Tennessee turned east from Memphis, then Breckenridge’s Corps at Corinth would be in a position to stop them, or at least slow them down while fall back positions were established. If the Department of Ohio gets reinforced they could come straight south through Knoxville, and take Chattanooga from behind. That would be a tough campaign, and the Confederate Department of Kentucky has enough strength to secure that route. The most likely route was down the middle with the Army of the Cumberland. They would have to occupy Huntsville, and then turn east to cross the Tennessee River. Approaching Chattanooga from the north or northwest was simply not feasible. Accordingly, Hardee was stationed at Huntsville and Polk at Chattanooga, along with Johnston’s HQ. Wheeler’s cavalry was deployed between Nashville and Huntsville, their task being to screen the army and provide advance notice of when the Yankees resumed the march. Forrest remained at Holly Springs, MS. His job was to be a thorn in Grant’s side (his right side if he turned towards Chattanooga, or his left side if he continued south into Mississippi).


< Message edited by Raindem -- 11/6/2020 1:09:22 PM >


_____________________________

Grab them by the balls. Their hearts and minds will follow.

(in reply to Raindem)
Post #: 16
RE: Nation in Conflict 1861 - 11/6/2020 2:12:10 PM   
Raindem


Posts: 696
Joined: 7/15/2000
From: Arizona
Status: offline
Fall 1862
Turns 38-43

The Union’s eastern offensive was going nowhere. The Union had lost around 3,000 men trying to get around Jackson in the Shenadoah Valley, and another 4,000 trying to work their way up the Peninsula against Magruder. They only had 3 corps guarding the approaches to Washington DC, and started to get a little nervous about Rebel intentions. So the VI and XI Corps returned to Fort Monroe and the V and IX Corps fell back to Winchester. In the process, a large cavalry battle developed 20 miles northwest of Staunton. Sheridan was trying to flank Jackson but ran into Stuart’s cavalry rushing up from Staunton. The flanker became the flankee and was promptly eliminated. The Union forces in front of Fredricksburg decided to pull back also, to better protect the capital. As the Union retreated the Confederates followed, with Jackson advancing as far as Winchester. Stuart moved up the west side of the Valley and captured Romney.


The momentum of the Union retreat and Confederate follow up transformed the battle into Lee’s first invasion of the north. Stuart continued his raid, reaching the Pennsylvania border and going as far as Chambersburg before turning back. Jackson continued rolling back the Union’s right flank, inflicting massive casualties on the V Corps. Lee’s main army captured Manassas and then crossed the border into Maryland at Leesburg .

The game does not automatically end if Washington DC is captured. But a lot of bad things will happen and the Union really doesn’t want to take that chance. Even if Washington was safe, the Confederacy couldn't be allowed to roam the countryside unchecked. So the VI and XI Corps were evacuated from the Peninsula and landed at Annapolis to reinforce the capital. In addition, both the Department of the Susquehanna (Cadwalader) and Department of Washington (Heinztelman) were activated in response to Rebel incursions. The Confederates were still winning the battles at this point, but each position that was taken revealed a fresh Union line behind it. The trick is to know when the attack has run its course and pull back before sustaining too many casualties.


The western theater has flared up again. The Confederate Department of Kentucky (Buckner), based in Knoxville, advanced into central Kentucky with the objective of preventing the Union from repairing the Louisville-Bowling Green rail line. The nearest Union force was the Department of Ohio (Burnside) in Frankfort and Lexington. The opposing forces clashed along the rail line and a series of battles ensued. The Confederates had 34,000 men total, but left some behind to guard the route they would have to take back into Tennessee. The Union had fewer men (13,600) but a lot more artillery (101 field guns vs. the Rebel’s 43) , and they were situated directly on their supply line whereas the Confederates were stretched out. When the smoke cleared the Confederates had sustained 2,600 casualties to the Union’s 1,200. The Confederacy can ill-afford these kinds of losses and returned to Tennessee. As it turned out the whole operation was a waste of effort. The Union wasn’t even planning to supply the Army of the Cumberland by that route. Instead, they were working on the rail line that passed through Clarksville.


Further west, the XVII Corps of the Army of the Tennessee attacked the Confederate force at Corinth as a prelude to moving south into Mississippi. The movements of the main body of the Union army made it clear that Grant was going to continue following the river, which meant that Chattanooga would only face a single threat from the Army of the Cumberland. So Breckenridge readily gave up his position at Corinth and moved closer to Chattanooga. Grant would soon become Beauregard’s problem, who commanded the Confederate Department of the Gulf.


< Message edited by Raindem -- 11/6/2020 2:32:45 PM >


_____________________________

Grab them by the balls. Their hearts and minds will follow.

(in reply to Raindem)
Post #: 17
RE: Nation in Conflict 1861 - 11/9/2020 1:27:23 PM   
Raindem


Posts: 696
Joined: 7/15/2000
From: Arizona
Status: offline
Winter 1862-63
Turns 44-50

The Confederate invasion of the North that began in the Fall was now encountering increased resistance as the Union rushed in reinforcements from all directions. Lee decided to return to Virginia. The last action in the east for 1862 occurred at Fredricksburg. The Confederates had ended their retreat at the Rapphannock River. The Union was advancing cautiously but still wanted to take the position before the campaign season was over, and launched a series of attacks on Fredricksburg. They broke off the battle after sustaining 5,400 casualties. Winter camps in the east were now fixed.

In the west, Winter brought no rest for the armies. The situation at the start of December was as follows: the Army of the Tennessee (Grant) was continuing its march south through Mississppi. The Department of Kentucky (Buell) was at Corinth. The Department of Arkansas (Steele) halted its advance on the west side of the Mississippi River opposite of Memphis. The Army of the Cumberland (not pictured) was still at Nashville preparing for their Chattanooga campaign. Opposing the Union forces in Mississippi was the Department of the Gulf (Beauregard). On the other side of the river a patchwork of formations stood between Steele and Little Rock, the main one being the Army of the West (A.S. Johnston). Forrest was keeping a low profile between Holly Springs and Corinth, with the intention of launching raids into the Union rear once the main body of forces had passed.

The leading Union forces reached Grenada on December 5th, and proceeded to invest it. But most of the defenders slipped away before they could be cut off. This would be the pattern all the way back to Jackson. Around Christmas time, Forrest launched his raid. Two cavalry divisions cut the rail lines north of Memphis, and two cut it south. The Army of the Tennessee had to halt its march while the rear echelon troops (mostly from the Department of Kentucky) cleaned this up.

About the time that Forrest was tearing up the tracks around Memphis, Union gunboats under Admiral Foote made it all the way down to Vicksburg. They ran into a Confederate squadron of 1 Ironclad and 10 River Monitors protecting a 31-gun river fort that blocked the approaches to Vicksburg. A short naval battle ensued in which each side lost 2 ships and 3 of the fort’s guns were destroyed. Although not decisive, the battle affirmed the fact that the Union Navy wasn’t going to be able to blast their way past these forts. It was better to take them with a land assault.


After Forrest’s raid was dealt with, the Union Department of Arkansas moved south and captured Arkansas Post. This location controls access to the Arkansas River, and Union possession prevents Confederate river supply to Little Rock and Fort Smith (the supply points are removed). The Confederacy responded by scattering their forces. The Army of Arkansas (Price) moved north torwards the Missouri border. Van Dorn headed to Camden in the southwest corner of the state. The Army of the West took responsibility for the defense of Little Rock, with a fall back position at Fort Smith. In Missouri, some partisans under Quantrill have organized. They kept busy blowing bridges and destroying rail lines. All of these Confederate moves had the end result of conceding central Arkanas. Little Rock would eventually fall a few months later.


1862 should have been a good year for the Union. They captured 3 of the largest 5 Confederate cities and penetrated deep into the Rebel’s heartland. But the South still had a 50 VP advantage, which would give them a Significant Victory if it held. They fought the Union to a stalemate in the east. Their armies were being rolled back in the western theater but the Army of Tennesse was still in good shape. The fact that the Union made such good progress in Mississippi was a result of the Confederate realization that they couldn’t defend everything, and chose to concentrate their forces at higher priority locations. In summary, it was a good year for the Union, but it was obvious there was a lot more work to do.


_____________________________

Grab them by the balls. Their hearts and minds will follow.

(in reply to Raindem)
Post #: 18
RE: Nation in Conflict 1861 - 11/12/2020 12:33:14 PM   
Raindem


Posts: 696
Joined: 7/15/2000
From: Arizona
Status: offline
Spring 1863
Turns 51-56

The Department of Ohio (Burnside) relocated from eastern Kentucky to central Tennessee in response to Forrest’s raid last December. There were now 7 divisions and 2 HQs assigned to maintaining the supply line of the western armies.

Once Grenada was captured the Army of the Tennessee made good progress. Union gunboats made it into the Yazoo River system and obtained intel on enemy deployment between Jackson and Vicksburg. XIII Corps (McClernand) split off and headed straight for Vicksburg. The rest of the army bore down on Jackson. Normally, Vicksburg would have had its own supply point. But that was removed when the Union captured New Orleans. So Jackson was now the key to Vicksburg’s defenses. The Confederates knew this also and had their strongest units in Jackson.

The Union XV Corps (Sherman) attempted to flank the city. Beauregard moved his HQ to Meridian and moved one division south of the city to thwart the manuever. The Union then launched a frontal attack on May 22. Casualties were heavy on both sides (Union: 7,300 Confederacy: 4,900) but the ground was taken. At the same time forces from the Union Department of the Gulf (Banks), which had taken over occupation duties in New Orleans, were moving north. They had already captured Baton Rouge and would soon be upon Natchez, the last remaining Confederate port on the Mississippi besides Vicksburg. Beauregard left a couple divisions in Vicksburg and pulled back the remainder of his forces to Meridian. Vicksburg would fall on July 31 after a seige. That ended the campaign. The Army of the Tennessee couldn’t go any further. Rail construction was lagging behind and things were heating up at Chattanooga.


Note the two 75% Union supply points in the above image. The scenario models river supply by placing supply points along major rivers. Many of these will be guarded by a Confederate Fort which will have to be overcome. For example, if the Union captures the fort west of Vicksburg another supply point will appear. In other places a key location must be captured to enable supply points further down the river, such as the capture of Fort Donelson allowing a Union supply point in Nashville. It’s not a perfect system, and the player will find it’s still better to use rail lines for supply. Still, it attempts to address the importance that river supply played in the Civil War.

The Union conducted an amphibious assault on Fort Sumter. Attacking coastal forts directly can be costly, and success is not guaranteed. The Union tried to take Ft. Sumter twice during the war and failed both times. TOAW only allows 1 round of amphibious combat each turn. So if the defenders are not completely destroyed they can counter-bombard during their own turn and wipe out the fleet. In this case the attack succeeded. Barely. The Union lost 18 ships to the fort’s guns and 1,300 men in the landing but the fort was taken. The capture of Fort Sumter effectively blockaded Charleston. Combined with the other supply drops from captured ports and cities, and from the Naval Blockade, the Confederate supply level was down to 26 (from a starting level of 35).


_____________________________

Grab them by the balls. Their hearts and minds will follow.

(in reply to Raindem)
Post #: 19
RE: Nation in Conflict 1861 - 11/13/2020 1:21:14 PM   
Raindem


Posts: 696
Joined: 7/15/2000
From: Arizona
Status: offline
Summer 1863
Turns 57-63

The Battle of Gettysburg cannot be accurately replicated at this scale. There’s just too much congestion on the map. So the plan was modified. The Confederates skimmed off troops from Fredericksburg and the Peninsula and used them to strengthen their left wing. This force would advance up through the Shenandoah Valley. Stuart was to make a wider arc through West Virginia in an attempt to get around the Union’s right flank.

Delays were encountered from the start. First, three brigades from the Department of the Susquehanna (Cadwalader) barred Stuart’s easy passage through West Virginia. He would have to fight his way to the Maryland border. Next, the Union XII Corps (Slocum) held up the Confederates at Winchester, winning a battle before pulling back to Harper’s Ferry, where the IX Corps (McClellan) was already entrenched. The Union also had the two corps from the Peninsular campaign, VI Corps (Sedgewick) and XI Corps (Howard), in reserve 20 miles north of Washington DC.

Harper’s Ferry was captured on June 15 by two divisions of Magruder’s corps. This split the Union forces there. The XII Corps retreated to Hagerstown and the IX Corps to Leesburg. The VI and XI Corps were brought up to fill the gap that those two retreats created. Stuart’s cavalry was brushing aside the brigades of the Department of the Susquehanna on its way to Chambersburg.

Unlike real life, the movement of the Army of Northern Virginia into this area did not pose enough of a threat to Washington DC that a general redeployment of the Army of the Potomac was called for. The IX and XII Corps were fighting a successful delaying action and the capital itself was covered by 4 divisions and a lot of artillery. It was felt that Lee’s offensive could be absorbed without giving up the Union positions near Fredericksburg.

The Confederate advance made it as far as Hagerstown. Thus far, the campaign had caused some political damage (increasing the EEV) by occupying territory in northern states. But there was little else to be gained and casualties were starting to mount. So it was decided to turn Lee's army around and head back to Virginia as quickly as possible. Meade (now in command of the Army of the Potomac) might at any moment decide to take advantage of the temporary Confederate weakness at Fredericksburg.


The Chattanooga campaign has begun. The entire Army of the Cumberland was forced to advance along a single rail line bordered by mountains. This made Confederate delaying actions relatively easy. A player’s first instinct may be to use the roads to the north of Chattanooga to bypass it. But the overextended supply setting would result in units being out of supply before they reached the Chattanooga-Knoxville rail line, and make them easy targets for Rebel counterattacks. Nope. The Union was going to have to slug its way forward here. Cavalry from the Department of Ohio (Burnside) did split off to occupy Sparta. But this was simply a move to keep an eye of the army’s flank rather than a prelude to a bypass.

When the Union’s route of advance became apparent, the Confederates adjusted their defensive positions. Hardee moved to the Tennessee River crossing that the Union would now have to use to get to Chattanooga. Breckenridge gave up Decatur to cover the river crossing south of Huntsville.

The Union sustained heavy losses in repeated attacks trying to take the river crossing held by Hardee. Historically, the Confederates pulled back around this time. But their position was so strong right now I decided to just leave them there and force the Union to overcome it.

So the Union plan was modified as follows: The Department of Ohio mustered up at Sparta and headed east to bypass the Army of Tennessee and attack Knoxville directly. Supply could have been a problem so the rail spur to Sparta was repaired and a supply unit added to the army. At the same time, XX Corps (Hooker) captured an undefended Decatur and attempted to swing around Breckenridge’s rear. IV Corps (Keyes) passed through Huntsville before engaging Breckenridge from the front.


_____________________________

Grab them by the balls. Their hearts and minds will follow.

(in reply to Raindem)
Post #: 20
RE: Nation in Conflict 1861 - 11/13/2020 2:34:59 PM   
golden delicious


Posts: 5575
Joined: 9/5/2000
From: London, Surrey, United Kingdom
Status: offline

quote:

ORIGINAL: Raindem


The Chattanooga campaign has begun. The entire Army of the Cumberland was forced to advance along a single rail line bordered by mountains. This made Confederate delaying actions relatively easy. A player’s first instinct may be to use the roads to the north of Chattanooga to bypass it. But the overextended supply setting would result in units being out of supply before they reached the Chattanooga-Knoxville rail line, and make them easy targets for Rebel counterattacks. Nope. The Union was going to have to slug its way forward here. Cavalry from the Department of Ohio (Burnside) did split off to occupy Sparta. But this was simply a move to keep an eye of the army’s flank rather than a prelude to a bypass.

When the Union’s route of advance became apparent, the Confederates adjusted their defensive positions. Hardee moved to the Tennessee River crossing that the Union would now have to use to get to Chattanooga. Breckenridge gave up Decatur to cover the river crossing south of Huntsville.

The Union sustained heavy losses in repeated attacks trying to take the river crossing held by Hardee. Historically, the Confederates pulled back around this time. But their position was so strong right now I decided to just leave them there and force the Union to overcome it.

So the Union plan was modified as follows: The Department of Ohio mustered up at Sparta and headed east to bypass the Army of Tennessee and attack Knoxville directly. Supply could have been a problem so the rail spur to Sparta was repaired and a supply unit added to the army. At the same time, XX Corps (Hooker) captured an undefended Decatur and attempted to swing around Breckenridge’s rear. IV Corps (Keyes) passed through Huntsville before engaging Breckenridge from the front.


I'm not that familiar with the Civil War- but given the horrendous terrain around Chattanooga and the crossing at Decatur being taken without any opposition, wouldn't a push into Alabama be simpler than trying to get into Georgia? I guess Atlanta's a richer prize than Birmingham, but Montgomery is down the road too and I think more of a major city in 1864 than it is now. Sherman could just as easily have driven to the sea at Mobile as he did at Savannah (given that the Union navy could be strong wherever it chose), and terrorising Alabama would have had much the same effect as terrorising Georgia.

_____________________________

"What did you read at university?"
"War Studies"
"War? Huh. What is it good for?"
"Absolutely nothing."

(in reply to Raindem)
Post #: 21
RE: Nation in Conflict 1861 - 11/13/2020 5:12:07 PM   
Raindem


Posts: 696
Joined: 7/15/2000
From: Arizona
Status: offline
As a point of strategy you're probably right. The route through central Alabama and Georgia would be a much easier campaign. However, the Chattanooga-Knoxville-Atlanta triad is worth 10 VPs, whereas Selma-Montgomery-Columbus are worth 3. So you'd have to eventually turn back north anyway. Atlanta would be an easy capture from the south. But Chattanooga and Knoxville are surrounded by mountains on all sides. Now, if you could simultaneously cut the Wytheville-Knoxville line that puts all of the Confederate defenders out of supply. In theory, the Union could win without Chattanooga or Knoxville, but you'd have to push deeper into the Carolinas. Or capture Richmond early. That's doable. Extend the rail line from Lexington KY to Charleston WV. Transfer the Army of the Cumberland there and penetrate into the heart of Virginia through Lynchburg.

The Union has numerous options available. I chose the direct attack on Chattanooga because that's what they did historically. I'm afraid though it may have cost them the game.


_____________________________

Grab them by the balls. Their hearts and minds will follow.

(in reply to golden delicious)
Post #: 22
RE: Nation in Conflict 1861 - 11/13/2020 6:33:57 PM   
golden delicious


Posts: 5575
Joined: 9/5/2000
From: London, Surrey, United Kingdom
Status: offline

quote:

ORIGINAL: Raindem

The Union has numerous options available. I chose the direct attack on Chattanooga because that's what they did historically. I'm afraid though it may have cost them the game.


Yeah I figured you were essentially demonstrating the scenario by repeating the historic moves.

_____________________________

"What did you read at university?"
"War Studies"
"War? Huh. What is it good for?"
"Absolutely nothing."

(in reply to Raindem)
Post #: 23
RE: Nation in Conflict 1861 - 11/16/2020 1:46:21 PM   
Raindem


Posts: 696
Joined: 7/15/2000
From: Arizona
Status: offline
Fall 1863
Turns 62-69

The Department of Ohio reached Knoxville in an exhausted state and was in no condition to attack. The Army of the Cumberland (now under Thomas) continued its costly and mostly unsuccessful attacks on Confederate river positions. But there were signs that the Rebels were starting to crack. The struggle for the Huntsville-Chattanooga line river crossing was a battle of attrition in which the Confederates couldn’t keep up. The Union was replacing their losses. The Confederacy was not, and their position was starting to weaken. Southwest of there, XX Corps (Hooker) had nearly completed it’s sweep to Breckenridge’s rear. Breckenridge didn’t have the resources to hold off both the IV Corps (Keyes) and XX Corps attacking from different directions. So to avoid being trapped on the wrong side of the Tennessee River, Breckenridge retreated to Rome, GA. Now the Union could peel away the remainder of the Confederate positions.

About this time, the Confederates noticed the large gap between the Department of Ohio and the left flank of the Army of the Cumberland. Wheeler was in a perfect position to take advantage of this and launched a cavalry raid into central Tennessee. At the same time Forrest became active again in northern Mississippi (although the damage caused was negligable since the Union had already finished their campaign in Mississippi). Wheeler’s raid caused a chain reaction of events. The Department of Ohio did an about-face to move closer to supply and to block Wheeler’s return route to friendly territory. The Army of the Cumberland had to pause its advance and detach a couple corps to protect the rail lines. Forrest’s raid in the west was being dealt with by the Department of Kentucky and Grierson’s cavalry.

After the Department of Ohio broke contact to backtrack to the west, the Confederate Department of Kentucky decided to support the raid by invading eastern Kentucky. There were no Union combat troops up there. Only garrisons. Frankfort and Lexington were quickly captured (but later taken back). So yet another corps, the XXIII (Rosecrans), had to be pulled out of combat and sent north. The entire Chattanooga campaign was halted until these fires were put out. But put out they were. It was amazing how many extra troops the Union could come up with by waking everyone up who was on garrison duty. By the time all the little roundup operations were completed, the Confederacy had lost 60% of its western theater cavalry. Both the Confederate Departments of Kentucky and the Gulf (which had supported Forrest's raid) had taken serious hits. But the Army of Tennessee was in good shape and, more importantly, they still held Chattanooga. And it would be some time before the Army of the Cumberland could resume the drive.


_____________________________

Grab them by the balls. Their hearts and minds will follow.

(in reply to golden delicious)
Post #: 24
RE: Nation in Conflict 1861 - 11/16/2020 2:31:52 PM   
golden delicious


Posts: 5575
Joined: 9/5/2000
From: London, Surrey, United Kingdom
Status: offline

quote:

ORIGINAL: Raindem

But the Army of Tennessee was in good shape and, more importantly, they still held Chattanooga. And it would be some time before the Army of the Cumberland could resume the drive.


A really nice example of a diversionary attack. The Confederacy seizes the initiative with these attacks and ties down a much larger portion of the Union force than if these troops had simply been added to the Army of Tennessee, to be ground away by attrition along with the rest.

_____________________________

"What did you read at university?"
"War Studies"
"War? Huh. What is it good for?"
"Absolutely nothing."

(in reply to Raindem)
Post #: 25
RE: Nation in Conflict 1861 - 11/16/2020 5:11:19 PM   
Raindem


Posts: 696
Joined: 7/15/2000
From: Arizona
Status: offline
Exactly. The Union is forced to operate with a huge tail guarding its supply lines. But there is always room for a cavalry division to slip through (disengagement effects are turned off in this scenario).

Unfortunately, the scale doesn't permit the same effects in the east. When J.E.B. Stuart heads off on an adventure he usually runs into a gaggle of Union troops.

_____________________________

Grab them by the balls. Their hearts and minds will follow.

(in reply to golden delicious)
Post #: 26
RE: Nation in Conflict 1861 - 11/17/2020 12:07:17 PM   
golden delicious


Posts: 5575
Joined: 9/5/2000
From: London, Surrey, United Kingdom
Status: offline

quote:

ORIGINAL: Raindem

Unfortunately, the scale doesn't permit the same effects in the east. When J.E.B. Stuart heads off on an adventure he usually runs into a gaggle of Union troops.


Does this happen because divisions shouldn't really be able to screen a 10 mile front- or because the Union can comfortably hold the line in Virginia with fewer pieces and so has more to play with on the flank?

It'd be interesting to look at the scenario with units at the corps scale but with the option to divide. This would give you a more historic capacity to concentrate force at a desired point and punish an opponent so screens a wide front.

_____________________________

"What did you read at university?"
"War Studies"
"War? Huh. What is it good for?"
"Absolutely nothing."

(in reply to Raindem)
Post #: 27
RE: Nation in Conflict 1861 - 11/17/2020 1:16:42 PM   
Raindem


Posts: 696
Joined: 7/15/2000
From: Arizona
Status: offline
It's not that a division couldn't screen a 10 mile front. It's just that they didn't use them that way. Communication was so poor they had to keep everyone physically close. I had considered a house rule - all divisions must remain adjacent to their HQ, and all Corps HQs must be adjacent to the army HQ. But that's overdoing it. There are numerous examples of units being detached and sent to another theater.

I like your idea of increasing the unit scale to corps. Hadn't even thought of approaching it from that direction. It would save me about 100 events that are tied up with the Command & Control system. This is no easy change, though. The OOB will have to be re-constructed from scratch. But the more I think about this idea the more I like its potential. I might just make a test scenario to try it out.

_____________________________

Grab them by the balls. Their hearts and minds will follow.

(in reply to golden delicious)
Post #: 28
RE: Nation in Conflict 1861 - 11/17/2020 1:24:02 PM   
golden delicious


Posts: 5575
Joined: 9/5/2000
From: London, Surrey, United Kingdom
Status: offline
quote:

ORIGINAL: Raindem

I like your idea of increasing the unit scale to corps. Hadn't even thought of approaching it from that direction. It would save me about 100 events that are tied up with the Command & Control system. This is no easy change, though. The OOB will have to be re-constructed from scratch. But the more I think about this idea the more I like its potential. I might just make a test scenario to try it out.


Good man. I was expecting you to come up with an extended rationalisation for keeping things the way they are.

It's heartbreaking of course because at corps scale your units really do wind up being fairly faceless lumps. It may also cause weirdness where the broken down elements will have a lower proficiency, and if you lose a division from each of two corps you can't combine them back into a whole corps (and as you noted there's no reconstitution).

The other thing is that as your unit count gets smaller, individual small units become more valuable for their ability to block supply through ZOCs etc. and so eliminating these becomes an important design consideration.

< Message edited by golden delicious -- 11/17/2020 1:25:03 PM >


_____________________________

"What did you read at university?"
"War Studies"
"War? Huh. What is it good for?"
"Absolutely nothing."

(in reply to Raindem)
Post #: 29
RE: Nation in Conflict 1861 - 11/17/2020 2:09:56 PM   
Curtis Lemay


Posts: 12969
Joined: 9/17/2004
From: Houston, TX
Status: offline
What is your "Combat Density Penalty Rate"? It should be very low. This was before HE, so forces were motivated to concentrate rather than spread out. The more concentrated a force was, the more powerful it became. After HE, that changed, and forces were motivated to not get too dense. But, if there's no penalty for concentrating, players will be motivated to keep forces as concentrated as circumstances allow. And, if they spread out, they'll be vulnerable to their more concentrated enemy.

Forces only spread out in those circumstances for foraging purposes (which you're probably not able to model, yet).

_____________________________

My TOAW web site:

Bob Cross's TOAW Site

(in reply to golden delicious)
Post #: 30
Page:   [1] 2   next >   >>
All Forums >> [New Releases from Matrix Games] >> The Operational Art of War IV >> After Action Reports >> Nation in Conflict 1861 Page: [1] 2   next >   >>
Jump to:


New Messages No New Messages
Hot Topic w/ New Messages Hot Topic w/o New Messages
Locked w/ New Messages Locked w/o New Messages
 Post New Thread
 Reply to Message
 Post New Poll
 Submit Vote
 Delete My Own Post
 Delete My Own Thread
 Rate Posts


Forum Software © ASPPlayground.NET Advanced Edition 2.4.5 ANSI

1.863